1. Introduction
This manual provides comprehensive instructions for the assembly, installation, operation, and maintenance of your FITUEYES Concise Floating TV Stand Shelf. Please read this manual thoroughly before beginning installation to ensure safe and correct usage. Retain this manual for future reference.

Image 1.1: The FITUEYES Floating TV Stand Shelf installed in a living space.
2. Safety Information
- Weight Capacity: Do not exceed the maximum weight capacity. Each individual shelf can hold up to 33 lbs (15 kg). The top shelf has a maximum capacity of 66 lbs (30 kg). Overloading can cause instability and damage.
- Wall Type: Ensure the wall material is suitable for mounting. This unit is designed for installation on concrete walls or wood studs spaced 16 inches apart. Do not install on drywall alone without proper stud support or appropriate heavy-duty anchors (not included).
- Secure Installation: Always follow the assembly instructions carefully to ensure the unit is securely fixed to the wall. Improper installation can lead to the unit falling, causing injury or damage.
- Children and Pets: Keep children and pets away from the installation area during assembly.
- Tools: Use appropriate tools for installation. Wear safety glasses and gloves if necessary.
For additional safety, consider having two people for installation, especially when lifting and positioning the unit on the wall.
3. Specifications
| Feature | Detail |
|---|---|
| Brand | FITUEYES |
| Model Number | Suspended asymmetric quadrilateral |
| Product Dimensions (D x W x H) | 9.8"D x 49.7"W x 9"H (248mm D x 1262mm W x 229mm H) |
| Number of Shelves | 2 |
| Material | High-quality MDF board |
| Finish Type | Powder Coated, Black Wood Grain |
| Item Weight | 26.7 pounds (12.1 kg) |
| Installation Type | Wall Mount |
| Maximum TV Size Compatibility | Up to 60 inches (for aesthetic pairing) |
| Shelf Thickness | 25mm |
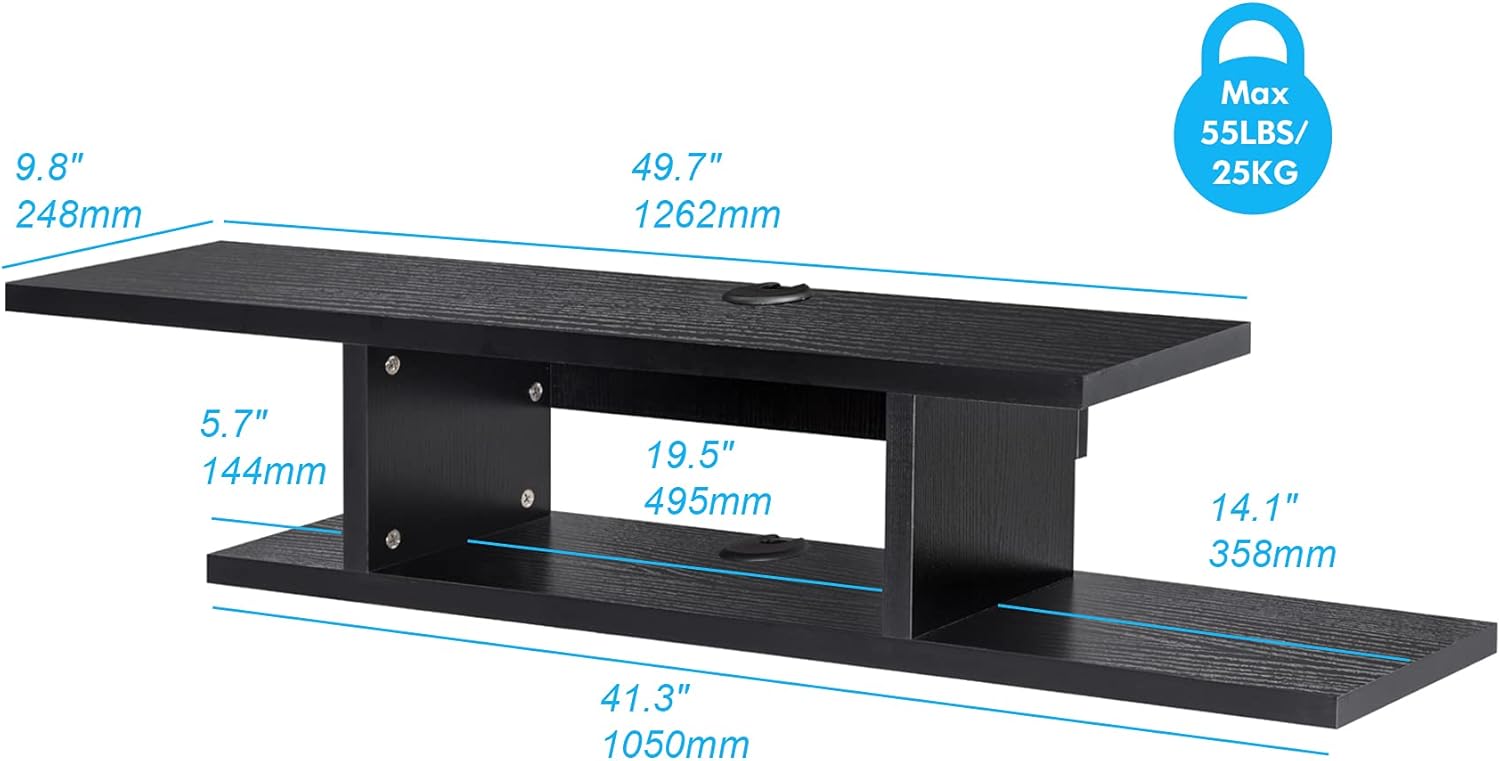
Image 3.1: Detailed dimensions and weight capacity of the shelf.

Image 3.2: Visual guide for TV size compatibility.
4. Package Contents
The package includes all necessary hardware and components for assembly and wall mounting. Please refer to the included parts list in your physical manual to verify all items are present before beginning assembly.
- Shelf panels (top, bottom, and support panels)
- Mounting hardware (screws, anchors for concrete, wall plates)
- Cable grommets
- Assembly manual
5. Setup and Installation
5.1 Tools Required (Not Included)
- Drill
- Level
- Measuring tape
- Pencil
- Screwdriver
- Stud finder (for wood stud installation)
5.2 Assembly Steps
- Unpack and Identify Parts: Carefully unpack all components and compare them with the parts list in your physical manual.
- Assemble Shelf Structure: Follow the step-by-step diagrams in your manual to connect the shelf panels using the provided screws and connectors. Ensure all connections are tight and secure.
- Attach Mounting Plates: Secure the metal mounting plates to the back of the assembled shelf unit as indicated in the manual.
5.3 Wall Mounting
The shelf can be mounted on concrete walls or walls with wood studs. Proper wall preparation is critical for stability.

Image 5.1: Wall mounting options for concrete and wood stud walls.
- Choose Location: Select a suitable location on your wall, ensuring it is free from electrical wires or plumbing. Consider the height relative to your television.
- Mark Drilling Points: Hold the assembled shelf against the wall at the desired height and use a level to ensure it is straight. Mark the drilling points for the mounting plates with a pencil.
- Drill Holes:
- For Concrete Walls: Use a masonry drill bit to drill holes at the marked points. Insert the provided wall anchors flush with the wall surface.
- For Wood Studs: Use a stud finder to locate wall studs. Drill pilot holes into the center of the studs at the marked points.
- Secure to Wall: Align the mounting plates on the back of the shelf with the drilled holes. Use the appropriate screws to securely fasten the shelf to the wall. Ensure the shelf is level and firmly attached before placing any items on it.
5.4 Cable Management
The shelf features integrated cable grommets to help organize and conceal wires from your media devices.

Image 5.2: Front and back view illustrating cable management features.
- Route device cables through the designated cable holes on the top and bottom shelves.
- Use the provided cable grommets to cover the holes for a neat appearance and to protect cables.
6. Operation and Usage
Once installed, the FITUEYES Floating TV Stand Shelf provides a stable platform for your media components and decorative items.
- Placement of Devices: Place DVD players, DVRs, cable boxes, gaming consoles, and other AV components on the shelves.
- Weight Distribution: Distribute weight evenly across the shelves. Do not concentrate heavy items in one spot.
- Maximum Load: Adhere strictly to the stated weight capacities: 33 lbs (15 kg) per lower shelf, 66 lbs (30 kg) for the top shelf.
- Ventilation: Ensure adequate airflow around electronic devices to prevent overheating.
7. Maintenance
To maintain the appearance and longevity of your floating TV stand shelf, follow these simple care instructions:
- Cleaning: Wipe the surface with a dry, soft cloth. For stubborn marks, a slightly damp cloth can be used, followed immediately by a dry cloth. Avoid abrasive cleaners or harsh chemicals.
- Inspection: Periodically check all mounting screws and connections to ensure they remain tight and secure. Re-tighten if necessary.
- Avoid Moisture: Protect the unit from excessive moisture and direct sunlight to prevent warping or fading.

Image 7.1: Features highlighting durability, easy cleaning, and cable management.
8. Troubleshooting
- Shelf feels wobbly after installation: Ensure all mounting screws are fully tightened and that the wall anchors (if used) are properly seated. Verify that the wall material is suitable for the installation method used.
- Missing parts: If any parts are missing from the package, please contact FITUEYES customer support with your purchase details.
- Difficulty with assembly: Review the assembly diagrams in your manual carefully. If issues persist, contact customer support for assistance.
9. Warranty and Support
FITUEYES products are manufactured with quality and durability in mind. For specific warranty information, please refer to the documentation included with your purchase or visit the official FITUEYES website. For technical support, replacement parts, or any inquiries, please contact FITUEYES customer service through their official channels.
Manufacturer: FITUEYES