1. Introduction
The AstroAI OBD2 Professional Automotive Scanner is a diagnostic tool designed to read and clear trouble codes from your vehicle's On-Board Diagnostics II (OBDII) system. It helps identify the cause of the Check Engine Light (MIL) and provides various diagnostic functions for vehicles manufactured in 1996 and later. This manual provides detailed instructions for its proper use and maintenance.
2. Product Overview
The AstroAI OBD2 Scanner features a large, backlit LCD screen for easy readability, unit conversion between English and metric systems, and an adjustable beep setting. It includes a durable cable for connection to your vehicle's OBDII port.

Figure 2.1: AstroAI OBD2 Scanner with labeled components. The screen displays the 'Diagnostic Menu' with options like Read Codes, Erase Codes, Live Data, View Freeze Frame, I/M Readiness, and O2 Monitor Test. Key buttons include Up Scroll, Exit, Enter, and Down Scroll. The device connects via an OBDII 16-Pin Connector.
3. Setup
- Locate the OBDII Port: The OBDII port is typically located under the dashboard on the driver's side of the vehicle. Consult your vehicle's service manual if you cannot locate it.
- Connect the Scanner: With the vehicle's ignition off, firmly plug the scanner's 16-pin connector into the vehicle's OBDII port.
- Power On: Turn the vehicle's ignition to the 'ON' position (do not start the engine). The scanner will automatically power on. If it does not, check the connection.
- Select Language: Navigate through the menu to select your preferred language (English, French, Spanish, German, Russian, Dutch are supported).
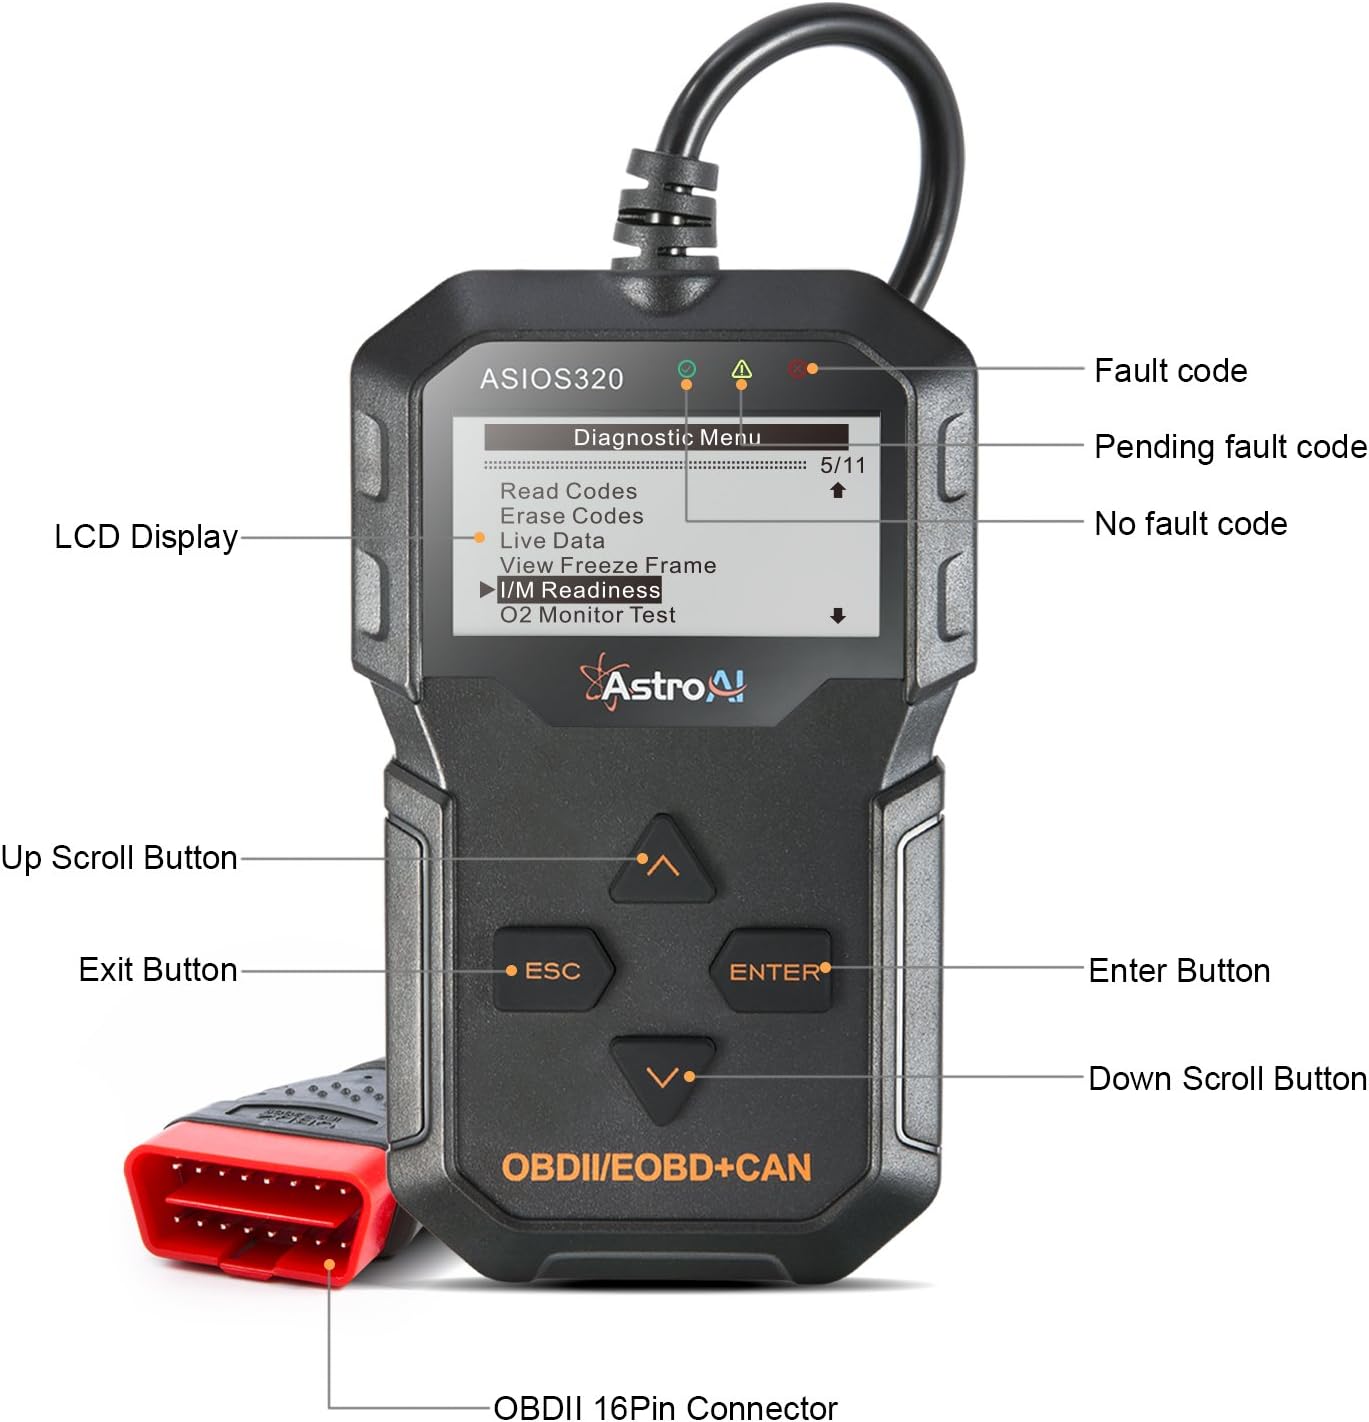
Figure 3.1: The AstroAI OBD2 Scanner connected to a vehicle's OBDII port, ready for diagnostic operations. The screen shows the 'Diagnostic Menu'.
4. Operating Instructions
The scanner offers multiple functions to diagnose vehicle issues. Use the 'Up' and 'Down' scroll buttons to navigate the menu and 'Enter' to select an option. 'ESC' is used to go back.

Figure 4.1: The main functions menu of the ASIOS320 scanner, listing options such as Read Codes, Erase Codes, Live Data, View Freeze Frame, I/M Readiness, O2 Monitor Test, Component Test, On-Board Mon. Test, Vehicle Info., Modules Present, and Unit of Measure.
4.1. Read Codes
This function retrieves Diagnostic Trouble Codes (DTCs) from the vehicle's computer. These codes indicate specific issues detected by the vehicle's system.
4.2. Erase Codes
After addressing a vehicle issue, this function clears the DTCs and turns off the Check Engine Light (MIL). It also resets the monitors. Ensure the underlying problem is resolved before clearing codes to prevent recurrence.
4.3. Live Data
View real-time data stream from the vehicle's sensors and modules. This includes parameters like engine RPM, vehicle speed, oxygen sensor readings, and more, which can help in diagnosing intermittent problems.

Figure 4.2: The scanner being used to identify specific vehicle issues, such as an engine shut-off solenoid problem, open injector circuit, or high intake air temperature, by analyzing diagnostic data.
4.4. I/M Readiness
This function checks the status of the vehicle's emission-related monitoring systems to determine if they are ready for an emissions test. It detects misfire, fuel system, and emissions readiness status.

Figure 4.3: The scanner's display showing I/M Readiness results, indicating the status (OK or N/A) of various monitors like Misfire, Fuel System, Comprehensive Component, Catalyst, Evaporative System, Secondary Air System, A/C Refrigerant, Oxygen Sensor, Oxygen Sensor Heater, and EGR System.
4.5. DTC Lookup
The built-in OBD-II DTC library allows you to look up the definition of a diagnostic trouble code directly on the device, saving time in identifying problems.
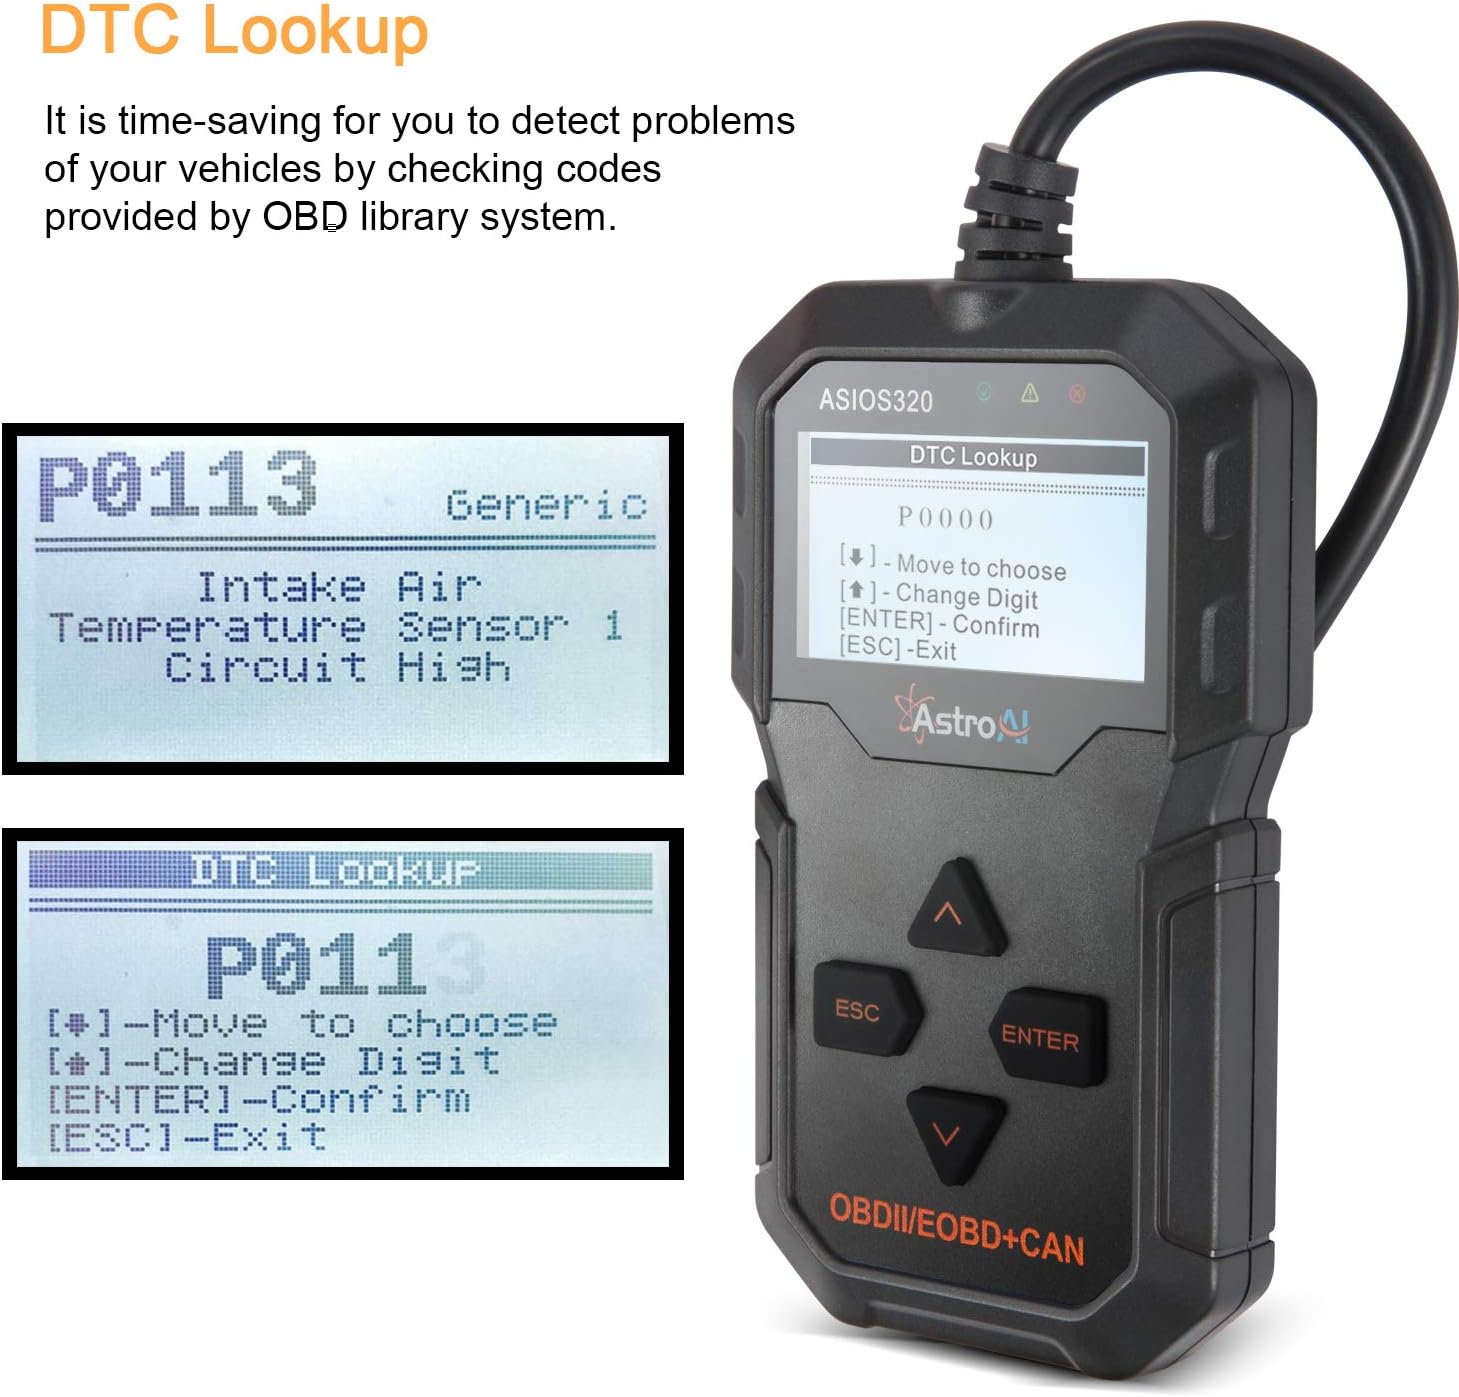
Figure 4.4: The DTC Lookup feature in action, showing how to search for a code (e.g., P0113) and view its definition, such as 'Intake Air Temperature Sensor 1 Circuit High'.
5. Maintenance
5.1. Software Update
The scanner's software is updateable via the internet. Connect the device to a PC using the provided USB cable. Ensure you press any button on the scanner before connecting the USB to the PC terminal to initiate the update mode. Note that this function is not compatible with Mac operating systems.
5.2. Printing Data
Diagnostic reports can be printed through a PC connection. Use the update software to access the print function.

Figure 5.1: Illustration of the Free Update & Print Function. The scanner connects to a PC via USB for software updates and printing diagnostic reports. This feature is not compatible with Mac systems.
5.3. Cleaning
Clean the scanner with a soft, damp cloth. Do not use abrasive cleaners or solvents. Keep the device dry and free from dust.
6. Troubleshooting
- No Power: Ensure the scanner is correctly plugged into the vehicle's OBDII port and the vehicle's ignition is in the 'ON' position. Check for any damage to the cable or connector.
- Link Error: If a 'Link Error' message appears, verify the connection to the vehicle's OBDII port. Ensure the vehicle is OBDII compliant and the ignition is on. Try connecting to a different OBDII compliant vehicle to rule out scanner malfunction.
- DTC Not Found: If no DTCs are found, it means the vehicle's system has not detected any current faults. This does not necessarily mean there are no issues, but rather no active trouble codes.
- Software Update Issues: If you encounter problems updating the software, ensure your PC is running Windows (Mac is not supported) and you have a stable internet connection. Make sure to press a button on the scanner before connecting it to the PC for update mode.
6.1. Compatibility Notes
Important:
- This OBD2 scanner supports all 12V gasoline cars.
- It is not compatible with diesel vehicles, 24V heavy-duty vehicles, hybrid vehicles, or electric vehicles.
- The device is designed for 16-pin OBD II compliant vehicles only.
7. Specifications
| Feature | Specification |
|---|---|
| Brand | AstroAI |
| Model | ASIOS320 |
| Power Source | Battery |
| Product Dimensions (L x W x H) | 11.6 x 2.9 x 14.8 cm |
| Operating System (for updates) | Windows (Not Mac compatible) |
| Screen Size | 2.8 Inches |
| UPC | 767452943766 |
| GTIN | 00767452943766 |
8. Warranty
For detailed warranty information regarding your AstroAI OBD2 Professional Automotive Scanner, please refer to the official AstroAI website or the warranty card included with your product packaging. Warranty terms and conditions may vary by region and purchase date.
9. Support
If you require technical assistance, have questions about product operation, or need customer service, please visit the official AstroAI website for support resources, FAQs, and contact information. You can also reach out to AstroAI customer support directly through the contact methods provided on their website.