1. Product Overview
This manual provides instructions for the Cloudray LIHUIYU M2 Nano CO2 Laser Controller Kit. This kit is designed as a replacement or upgrade part for DIY 3020, 3040, and K40 laser engraver and cutter machines.
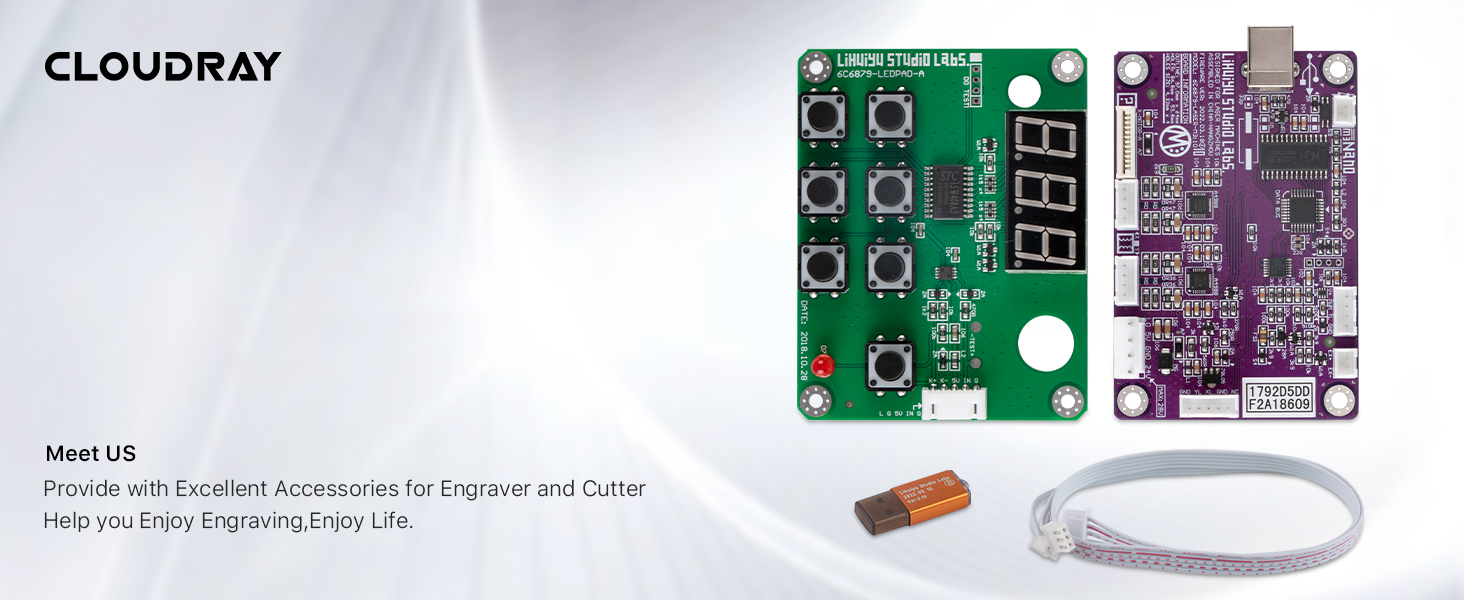
Package Contents (Set A)
- 1 x M2 Nano Controller Mainboard
- 1 x M2 Controller Panel
- 1 x Connection Cable
- 1 x USB Dongle B
2. Setup and Installation
Careful installation is crucial for proper function. Ensure all power is disconnected from your laser machine before proceeding with any connections.
2.1 M2 Nano Mainboard Layout
Familiarize yourself with the mainboard's various ports and components before installation.

2.2 Control Panel Layout
Understand the functions of the control panel buttons and display.

2.3 Wiring Connections
Connect the mainboard, control panel, and power supply according to the following diagrams. Ensure all connections are secure to prevent damage.


2.4 USB Dongle Connection
The USB Dongle B is required for software authorization and operation. Connect it to an available USB port on your computer.

3. Operating Instructions
After successful installation and power-up, the laser controller is ready for operation. This system typically uses specific laser control software (e.g., LaserDRW, CorelDRAW with a plugin) for design and machine control.
3.1 Software Installation and Setup
- Install the laser control software provided with your laser machine or recommended by the manufacturer.
- Ensure the USB Dongle B is connected to your computer before launching the software.
- Follow the software's instructions for driver installation and machine configuration.
3.2 Basic Control Panel Functions
- Digital Display: Shows operational status, current settings, or error codes.
- Directional Buttons: Used for manual movement of the laser head (X and Y axes).
- Start/Pause Button: Initiates or temporarily stops a laser job.
- Stop/Emergency Stop Button: Immediately halts all laser operations.
- Power Adjustment Buttons: Allows for fine-tuning of laser power during operation (if supported by software/firmware).
- Laser Status Indicator: Provides visual feedback on the laser's operational state (e.g., ready, firing, error).
Refer to your laser machine's specific software manual for detailed instructions on creating and executing laser jobs.
4. Maintenance
To ensure the longevity and reliable performance of your LIHUIYU M2 Nano controller kit, follow these general maintenance guidelines:
- Keep Clean: Regularly clean the mainboard and control panel surfaces with a soft, dry cloth. Avoid using liquids or abrasive cleaners.
- Dust Prevention: Operate the laser machine in a clean, dust-free environment as much as possible. Dust accumulation on electronic components can lead to overheating or short circuits.
- Inspect Connections: Periodically check all wiring connections for looseness or signs of wear. Secure any loose connections.
- Environmental Conditions: Ensure the controller is operated within its specified temperature and humidity ranges. Avoid extreme temperatures or high humidity.
- Software Updates: Keep your laser control software updated to the latest version to benefit from performance improvements and bug fixes.
5. Troubleshooting
This section addresses common issues you might encounter with your laser controller kit.
| Problem | Possible Cause | Solution |
|---|---|---|
| Controller not powering on | Loose power connection; Faulty power supply; Incorrect wiring. | Check all power connections. Verify power supply output. Review wiring diagrams (Figure 2.3, 2.4). |
| Laser machine not responding to software commands | USB Dongle not recognized; Incorrect software settings; USB cable issue. | Ensure USB Dongle B is properly inserted. Reinstall software drivers. Try a different USB port or cable. |
| Motor movement issues (X/Y axis) | Loose motor wiring; Motor driver fault; Mechanical obstruction. | Check X and Y axis motor connections on the mainboard (Figure 2.1). Inspect for any physical obstructions in the laser head's path. |
| Laser not firing | Water protection triggered; Laser power supply issue; Laser tube fault; Incorrect software settings. | Verify water flow and protection sensor status (if applicable, Figure 2.4). Check laser power supply connections and status indicators. Consult laser tube manual. |
| Incompatibility with existing laser machine | Controller model mismatch (e.g., M2 vs M3). | Verify that your laser machine is compatible with the M2 Nano controller. Some machines may require an M3 or other specific controller version. |
6. Specifications
| Feature | Detail |
|---|---|
| Brand | Cloudray |
| Model | LIHUIYU M2 Nano |
| Material | Aluminum, Metal |
| Color | Purple (Mainboard) |
| Item Weight | 0.15 Kilograms |
| Operation Mode | Automatic |
| UPC | 661021766933 |
| ASIN | B07BFSVS2V |
7. Warranty Information
For specific warranty details regarding your Cloudray LIHUIYU M2 Nano CO2 Laser Controller Kit, please refer to the warranty documentation provided at the time of purchase or contact Cloudray customer support directly. Warranty terms typically cover manufacturing defects under normal use conditions.
8. Customer Support
If you encounter any issues not covered in this manual or require further assistance, please contact Cloudray customer support. Provide your product model number (M2 Nano) and ASIN (B07BFSVS2V) for faster service.
- Cloudray Website: Visit the official Cloudray website for support resources, FAQs, and contact information.
- Seller Contact: If purchased through a marketplace, you may also contact the seller directly for product-specific inquiries.