1. Introduction
This manual provides essential information for the safe and efficient operation, installation, and maintenance of your Hestan 42-Inch Natural Gas Built-In Grill. Please read all instructions carefully before using the appliance. Retain this manual for future reference.
The Hestan built-in grill is designed for heavy-duty performance and features high-performance burners, a concealed infrared rotisserie, and motion-activated under-hood lighting, delivering optimal grilling results for your outdoor cooking space.
2. Safety Information
WARNING: For outdoor use only. Do not store or use gasoline or other flammable vapors and liquids in the vicinity of this or any other appliance.
DANGER: If you smell gas: 1. Shut off gas to the appliance. 2. Extinguish any open flame. 3. Open lid. 4. If odor continues, keep away from the appliance and immediately call your gas supplier or fire department.
- Always ensure proper ventilation when operating the grill.
- Keep children and pets away from the grill during operation and while it is cooling down.
- Use heat-resistant gloves when handling hot grill components.
- Ensure the grill is installed on a stable, non-combustible surface.
- Do not attempt to repair or alter the grill. Contact qualified service personnel for assistance.
- This product contains chemicals known to the State of California to cause cancer and birth defects or other reproductive harm.
3. Product Overview
The Hestan 42-Inch Natural Gas Built-In Grill is engineered with advanced features for superior grilling performance.
Key Features:
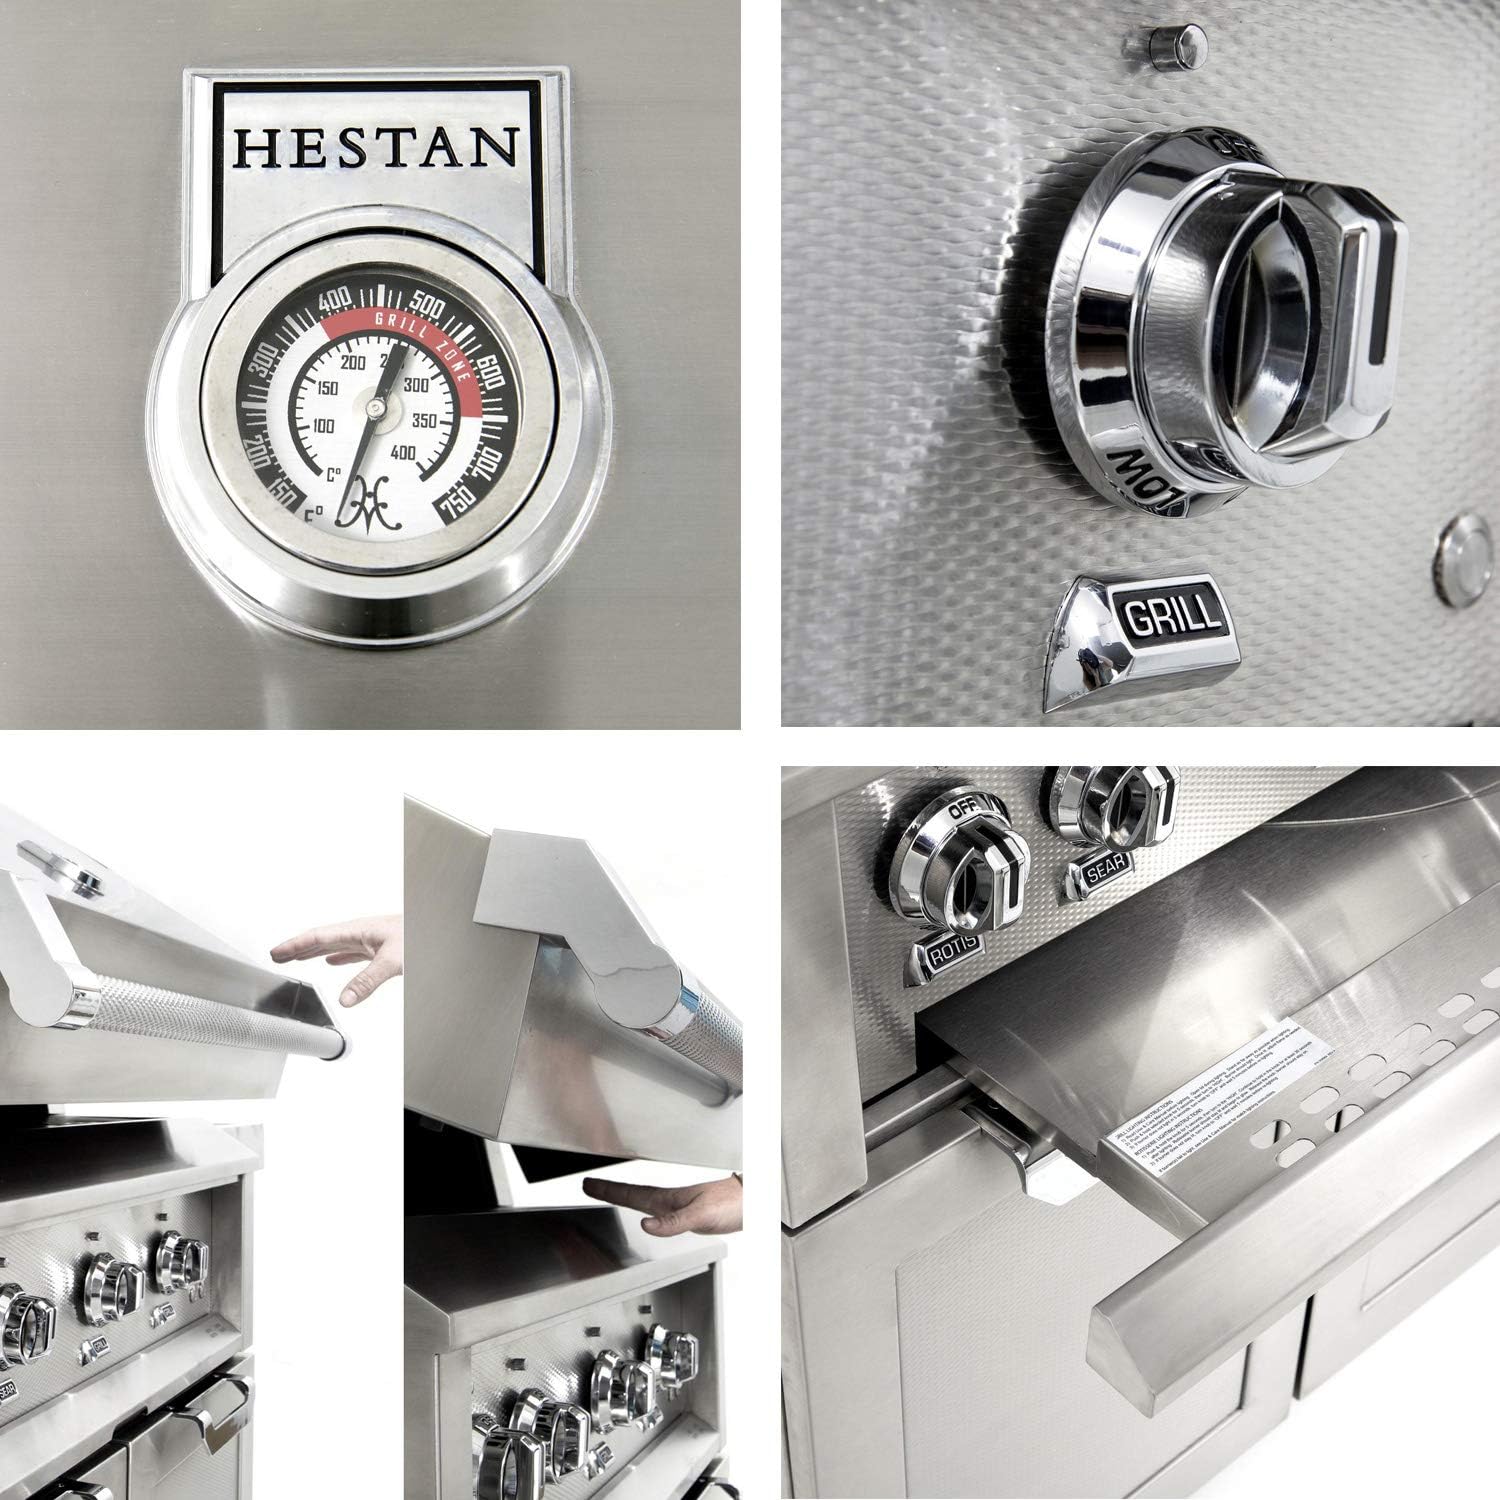
- Horizon Hood: Heavy-duty hood with spring-assisted hinges for easy opening and adjustable height.
- Halogen Stadium Lights: Motion-activated under-hood lighting illuminates the entire cooking area.
- Ceramic Infrared Top Burner: Delivers 12,000 to 18,000 BTUs for searing, finishing, and rotisserie cooking.
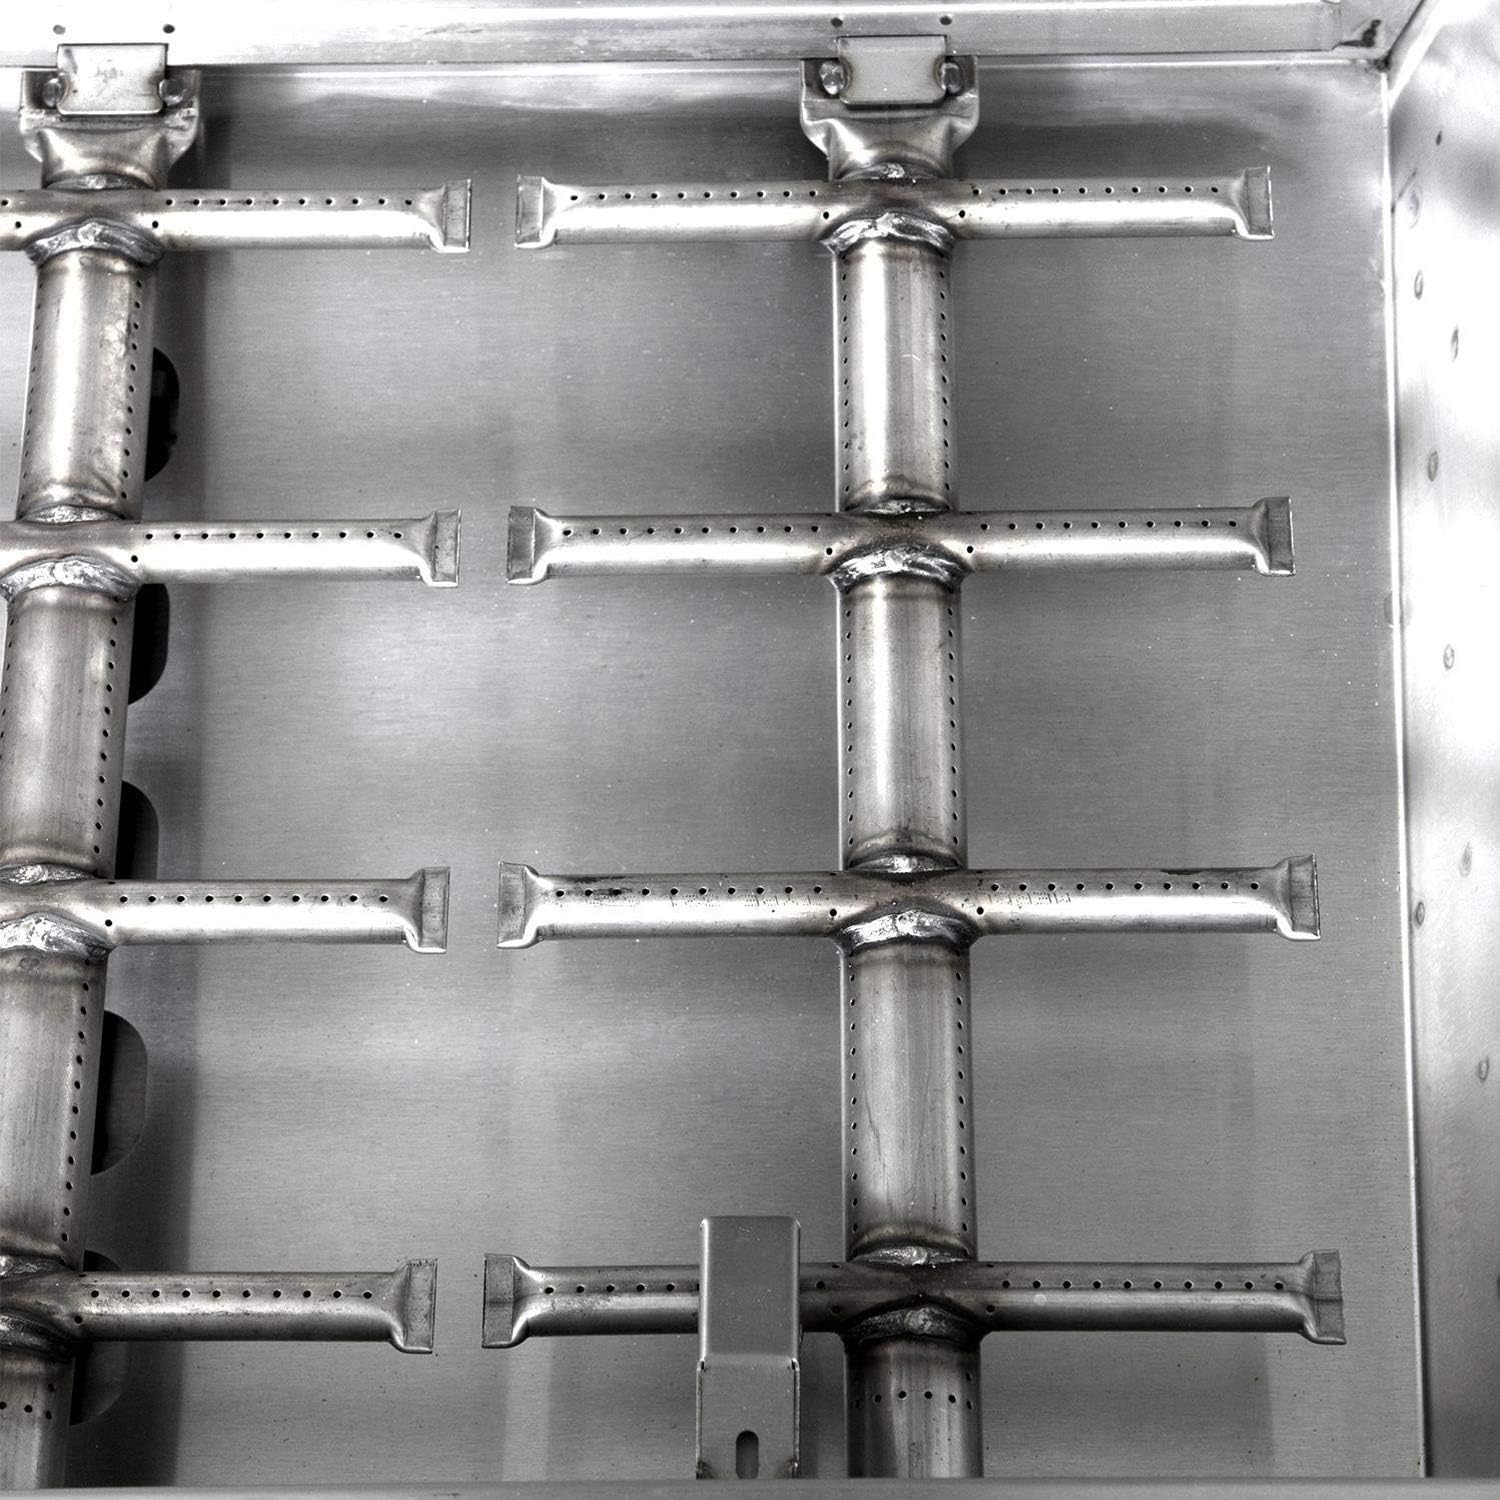
- Trellis Burners: Patented design provides 25,000 BTUs of high-performance power with excellent heat coverage and precise control.
- DiamondCut Grates: Patented ultra heavy-duty 5/16" stainless steel grates for superior grilling surface and heat distribution.
Product Components:


4. Setup and Installation
The Hestan Built-In Grill requires professional installation by a qualified technician to ensure safe and proper operation. Refer to the separate installation guide provided with your grill for detailed instructions and local code requirements.
Key Installation Considerations:
- Gas Supply: Ensure the grill is connected to a natural gas supply by a certified professional. Verify all connections are secure and leak-free.
- Ventilation: Proper ventilation of the grill enclosure is critical to prevent gas accumulation and ensure safe operation.
- Clearances: Maintain adequate clearances from combustible materials as specified in the installation guide.
- Electrical Connection: The grill's lighting and rotisserie motor require an electrical connection. Ensure it is properly grounded and meets local electrical codes.
- Leveling: Ensure the grill is level within its enclosure for optimal performance and drainage.
5. Operating Instructions
5.1. Lighting the Main Burners
- Open the grill hood.
- Ensure all burner control knobs are in the 'OFF' position.
- Slowly turn on the gas supply to the grill.
- Push and turn a main burner control knob to the 'HIGH' position. You should hear an ignition click.
- If the burner does not light within 5 seconds, turn the knob to 'OFF', wait 5 minutes for gas to dissipate, and repeat the lighting procedure.
- Once lit, adjust the flame to your desired cooking temperature.
5.2. Using the Sear Burner
The infrared sear burner provides intense heat for quickly searing meats to lock in juices and create a flavorful crust.
- Open the grill hood.
- Turn the sear burner control knob to the 'HIGH' position.
- Allow the burner to preheat for 5-10 minutes until it glows red.
- Place food directly over the sear burner for a short period, then move to a cooler section of the grill to finish cooking if necessary.
- After use, turn the sear burner control knob to 'OFF'.
5.3. Using the Rotisserie
The infrared rotisserie burner is ideal for slow-roasting poultry, roasts, and other large items.
- Assemble the rotisserie spit and forks, securing your food item in the center.
- Insert the rotisserie spit into the motor and support brackets.
- Turn on the rotisserie motor using the dedicated switch, selecting the desired speed (Low, Med, High).
- Turn the rotisserie burner control knob to the 'ON' position.
- Monitor cooking progress and internal temperature of the food.
- After cooking, turn off the rotisserie burner and motor, then carefully remove the spit.
5.4. Halogen Stadium Lights
The under-hood halogen lights are motion-activated. Simply open the grill hood, and the lights will automatically illuminate the cooking surface. Close the hood to turn them off.
6. Maintenance
Regular cleaning and maintenance will extend the life and performance of your Hestan grill.
6.1. Cleaning the Grill Grates
- After each use, while the grates are still warm, use a stiff wire brush to remove food residue.
- For deeper cleaning, remove the grates and wash with warm, soapy water. Rinse thoroughly and dry completely before reinstalling.
6.2. Cleaning Stainless Steel Surfaces
- Clean stainless steel surfaces with a mild detergent and warm water. Wipe in the direction of the grain.
- Avoid abrasive cleaners or scouring pads, which can scratch the finish.
- For stubborn stains, use a specialized stainless steel cleaner, following the product instructions.
6.3. Burner Maintenance
- Periodically inspect burner ports for blockages (e.g., from food debris or insects). Use a wire brush or paper clip to clear any obstructions.
- Ensure burner tubes are free of spider webs or other debris that could impede gas flow.
6.4. Drip Tray
- Regularly check and clean the drip tray to prevent grease buildup, which can be a fire hazard.
7. Troubleshooting
If you encounter issues with your Hestan grill, refer to the following common troubleshooting steps. For problems not listed here or if issues persist, contact Hestan customer support.
| Problem | Possible Cause | Solution |
|---|---|---|
| Burner fails to light | No gas supply, clogged burner port, faulty igniter. | Check gas supply, clean burner ports, contact service for igniter issues. |
| Uneven heating | Clogged burner ports, uneven briquette placement. | Clean burner ports, ensure briquettes are evenly distributed. |
| Excessive flare-ups | Grease buildup, high heat setting. | Clean grill grates and drip tray, reduce heat, trim excess fat from food. |
| Rotisserie motor not turning | No power, motor malfunction, overloaded spit. | Check power connection, ensure spit is not overloaded, contact service. |
| Lights not working | No power, motion sensor issue, bulb failure. | Check power, ensure hood is fully open, contact service for sensor/bulb replacement. |
8. Specifications
Detailed specifications for the Hestan 42-Inch Natural Gas Built-In Grill (Model GMBR42-NG).
| Feature | Detail |
|---|---|
| Brand | Hestan |
| Model Name | Hestan 118000 BTU 42 Inch |
| Item Model Number | GMBR42-NG |
| ASIN | B07B7PRMJ8 |
| GTIN / UPC | 842763101682 |
| Fuel Type | Natural Gas |
| Installation Type | Built-In |
| Color | Stainless Steel |
| Material | Stainless Steel |
| Item Dimensions (L x W x H) | 32.44 x 42 x 29.5 inches |
| Item Weight | 351 Pounds |
| Main Burner Count | 5 |
| Heating Power (Infrared Top Burner) | 12,000 to 18,000 British Thermal Units |
| Heating Power (Trellis Burners) | 25,000 British Thermal Units per burner |
| Cooking Surface Area | 774 Square Inches |
| Included Components | Rotisserie Kit |
| Assembly Required | No (Professional installation recommended) |
| Indoor/Outdoor Usage | Outdoor |
9. Warranty and Support
For warranty information, please refer to the warranty card included with your product or visit the official Hestan website. For technical support, replacement parts, or service inquiries, please contact Hestan customer service directly. Ensure you have your model number (GMBR42-NG) and proof of purchase available when contacting support.


