Introduction
This manual provides comprehensive instructions for the installation, operation, and maintenance of your HONWELL LED Spotlight Wireless Accent Lights. Please read this manual thoroughly before use and retain it for future reference.
Safety Information
- Do not mix old and new batteries.
- Do not mix alkaline, standard (carbon-zinc), or rechargeable (nickel-cadmium) batteries.
- Ensure batteries are inserted with correct polarity (+ and -).
- Remove batteries if the device will not be used for an extended period.
- Keep out of reach of children.
- Do not expose to water or extreme temperatures.
Package Contents
Verify that all components are present:
- HONWELL LED Spotlight (2 units)
- Remote Control (1 unit)
- Hook and Loop Tape (for mounting)
- Mounting Screws (for optional permanent installation)

Image: Two HONWELL LED Spotlights, one with its head angled upwards, and a white remote control with colored buttons. This image displays the main components included in the package.
Product Overview
The HONWELL LED Spotlight features a rotatable head for directional lighting and is controlled by an included remote. It is battery-operated for wireless convenience.

Image: A diagram illustrating the multi-directional movement of the spotlight head, showing it can pivot and turn. Dimensions are also provided: 4.25 inches diameter and 1.65 inches height.
Setup and Installation
1. Battery Installation
Each spotlight requires 3x AA batteries (not included). The remote control also requires batteries (type not specified in product info, but typically AAA or button cell).
- For the Spotlight: Twist the back cover of the spotlight counter-clockwise to open. Insert 3x AA batteries, ensuring correct polarity. Twist the cover clockwise to close.
- For the Remote Control: Open the battery compartment on the back of the remote and insert the required batteries, observing polarity.

Image: Step-by-step illustration of opening the spotlight's back cover, inserting three AA batteries, and the location of mounting holes for screws. It also shows the hook and loop tape installation process.
2. Mounting Options
The spotlight can be installed using either hook and loop tape or screws.
- Using Hook and Loop Tape:
- Clean the desired mounting surface.
- Peel off the protective backing from one side of the hook and loop tape and firmly press it onto the back of the spotlight.
- Peel off the protective backing from the other side of the tape and press the spotlight firmly onto the mounting surface.
- Using Screws (Recommended for permanent installation or heavier applications):
- Mark the desired mounting location.
- Use the spotlight's back plate as a template to mark the screw holes.
- Drill pilot holes if necessary.
- Secure the spotlight to the surface using the provided screws.

Image: Examples of the HONWELL spotlight installed in various locations, including under a kitchen cabinet and inside a wardrobe, demonstrating its versatility.

Image: Further examples of the HONWELL spotlight installed, showing it mounted under a wooden surface and on a shelf, highlighting its use as accent lighting.
Operating Instructions
Manual Operation
Press the button on the spotlight once to turn it ON at full brightness. Press it again to turn it OFF.
Remote Control Operation
The remote control provides additional functions for convenience.

Image: A detailed diagram of the remote control, labeling buttons for Power ON/OFF, Brightness adjustment (+/-), preset brightness (50%, 100%), and timer settings (15, 30, 60, 120 minutes). It also shows the visual difference between OFF, Low, and High brightness settings of the spotlight.
- Power ON/OFF: Press the ON button to turn the light on, and the OFF button to turn it off.
- Brightness Adjustment:
- Press + to increase brightness.
- Press - to decrease brightness.
- Use the 50% or 100% buttons for preset brightness levels.
- Timer Function: Set the light to automatically turn off after a specified duration.
- Press 15 for 15 minutes.
- Press 30 for 30 minutes.
- Press 60 for 60 minutes.
- Press 120 for 120 minutes.
Maintenance
- Battery Replacement: Replace batteries in both the spotlight and remote control when the light dims or the remote becomes unresponsive. Follow the battery installation steps.
- Cleaning: Wipe the surface of the spotlight with a soft, dry cloth. Do not use abrasive cleaners or immerse in water.
Troubleshooting
| Problem | Possible Cause | Solution |
|---|---|---|
| Light does not turn on. | Dead or incorrectly inserted batteries. | Check battery polarity and replace batteries if necessary. |
| Remote control not working. | Dead remote batteries or obstruction. | Replace remote batteries. Ensure no obstructions between remote and light. |
| Light is dim. | Low batteries. | Replace spotlight batteries. |
Specifications
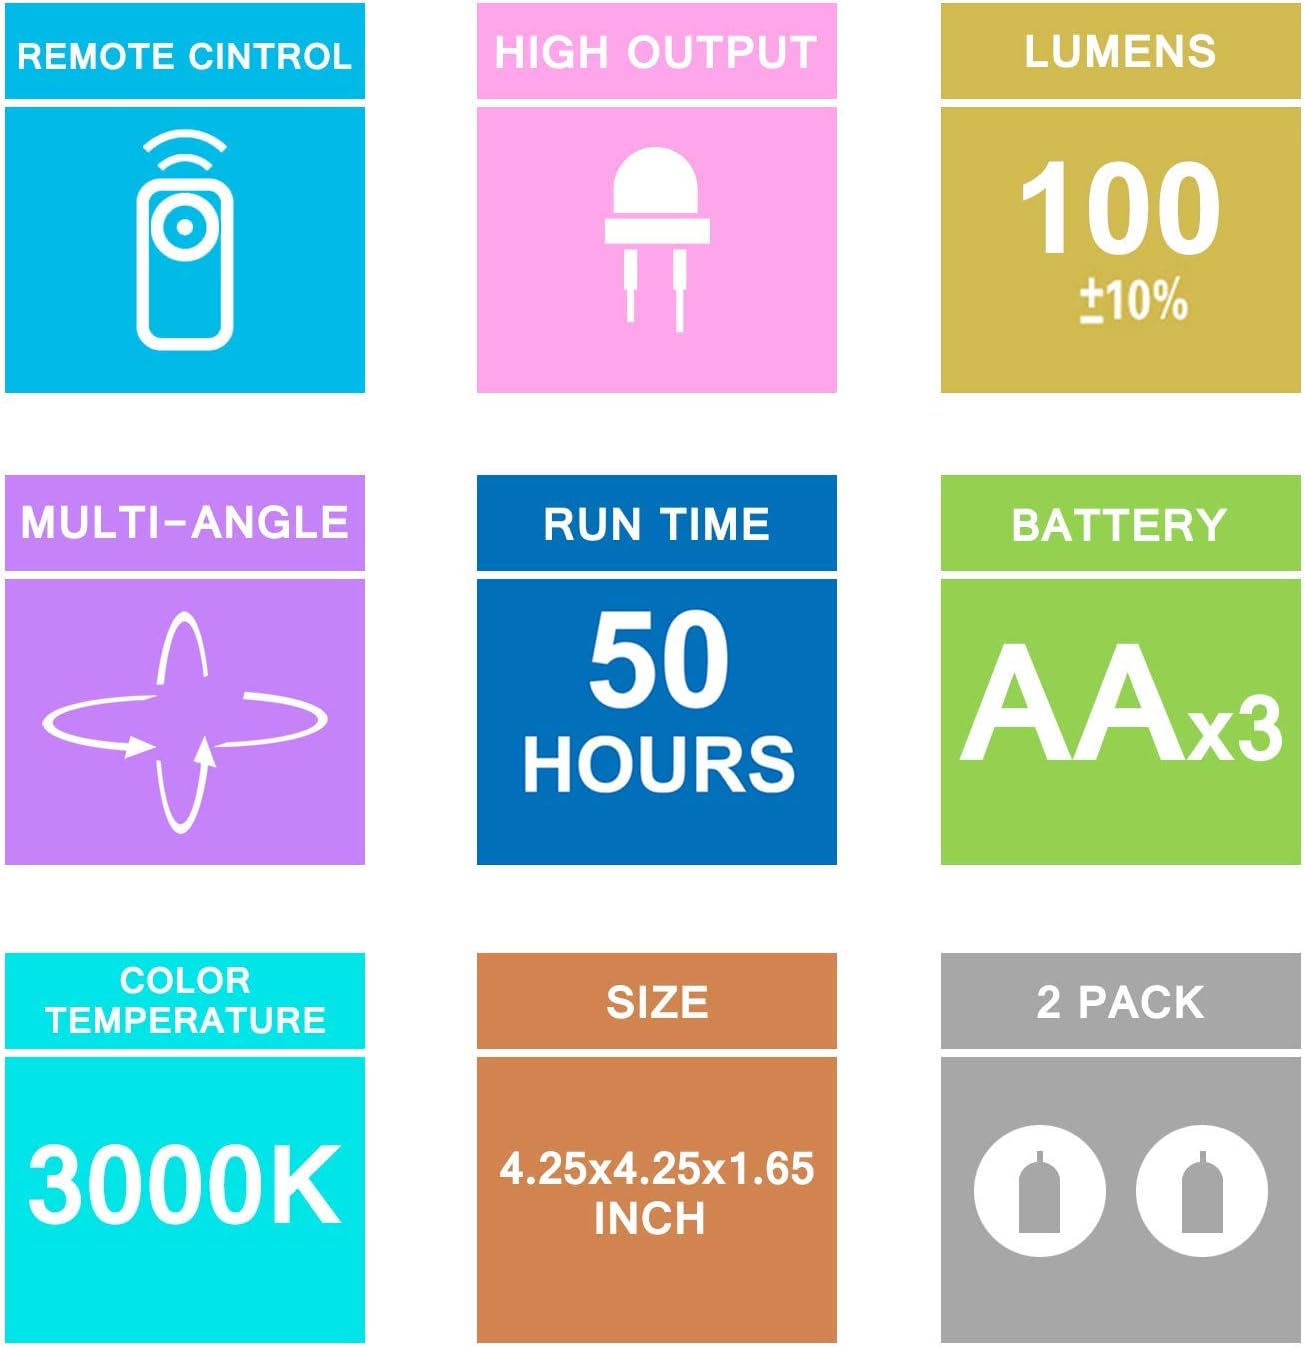
Image: A visual summary of the product's technical specifications, including lumens, run time, battery type, color temperature, and size.
| Feature | Detail |
|---|---|
| Brand | HONWELL |
| Model | LED Spotlight |
| Light Output | 100 Lumens (±10%) |
| Color Temperature | 3000K (Warm White) |
| Run Time | Approx. 50 hours |
| Battery Type (Spotlight) | 3 x AA batteries (not included) |
| Control | Remote Control, On/Off Switch |
| Dimensions | 4.25 x 4.25 x 1.65 inches |
| Material | Plastic |
| Quantity | 2 Pack |
Warranty and Support
For warranty information or technical support, please refer to the product packaging or contact HONWELL customer service. The product packaging includes contact details for after-sales service.

Image: The product packaging box, displaying "HONWELL" brand, "LED Spotlight" name, model "HE24R-UK", and manufacturer details including an after-sales service email address (honwell-europe@hotmail.com).
After-Sales Service Email: honwell-europe@hotmail.com