G-MARK MG16MP3
G-MARK MG16MP3 Audio Mixer User Manual
Professional 16-Channel Digital Mixing Console
1. Introduction
Thank you for choosing the G-MARK MG16MP3 Audio Mixer. This professional 16-channel digital mixing console is designed to provide high-quality audio processing for various applications, including live performances, studio recording, and installations. Featuring a user-friendly interface, robust construction, and advanced functionalities like Bluetooth connectivity, USB audio interface, and 24-bit SPX effects, the MG16MP3 offers exceptional sound control and versatility.
This manual provides essential information on setting up, operating, maintaining, and troubleshooting your G-MARK MG16MP3 mixer to ensure optimal performance and longevity.

Figure 1: Front view of the G-MARK MG16MP3 Audio Mixer, showcasing its 16 channels, faders, knobs, and display screen.
2. Setup
2.1 Power Connection
- Ensure the mixer's power switch is in the OFF position.
- Connect the supplied power cable to the AC IN socket on the rear panel of the mixer.
- Plug the other end of the power cable into a standard electrical outlet.
- Turn on the power switch. The power indicator on the mixer will illuminate.
2.2 Audio Input Connections
The MG16MP3 offers various input options for microphones, instruments, and other audio sources.
- Microphones: Connect dynamic or condenser microphones to the XLR inputs (MIC/LINE) on channels 1-16. For condenser microphones, activate the +48V phantom power switch located near the input section.
- Line-Level Devices: Connect instruments (e.g., keyboards, guitars with preamps) or other line-level devices to the 1/4" TRS/TS inputs (MIC/LINE) on channels 1-16.
- Stereo Inputs: Use channels 9/10, 11/12, 13/14, and 15/16 for stereo line-level sources.
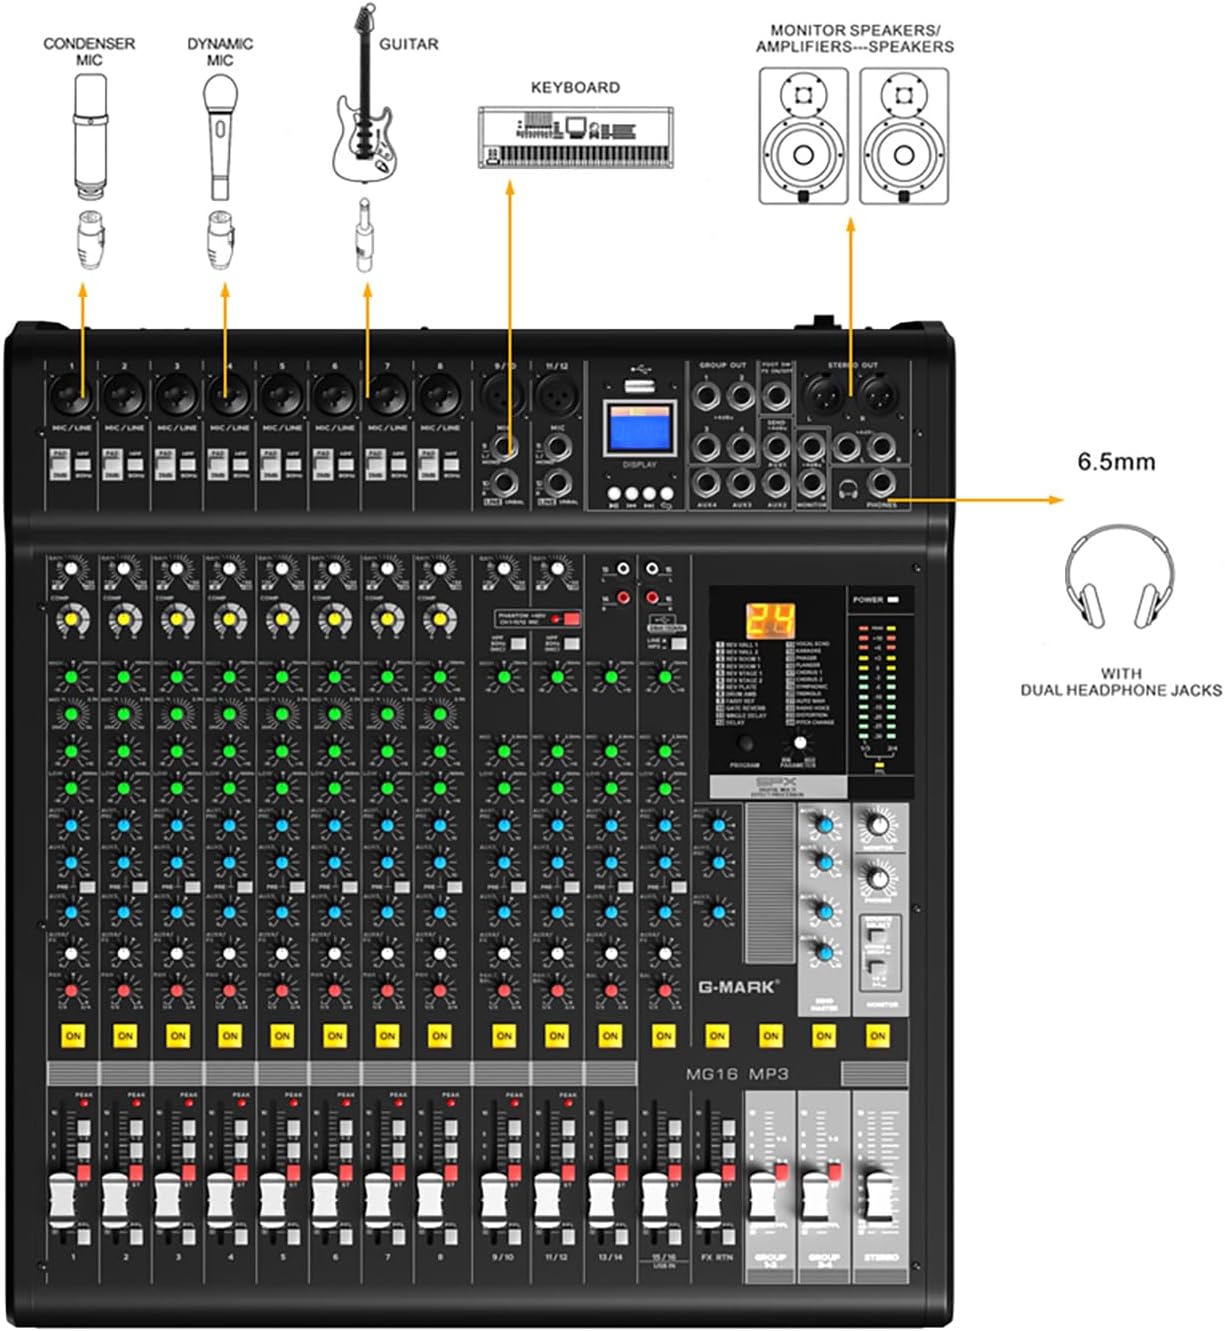
Figure 2: Diagram illustrating various input connections for the G-MARK MG16MP3 mixer, including microphones, instruments, and headphones.
2.3 Audio Output Connections
- Main Output: Connect the STEREO OUT (XLR balanced) to your main PA system or recording device.
- Monitor Output: Connect the MONITOR OUT (1/4" TRS) to your stage monitors or studio monitors.
- Headphones: Plug your headphones into the PHONES jack for personal monitoring.
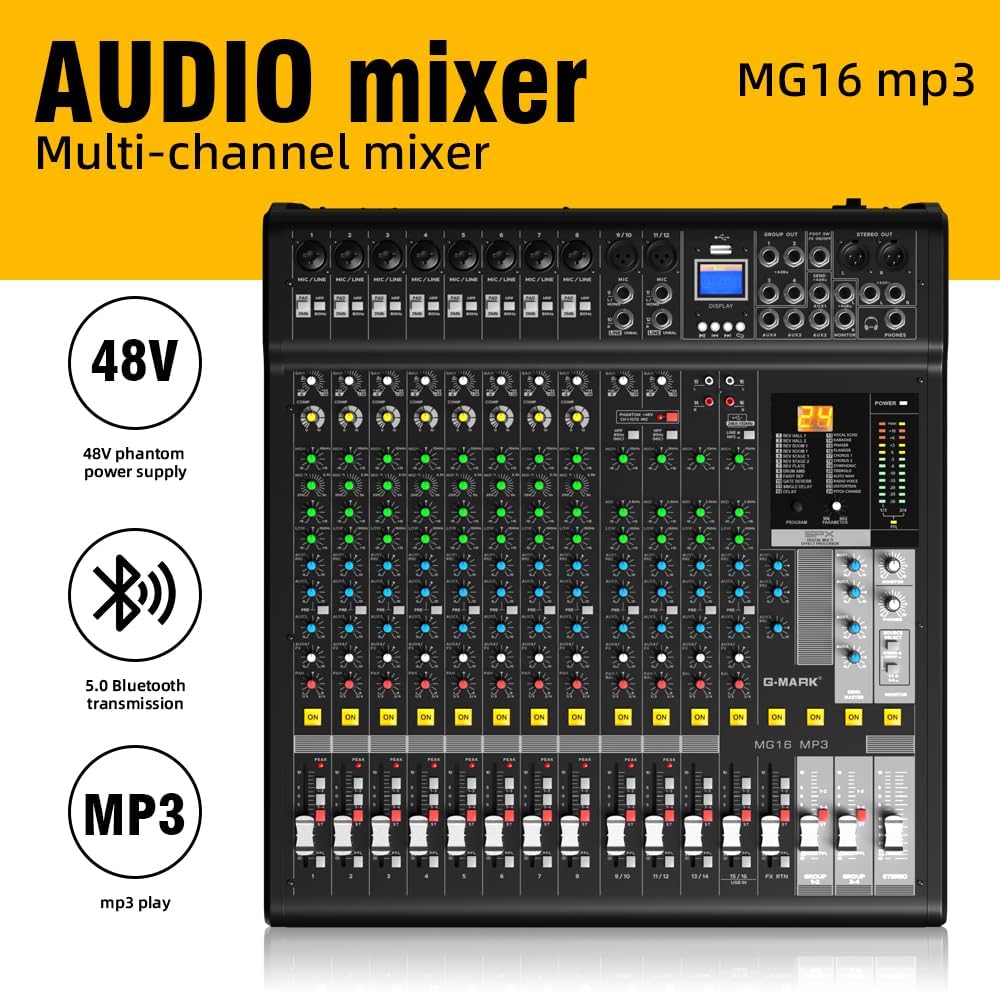
Figure 3: Rear panel of the G-MARK MG16MP3 mixer, showing the power input, power switch, USB ports, and other interfaces.
2.4 Bluetooth Connectivity
The MG16MP3 features built-in Bluetooth for wireless audio streaming.
- Activate Bluetooth on your mobile device (smartphone, tablet, or computer).
- On the mixer's display, navigate to the Bluetooth mode.
- Search for available devices on your mobile device and select "G-MARK MG16MP3" (or similar name) to pair.
- Once paired, you can stream audio wirelessly to the mixer.
2.5 USB Audio Interface
Connect the mixer to a computer via the USB port to use it as an audio interface for recording or playback.
- Connect a USB cable from the mixer's USB port to your computer.
- The mixer should be recognized as an audio device by your operating system (Windows/macOS).
- Select the G-MARK MG16MP3 as your input/output device in your Digital Audio Workstation (DAW) or system sound settings.
3. Operating
3.1 Channel Controls
Each mono input channel (1-8) and stereo input channel (9/10 - 15/16) features a set of controls for precise audio shaping:
- GAIN Knob: Adjusts the input sensitivity for the connected microphone or line-level device. Set this to achieve a healthy signal level without clipping.
- PAD Switch: Attenuates the input signal by a fixed amount (e.g., 26dB) to prevent clipping from high-output sources.
- HIGH-PASS FILTER (HPF) Switch: Cuts out unwanted low-frequency noise below 80Hz, such as stage rumble or vocal pops.
- EQ (Equalizer) Knobs (HIGH, MID, LOW): Adjust the tonal balance of the channel.
- COMP (Compressor) Knob (Mono Channels): A single-knob compressor to smooth out dynamic range and add punch to vocals or instruments.
- AUX/FX Knobs: Send signal to external effects processors or monitor mixes.
- PAN Knob: Positions the channel's sound within the stereo field (left to right).
- MUTE Button: Silences the channel.
- ON Button: Activates the channel. Ensure this is pressed for sound to pass through.
- CHANNEL FADER: Controls the output level of the individual channel.

Figure 4: Detailed view of the G-MARK MG16MP3 mixer's controls, with labels indicating the function of each knob, switch, and fader.
3.2 Digital Effects (SPX Effects)
The MG16MP3 features 24-bit SPX digital effects to enhance your sound.
- PROGRAM Knob: Rotate to select from the 24 built-in effects (e.g., Reverb, Delay, Chorus, Flanger). The selected effect number will appear on the display.
- PARAMETER Knob: Adjusts specific parameters of the selected effect (e.g., decay time for reverb, delay time for echo).
- FX RTN Fader: Controls the overall return level of the effects to the main mix.
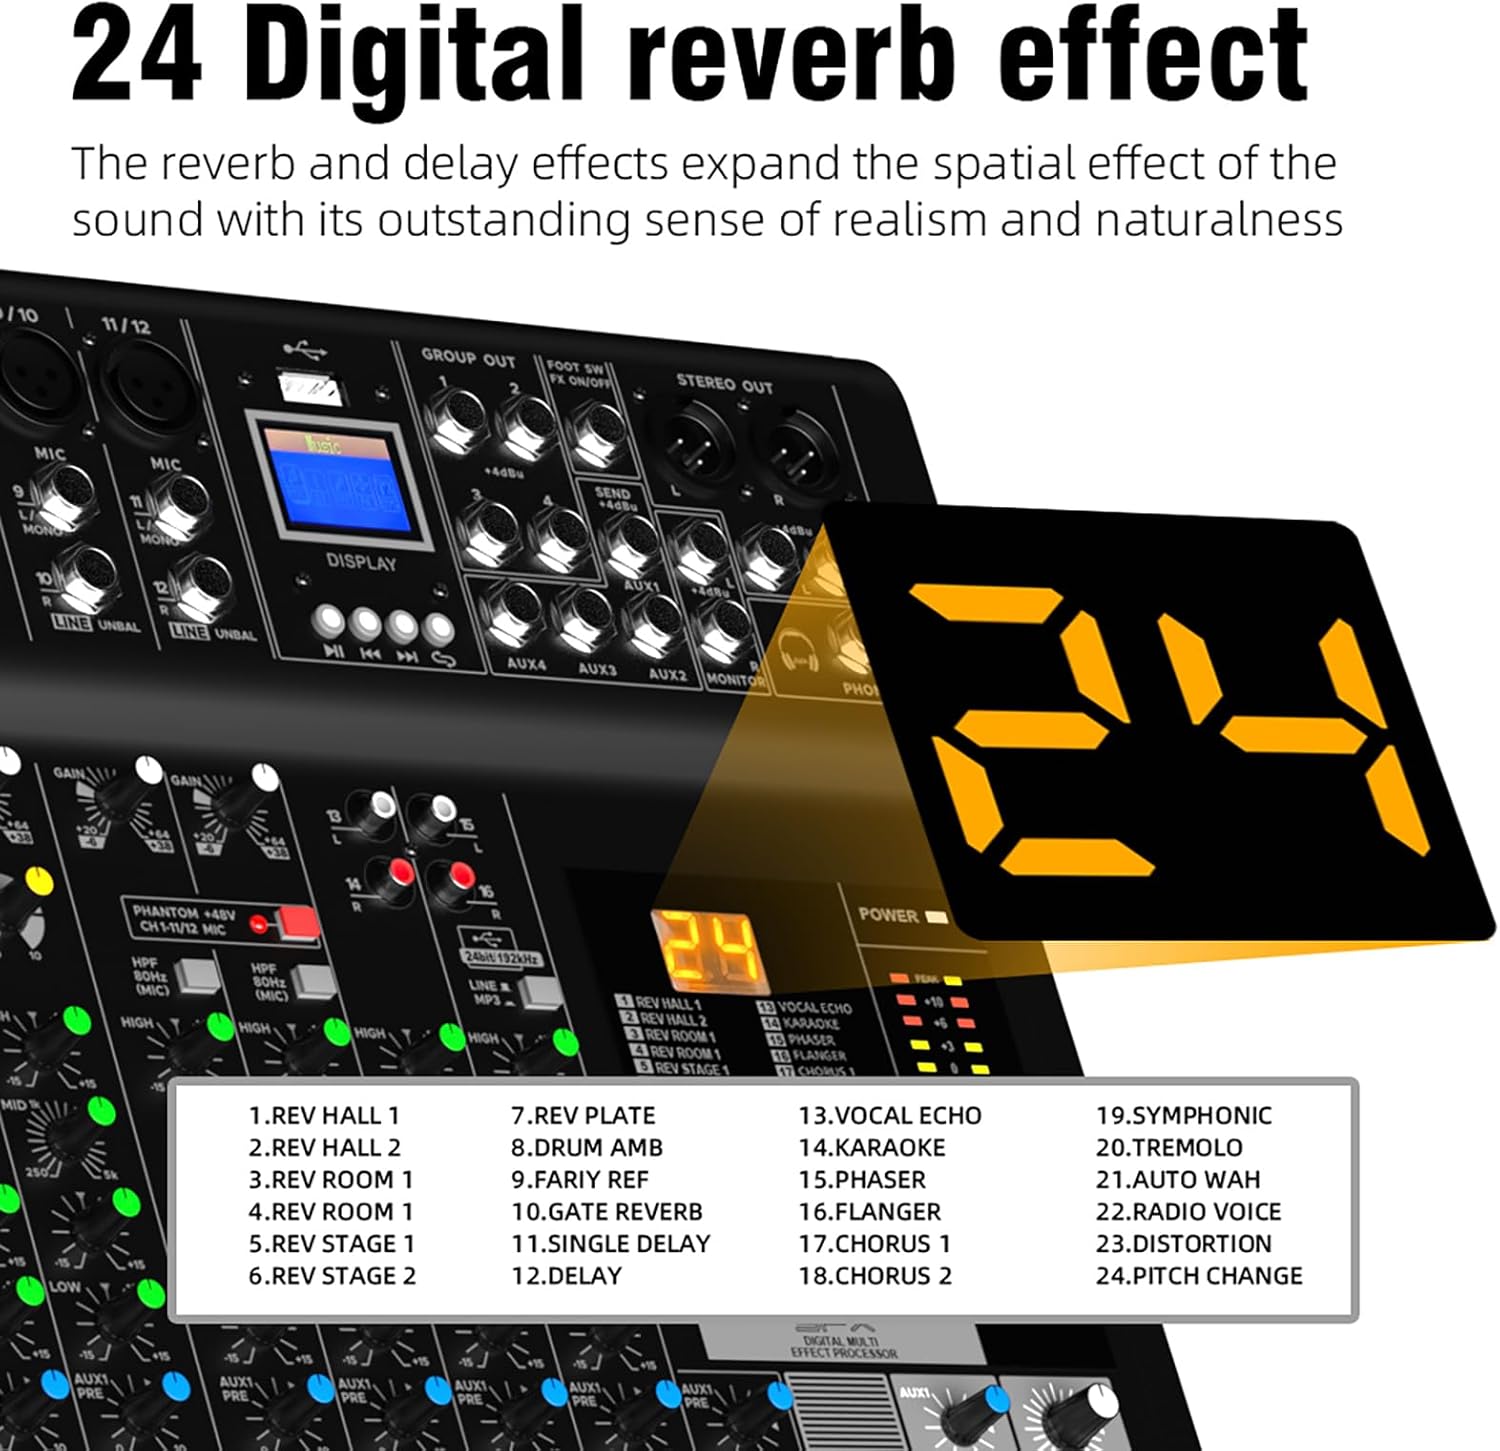
Figure 5: Close-up of the G-MARK MG16MP3's digital display, showing the selection of 24 digital reverb and delay effects.
3.3 MP3 Playback
The mixer supports MP3 playback via USB or Bluetooth.
- USB Playback: Insert a USB drive containing MP3 files into the dedicated USB port. Use the transport controls (Play/Pause, Next, Previous) on the mixer's display section to navigate and play tracks.
- Bluetooth Playback: Once paired with a Bluetooth device, audio streamed from that device will play through the mixer.
3.4 Monitoring
The MG16MP3 provides flexible monitoring options.
- PHONES Jack: Connect headphones to monitor the main stereo mix or a dedicated monitor mix.
- MONITOR Output: Send a dedicated monitor mix to external monitor speakers.
- PFL (Pre-Fader Listen) Button: Press this button on individual channels to solo their signal in your headphones or monitor output, allowing you to check the signal before it reaches the main mix.
4. Maintenance
Proper maintenance ensures the longevity and optimal performance of your G-MARK MG16MP3 mixer.
- Cleaning: Regularly wipe the mixer's surface with a soft, dry cloth. For stubborn dirt, use a slightly damp cloth and then dry thoroughly. Avoid using abrasive cleaners, solvents, or waxes, as these can damage the finish and internal components.
- Dust Protection: When not in use, cover the mixer with a dust cover to prevent dust and debris from accumulating on faders, knobs, and internal circuits.
- Storage: Store the mixer in a cool, dry place away from direct sunlight, extreme temperatures, and high humidity.
- Ventilation: Ensure proper ventilation around the mixer during operation to prevent overheating. Do not block the ventilation slots.
- Cable Management: Use proper cable management to prevent strain on connectors and accidental disconnections.
5. Troubleshooting
This section addresses common issues you might encounter with your G-MARK MG16MP3 mixer.
| Problem | Possible Cause | Solution |
|---|---|---|
| No sound output | Power off; main fader down; channel fader down; MUTE button engaged; incorrect input/output connections. | Check power, raise main and channel faders, disengage MUTE, verify all cable connections. Ensure the 'ON' button for the channel is pressed. |
| Distorted sound / Clipping | Input GAIN too high; PAD switch not engaged for high-output sources; output level too high. | Reduce GAIN, engage PAD switch if necessary, lower channel or main faders. |
| No phantom power (+48V) for condenser mic | Phantom power switch not activated. | Activate the +48V phantom power switch. Ensure the microphone is connected before activating. |
| Bluetooth connection issues | Device not in pairing mode; out of range; interference. | Ensure mixer is in Bluetooth mode, device is discoverable, move closer, reduce interference. |
| USB audio interface not recognized | Incorrect USB cable; driver issue (rare for class-compliant devices); incorrect computer settings. | Try a different USB cable, restart computer and mixer, check computer's sound settings to ensure the mixer is selected as the audio device. |
| Unwanted low-frequency noise | Rumble, hum, or proximity effect from microphones. | Engage the High-Pass Filter (HPF) switch on the affected channel. |
If you encounter a problem not listed here, or if the suggested solutions do not resolve the issue, please contact G-MARK customer support for further assistance.
6. Specifications
- Brand: G-MARK
- Model: MG16MP3
- Item Weight: 9.12 kg
- Body Material: Metal
- Color: Black
- Connector Type: XLR, 6.35MM
- Hardware Interface: Bluetooth, USB
- Mixer Channel Quantity: 16
- Product Dimensions: 57D x 54W x 23H centimetres
- Power Source: Corded Electric
- Voltage: 48 Volts (for phantom power)
- Audio Input: USB, XLR
- Output Connector Type: XLR
- Digital Effects: 24-Bit SPX Effects
- UPC: 736364389955
7. Warranty and Support
For detailed warranty information, please refer to the warranty card included with your product or visit the official G-MARK website. Keep your proof of purchase for any warranty claims.
If you require technical assistance, have questions about product operation, or need to report a defect, please contact G-MARK customer support through their official channels. Contact information can typically be found on the manufacturer's website or in the product packaging.