1. Introduction
Thank you for choosing the JACK F4 Direct Drive Sewing Machine. This manual provides essential information for the safe and efficient operation, setup, and maintenance of your new sewing machine. Please read this manual thoroughly before using the machine to ensure proper function and longevity.

Figure 1: The JACK F4 Direct Drive Sewing Machine, showcasing its sleek design and integrated motor.
2. Safety Instructions
Always follow basic safety precautions when using electrical appliances to reduce the risk of fire, electric shock, or injury to persons.
- Ensure the machine is unplugged from the power outlet before cleaning, servicing, or when not in use.
- Keep fingers away from all moving parts, especially the needle, presser foot, and handwheel.
- Never operate the machine with the air openings blocked. Keep ventilation openings of the sewing machine and foot controller free from the accumulation of lint, dust, and loose cloth.
- Do not operate where aerosol (spray) products are being used or where oxygen is being administered.
- Use only accessories recommended by the manufacturer.
- This appliance is not intended for use by persons (including children) with reduced physical, sensory or mental capabilities, or lack of experience and knowledge, unless they have been given supervision or instruction concerning use of the appliance by a person responsible for their safety.
3. Setup
3.1 Unpacking and Placement
Carefully remove the machine from its packaging. Place the machine on a stable, level surface with adequate lighting. Ensure there is enough space around the machine for comfortable operation and material handling.
3.2 Power Connection
Connect the power cord to the machine's power input and then plug it into a suitable electrical outlet. The JACK F4 features a power-saving direct drive motor.

Figure 2: Side view of the machine, showing the power cord connection point.
3.3 Needle Installation
Ensure the machine is turned off and unplugged. Loosen the needle clamp screw, insert the new needle with the flat side facing the back of the machine, and push it up as far as it will go. Tighten the needle clamp screw securely.
3.4 Bobbin Winding and Insertion
Follow the winding path indicated on the machine for the bobbin thread. Once wound, insert the bobbin into the bobbin case under the needle plate. Refer to the markings for correct thread tension and direction.

Figure 3: Close-up of the needle and bobbin area, crucial for threading and maintenance.
3.5 Threading the Machine
Raise the presser foot and needle to their highest positions. Follow the numbered threading path from the spool pin through the tension discs, take-up lever, and finally through the needle eye. Pull both upper and bobbin threads to the back under the presser foot.
4. Operating Instructions
4.1 Powering On/Off
Locate the power switch, typically on the side or front of the machine. Press to turn the machine on or off. The integrated LED light near the needle plate will illuminate when the machine is on.
4.2 Speed Adjustment
The JACK F4 features adjustable speed control. Use the control panel, usually with '+' and '-' buttons or a dial, to set your desired sewing speed. Start with a slower speed for beginners or intricate work.

Figure 4: The control panel and speed adjustment dial, allowing precise control over sewing speed.
4.3 Needle Position Adjusting/Locking Stitch
This machine allows for needle position adjustment and locking stitch functionality. Consult the control panel for specific buttons or settings to utilize these features, which enhance precision and finish.
4.4 Basic Stitching
Place your fabric under the presser foot. Lower the presser foot. Gently press the foot pedal to begin sewing. Guide the fabric smoothly, allowing the machine to feed it. To reverse stitch, use the reverse lever or button.

Figure 5: Detailed view of the needle and presser foot, showing the working area.
5. Maintenance
Regular maintenance ensures the longevity and optimal performance of your sewing machine.
- Cleaning: Regularly clean lint and dust from the bobbin area, feed dogs, and tension discs using a small brush or vacuum cleaner. Always unplug the machine before cleaning.
- Lubrication: Refer to the machine's specific oiling points (if any) and lubricate with high-quality sewing machine oil as recommended.
- Needle Replacement: Replace needles frequently, especially when working with new projects or if you notice skipped stitches or fabric damage. A dull or bent needle can cause significant issues.
- Storage: When not in use, cover the machine to protect it from dust and store it in a dry place.
6. Troubleshooting
This section addresses common issues you might encounter. For more complex problems, contact customer support.
| Problem | Possible Cause | Solution |
|---|---|---|
| Skipped Stitches | Incorrect needle, bent needle, improper threading. | Replace needle, re-thread machine, ensure correct needle type for fabric. |
| Thread Breaking | Incorrect tension, poor quality thread, burrs on needle plate. | Adjust tension, use good quality thread, check for burrs. |
| Machine Not Starting | Not plugged in, power switch off, safety mechanism engaged. | Check power connection, turn on switch, ensure presser foot is down. |
| Uneven Stitches | Incorrect tension, worn needle, inconsistent fabric feeding. | Adjust tension, replace needle, guide fabric evenly. |
7. Specifications
Key specifications and features of the JACK F4 Direct Drive Sewing Machine:
- Brand: JACK
- Model: F4
- Colour: Blue
- Motor Type: Direct Drive Motor (Power Saving, Power Efficient)
- Speed Control: Adjustable Speed
- Lighting: LED Light Near Needle Plate
- Needle Features: Needle Position Adjusting/Locking Stitch
- Product Dimensions: 9.8D x 25.4W x 21.7H Centimeters
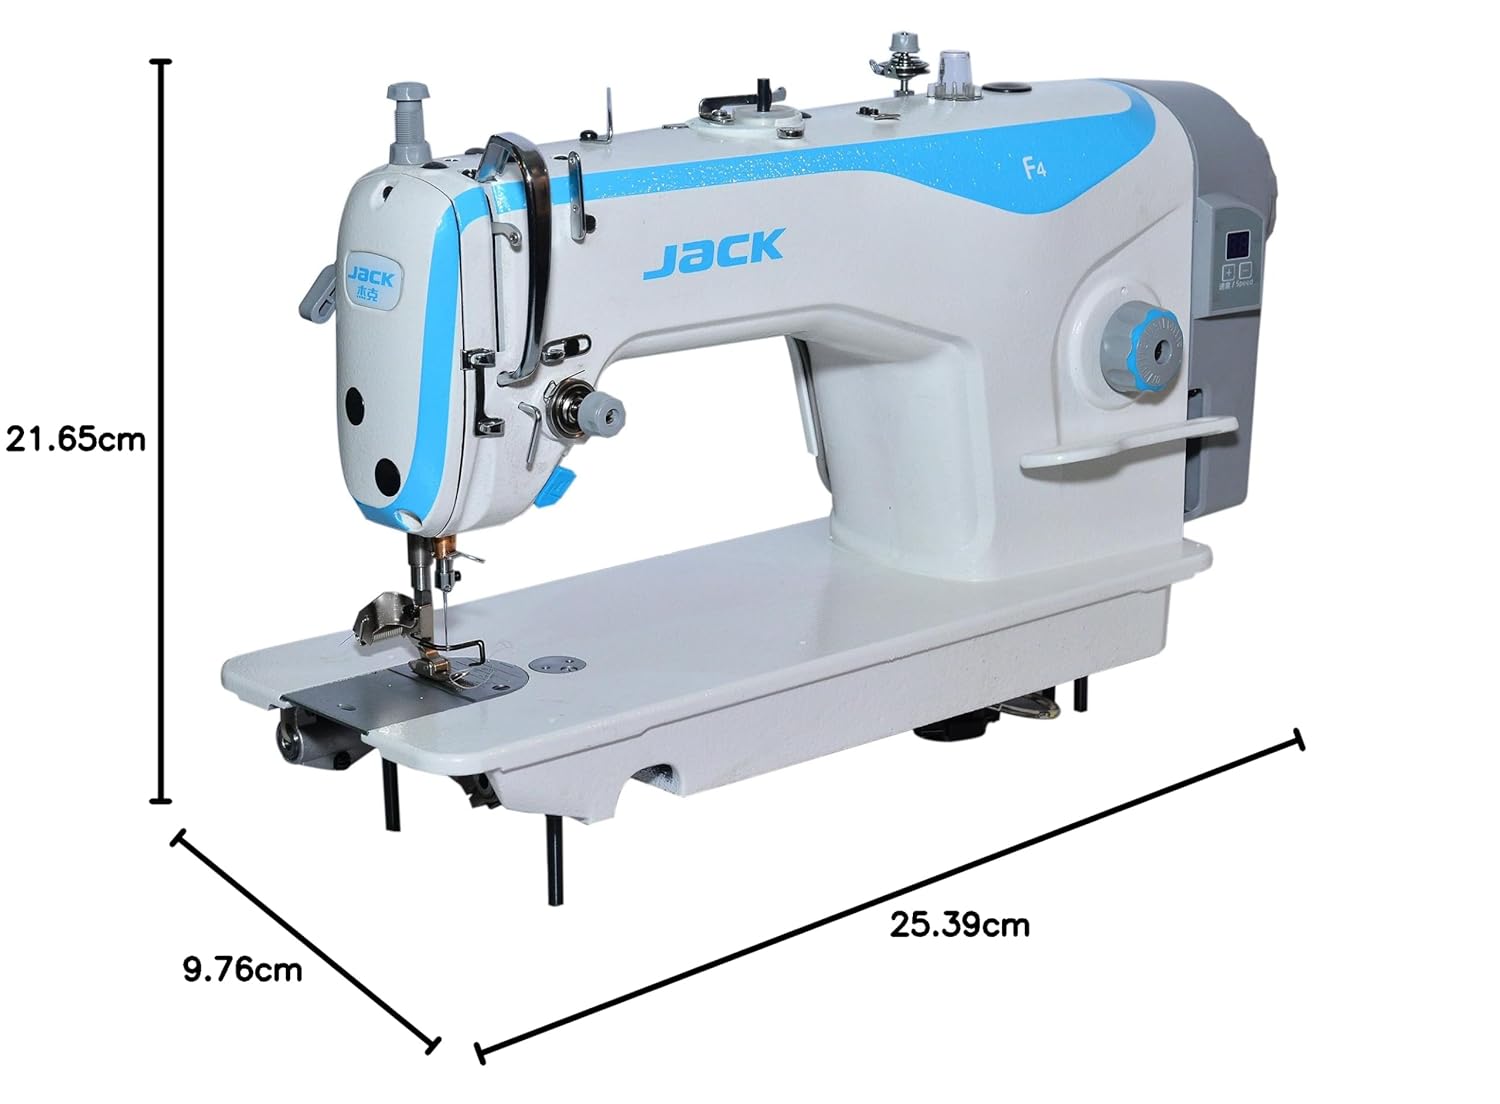
Figure 6: Product dimensions for the JACK F4 sewing machine.
8. Warranty and Support
The JACK F4 Direct Drive Sewing Machine comes with a 1 Year Warranty from the date of purchase. This warranty covers manufacturing defects under normal use. Please retain your proof of purchase for warranty claims.
For technical support, service, or warranty inquiries, please contact your authorized JACK dealer or the customer service department. Provide your machine's model number and a detailed description of the issue to facilitate faster assistance.