
Introduction
Thank you for purchasing the Lightshow Gemmy Multi Color Snow Flurry Snowflake LED Projection Light. This manual provides essential information for the safe and efficient setup, operation, and maintenance of your projection light. Please read these instructions thoroughly before use and retain them for future reference.
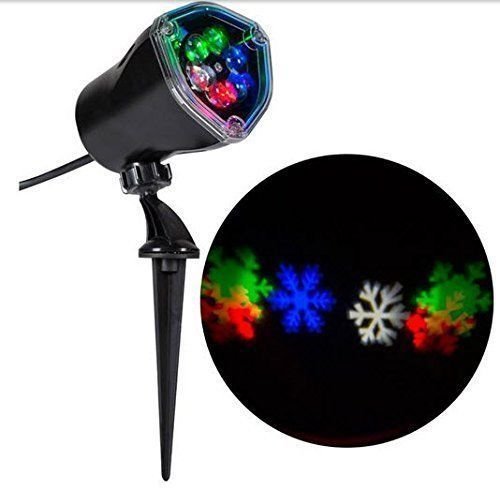
Image: The Lightshow Gemmy Multi Color Snow Flurry Snowflake LED Projection Light. This image displays the compact projector unit, designed to cast a multi-color snow flurry and snowflake effect. It includes a ground stake for outdoor installation and illustrates the type of light pattern it produces.
Important Safety Information
- Read all instructions: Before operating the product, read all safety and operating instructions.
- Outdoor Use: This product is designed for outdoor use. Ensure all connections are protected from moisture.
- Power Source: Connect the product only to a grounded outlet with the specified voltage. Do not overload electrical outlets.
- Avoid Direct Eye Exposure: Do not look directly into the light source.
- Children and Pets: Keep the product out of reach of children and pets.
- Damage: Do not operate the product if the cord or plug is damaged. If damaged, contact customer support for assistance.
- Temperature: Operate within specified temperature ranges.
Package Contents
Please check to ensure all items are present in your package:
- Lightshow Gemmy Multi Color Snow Flurry Snowflake LED Projection Light unit
- Ground stake (for surface mounting)
- Power adapter
- Instruction Manual (this document)
Setup Instructions
- Unpack: Carefully remove all components from the packaging.
- Assemble Mount: Attach the ground stake to the projection light unit. Ensure it is securely fastened.
- Placement: Select a suitable outdoor location. For optimal projection, position the light approximately 10 feet (3 meters) from the desired flat projection surface (e.g., a wall or garage door). This distance will result in an image approximately 15 feet (4.5 meters) in diameter.
- Secure Mounting: Insert the ground stake firmly into the soil. Ensure the unit is stable and will not tip over.
- Adjust Angle: The projector unit swivels. Adjust the angle to achieve precise placement of the projected image on your desired surface.
- Power Connection: Connect the power adapter to the projection light unit, then plug the adapter into a standard outdoor-rated, grounded electrical outlet. Ensure the connection is protected from weather elements.
Operating Instructions
Once the unit is set up and plugged into a power source, it should begin projecting automatically. The Lightshow Gemmy projector creates a dynamic multi-color snow flurry and snowflake effect.
- Power On/Off: The unit typically powers on when plugged in and powers off when unplugged. Some models may include an inline switch on the power cord.
- Adjust Projection: If the projected image is not clear or is too small/large, adjust the distance of the projector from the surface (recommended 10 feet). The swivel feature allows for fine-tuning the projection angle.
- Effect: The projector displays a continuous, moving snow flurry and snowflake pattern in multiple colors.
Maintenance
- Cleaning: Disconnect the power before cleaning. Use a soft, dry cloth to wipe the exterior of the projector. Do not use abrasive cleaners or solvents. Ensure the lens is clean for optimal projection clarity.
- Storage: When not in use, store the projector in its original packaging or a protective container in a cool, dry place, away from direct sunlight and extreme temperatures.
- Cord Care: Regularly inspect the power cord and plug for any signs of damage. Do not use if damaged.
Troubleshooting
| Problem | Possible Cause | Solution |
|---|---|---|
| Projector does not turn on. | No power, loose connection, or faulty unit. |
|
| Projection is dim or unclear. | Dirty lens, incorrect distance, or ambient light interference. |
|
| Projection effect is not moving. | Internal mechanism issue. |
|
Specifications
- Model Number: 36002
- Brand: Lightshow
- Color: Multicolor
- Material: Plastic
- Light Source Type: LED
- Item Weight: 1.04 Pounds (0.47 kg)
- Product Dimensions: 4.84 x 3.54 x 11.81 inches (12.29 x 8.99 x 29.99 cm)
- Mounting Type: Surface mount (with ground stake)
- Batteries Required: No
- UPC: 086786127810
- Optimal Projection Distance: Approximately 10 feet (3 meters)
- Projected Image Diameter: Approximately 15 feet (4.5 meters)
Warranty and Customer Support
For warranty information or technical support, please refer to the retailer's return policy or contact Lightshow customer service. Keep your purchase receipt as proof of purchase.
Note: Specific warranty details may vary by region and retailer.


