
Milwaukee 2803-20
Milwaukee 2803-20 M18 FUEL 1/2" Drill/Driver Instruction Manual
1. Introduction
This manual provides essential information for the safe and effective operation, maintenance, and troubleshooting of your Milwaukee 2803-20 M18 FUEL 1/2" Drill/Driver. Please read this manual thoroughly before using the tool to ensure proper handling and to maximize its performance and lifespan.
The Milwaukee 2803-20 is a powerful 1/2-inch drill/driver featuring a POWERSTATE brushless motor, designed for demanding applications. It delivers up to 1,200 inch-pounds of torque and 2,000 RPM, offering efficient drilling and driving capabilities.
2. General Safety Instructions
WARNING: Read all safety warnings, instructions, illustrations, and specifications provided with this power tool. Failure to follow all instructions listed below may result in electric shock, fire, and/or serious injury.
2.1. Work Area Safety
- Keep the work area clean and well-lit. Cluttered or dark areas invite accidents.
- Do not operate power tools in explosive atmospheres, such as in the presence of flammable liquids, gases, or dust. Power tools create sparks which may ignite the dust or fumes.
- Keep children and bystanders away while operating a power tool. Distractions can cause you to lose control.
2.2. Electrical Safety
- Power tool plugs must match the outlet. Never modify the plug in any way.
- Avoid body contact with earthed or grounded surfaces, such as pipes, radiators, ranges, and refrigerators. There is an increased risk of electric shock if your body is earthed or grounded.
- Do not expose power tools to rain or wet conditions. Water entering a power tool will increase the risk of electric shock.
2.3. Personal Safety
- Always wear eye protection. Use safety glasses with side shields or goggles.
- Dress properly. Do not wear loose clothing or jewelry. Keep your hair and clothing away from moving parts.
- Stay alert, watch what you are doing, and use common sense when operating a power tool.
- Use personal protective equipment. A dust mask, non-skid safety shoes, hard hat, or hearing protection used for appropriate conditions will reduce personal injuries.
2.4. Power Tool Use and Care
- Do not force the power tool. Use the correct power tool for your application.
- Disconnect the battery pack from the power tool before making any adjustments, changing accessories, or storing power tools.
- Store idle power tools out of the reach of children and do not allow persons unfamiliar with the power tool or these instructions to operate the power tool.
- Maintain power tools and accessories. Check for misalignment or binding of moving parts, breakage of parts, and any other condition that may affect the power tool’s operation.
3. Product Overview
The Milwaukee 2803-20 M18 FUEL 1/2" Drill/Driver is engineered for durability and high performance. Below are key components and features of the tool.

Figure 1: Front view of the Milwaukee 2803-20 M18 FUEL 1/2" Drill/Driver with the detachable side handle attached.

Figure 2: Side view of the Milwaukee 2803-20 M18 FUEL 1/2" Drill/Driver without the side handle, showcasing its compact design.

Figure 3: Labeled diagram illustrating key components of the drill/driver, including the side handle, 1/2" all-metal ratcheting chuck, 14-position clutch, variable speed trigger, LED light, 2-mode speed selector (0-550 RPM and 0-2,000 RPM), forward/reverse control switch, POWERSTATE brushless motor, premium rubber overmold, bit holder, belt clip, and weight (3.2 lbs without battery).
3.1. Key Features
- POWERSTATE Brushless Motor: Provides up to 60% more power compared to standard motors, ensuring efficient performance.
- REDLINK Plus Intelligence: Advanced electronics protect the tool and battery from overload, overheating, and over-discharge, while optimizing performance.
- REDLITHIUM XC5.0 Battery Pack (Sold Separately): Delivers extended run-time and increased work per charge.
- High Torque Output: Up to 1,200 inch-pounds of torque for demanding applications.
- Compact Design: At 6.9 inches in length, it offers improved access in tight spaces and reduces user fatigue.
- All-Metal Ratcheting Chuck: Provides superior bit grip strength and enhanced durability.
- Integrated LED Light: Illuminates the work area for better visibility in dark spaces.
4. Setup
4.1. Battery Installation and Removal
- To install the battery pack, slide the pack into the body of the tool. Ensure it latches securely into place.
- To remove the battery pack, press the release button on the battery pack and pull the pack away from the tool.
NOTE: Always remove the battery pack before changing accessories or performing maintenance.
4.2. Attaching the Side Handle
The detachable side handle provides additional control and stability, especially during high-torque applications.
- Loosen the side handle by rotating it counter-clockwise.
- Slide the handle onto the front of the drill, positioning it for comfortable use.
- Tighten the handle by rotating it clockwise until it is secure.
4.3. Installing Drill Bits and Accessories
- Ensure the battery pack is removed.
- Grip the rear half of the chuck and rotate the front half counter-clockwise until the chuck jaws are open wider than the bit shank.
- Insert the drill bit or accessory into the chuck. Ensure it is centered and fully seated.
- Rotate the front half of the chuck clockwise to tighten the jaws securely around the bit. A ratcheting sound indicates the chuck is fully tightened.
5. Operating Instructions
5.1. Forward/Reverse Control Switch
The forward/reverse control switch is located above the trigger. Push the switch to the left for forward rotation (drilling/driving) and to the right for reverse rotation (removing screws/bits). Center the switch to lock the trigger and prevent accidental startup.
5.2. Speed Selection
The 2-mode speed selector switch is located on top of the drill. It allows you to choose between two speed ranges:
- Mode 1 (0-550 RPM): Lower speed, higher torque, ideal for driving screws and drilling larger holes in tough materials.
- Mode 2 (0-2,000 RPM): Higher speed, lower torque, suitable for fast drilling of smaller holes in softer materials.
CAUTION: Always change speed settings when the tool is stopped to prevent gear damage.
5.3. Torque Adjustment (Clutch)
The 14-position clutch ring, located behind the chuck, allows you to adjust the torque output. This prevents over-driving screws and damaging work surfaces. Rotate the ring to select the desired torque setting. The higher the number, the greater the torque. For drilling, set the clutch to the drill symbol for maximum torque.
5.4. Variable Speed Trigger
The trigger provides variable speed control. Pressing the trigger further increases the speed. This allows for precise control during startup and when working with different materials.
5.5. Drilling and Driving Techniques
Always hold the tool firmly with both hands, especially when using the side handle. Apply steady, even pressure. For drilling, start with a slow speed to create a pilot hole, then increase speed as needed. For driving, select an appropriate clutch setting to prevent stripping screw heads or damaging the workpiece.

Figure 4: The drill/driver in use, demonstrating its capability to drill through a metal stud with a hole saw attachment.
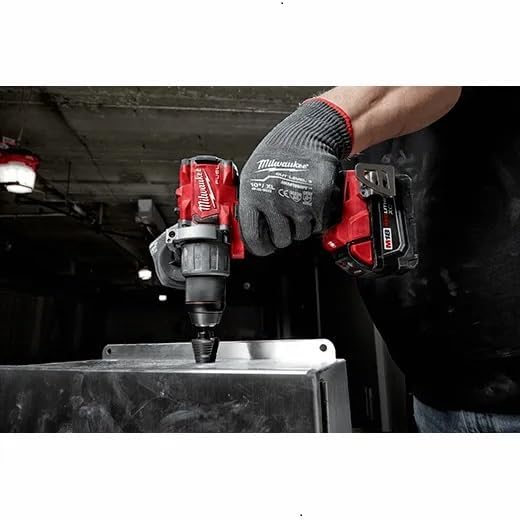
Figure 5: The drill/driver being used to drill into a thick metal plate, highlighting its power for heavy-duty tasks.

Figure 6: The drill/driver in action, drilling a large diameter hole through a wooden beam, showcasing its versatility.
6. Maintenance
WARNING: Always remove the battery pack before performing any maintenance.
6.1. Cleaning
- Keep the tool's ventilation openings clear and free of debris to prevent overheating.
- Use a soft, damp cloth to clean the exterior of the tool. Do not use harsh chemicals or abrasive cleaners.
- Regularly clean the chuck jaws to ensure proper grip on bits.
6.2. Lubrication
This tool is factory lubricated and sealed. No additional lubrication is required.
6.3. Storage
- Store the tool in a dry, secure place, out of reach of children.
- Remove the battery pack before storing for extended periods.
- Avoid storing the tool in direct sunlight or areas with extreme temperatures.
7. Troubleshooting
| Problem | Possible Cause | Solution |
|---|---|---|
| Tool does not start | Battery pack not installed correctly Battery pack discharged Forward/reverse switch in center (locked) position | Ensure battery is fully seated Charge battery pack Move switch to forward or reverse position |
| Loss of power during operation | Battery pack low or discharged Tool overloaded | Charge battery pack Reduce load on the tool; check for binding |
| Chuck not holding bit securely | Chuck not tightened sufficiently Chuck jaws dirty or worn | Retighten chuck firmly Clean chuck jaws; if worn, consider professional service |
| Excessive vibration or noise | Bent drill bit or accessory Internal component issue | Replace bent bit/accessory Discontinue use and seek professional service |
8. Specifications
| Feature | Specification |
|---|---|
| Model Number | 2803-20 |
| Brand | Milwaukee |
| Power Source | Battery Powered (M18 REDLITHIUM) |
| Voltage | 18 Volts |
| Amperage | 5 Amps |
| Maximum Rotational Speed | 2000 RPM |
| Speed Settings | Mode 1: 0-550 RPM Mode 2: 0-2000 RPM |
| Maximum Torque | 1200 Inch Pounds |
| Chuck Size | 1/2 inch (13 mm) |
| Chuck Type | All-metal ratcheting |
| Clutch Positions | 14 |
| Motor Type | POWERSTATE Brushless |
| Item Weight (without battery) | 3.2 Pounds (approx.) |
| Product Dimensions | 9"L x 5"W x 11"H (approx.) |
| Drilling Capacity (Wood) | 2.5 Inches |
| UPC | 045242002252 |
9. Warranty and Support
For detailed warranty information, please refer to the official Milwaukee website or the warranty card included with your product at the time of purchase. Warranty terms and conditions may vary.
For technical support, service, or replacement parts, please contact Milwaukee customer service or an authorized service center. Contact information can typically be found on the manufacturer's website or in your product packaging.
Ask a question about this manual
Ask about setup, troubleshooting, compatibility, parts, safety, or missing instructions. Manuals+ will review the question and use this page’s manual context to help answer it.