
Introduction
Welcome to the user manual for your Mustool G600 Digital Portable Microscope. This guide provides detailed instructions to help you set up, operate, and maintain your device, ensuring optimal performance and longevity. Please read this manual thoroughly before using the microscope.
Product Overview
The Mustool G600 is a versatile digital portable microscope designed for detailed observation of tiny objects. It features a high-definition display and adjustable magnification, making it suitable for various applications.
Key Features
- 4.3-inch HD LCD display for clear viewing.
- HD 3.6MP CCD sensor for high-resolution imaging.
- Adjustable magnification from 1x to 600x.
- Eight high-brightness LEDs for optimal illumination.
- Support for Micro SD card up to 64GB (not included) for storage.
- Built-in Li-ion battery providing approximately 6 hours of continuous working time.
- Auto turn-off function for power saving.
- Object distance: 15mm to infinity.
- Multi-language support.
Components

Figure 1: Mustool G600 Digital Portable Microscope in operation, showing a circuit board under its lens and the magnified image on the display.
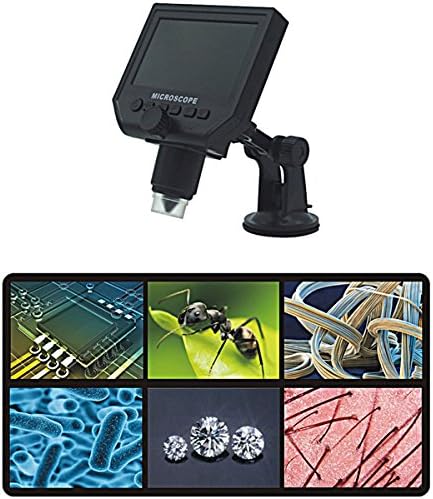
Figure 2: The Mustool G600 Digital Portable Microscope detached from its stand, showcasing the device's compact design and the adjustable stand.

Figure 3: The Mustool G600 Digital Portable Microscope display, illustrating various magnified views such as circuit components, an ant, textile fibers, bacteria, diamonds, and hair strands.

Figure 4: Front view of the Mustool G600 Digital Portable Microscope mounted on its suction cup stand, highlighting the 4.3-inch LCD screen and control buttons.

Figure 5: Side view of the Mustool G600 Digital Portable Microscope, illustrating the adjustable arm of the stand and the microscope's lens assembly.

Figure 6: Rear view of the Mustool G600 Digital Portable Microscope, showing the various ports for power, data, and Micro SD card insertion.
Package Contents
Please verify that all items listed below are included in your package. If any items are missing or damaged, please contact customer support.
- 1 x Mustool G600 LCD Digital Microscope
- 1 x EU Plug Power supply (Note: Adapter may vary by region)
- 1 x Data line (USB cable)
- 1 x Multi-functional support (Stand)
- 1 x User’s manual (This document)
Setup
Charging the Battery
Before first use, fully charge the microscope's built-in Li-ion battery.
- Connect the provided power supply to the microscope's charging port.
- Plug the power supply into a standard electrical outlet.
- The charging indicator light will illuminate. Once fully charged, the light may change color or turn off.
- A full charge provides approximately 6 hours of continuous operation.
Assembling the Stand
The multi-functional support allows for stable positioning of the microscope.
- Attach the microscope unit to the adjustable arm of the stand. Ensure it is securely fastened.
- Place the suction cup base on a clean, flat, non-porous surface. Press down firmly on the suction cup lever to secure the stand.
- Adjust the arm and microscope angle as needed for your viewing subject.
Inserting a Micro SD Card (Optional)
To save images and videos, insert a Micro SD card (up to 64GB, not included).
- Locate the Micro SD card slot on the side or back of the microscope unit.
- Gently insert the Micro SD card with the gold contacts facing down (or as indicated by the slot diagram) until it clicks into place.
- To remove, gently push the card in again until it springs out.
Operating Instructions
Powering On/Off
Press and hold the Power button (usually marked with a power symbol) for a few seconds to turn the microscope on or off. The LCD screen will illuminate.
Adjusting Magnification and Focus
The microscope offers 1x to 600x continuous magnification.
- Place the object you wish to observe directly under the microscope lens.
- Rotate the large Focus Knob (typically located on the side of the microscope body) to bring the image into sharp focus on the LCD screen.
- Adjust the distance between the lens and the object (object distance: 15mm to infinity) using the stand's adjustment mechanisms to achieve the desired magnification and clarity.
Adjusting LED Brightness
The microscope is equipped with 8 adjustable high-brightness LEDs.
Locate the LED Brightness Control (often a small knob or button) on the microscope body. Rotate or press it to increase or decrease the illumination on your subject.
Capturing Images and Videos
To capture still images or record videos, ensure a Micro SD card is inserted.
- While viewing your subject, press the Mode button to switch between photo mode, video mode, and playback mode.
- In photo mode, press the OK/Capture button to take a picture.
- In video mode, press the OK/Capture button to start recording. Press it again to stop recording.
- Captured files are saved to the Micro SD card.
Menu Navigation
Use the Menu button to access settings and options.
Use the Up/Down or Left/Right arrow buttons to navigate through menu options.
Press the OK button to confirm selections.
Common settings include resolution (1080P, 720P, VGA), language, date/time, and auto-off timer.
Maintenance
Cleaning
To ensure clear viewing and extend the life of your microscope:
- Gently wipe the LCD screen with a soft, lint-free cloth. For stubborn smudges, slightly dampen the cloth with water or a screen cleaner.
- Use a soft brush or air blower to remove dust from the lens. For smudges on the lens, use a specialized lens cleaning solution and cloth.
- Clean the microscope body with a dry or slightly damp cloth. Do not use abrasive cleaners or solvents.
Storage
When not in use, store the microscope in a cool, dry place, away from direct sunlight and extreme temperatures.
Keep the lens covered to prevent dust accumulation.
Battery Care
To prolong battery life:
- Avoid fully discharging the battery frequently.
- If storing for an extended period, charge the battery to about 50% capacity.
- Recharge the battery every few months if not in use to prevent deep discharge.
Troubleshooting
| Problem | Possible Cause | Solution |
|---|---|---|
| Microscope does not turn on. | Battery is depleted. | Charge the battery using the provided power supply. |
| Image is blurry. | Incorrect focus or object distance. | Adjust the focus knob and/or the distance between the lens and the object. |
| Screen is too dark/bright. | LED brightness not adjusted. | Adjust the LED brightness control. |
| Cannot save images/videos. | No Micro SD card inserted or card is full/corrupted. | Insert a Micro SD card, ensure it has sufficient space, or try formatting the card (this will erase all data). |
| Microscope turns off automatically. | Auto turn-off function is enabled or battery is low. | Charge the battery. Check menu settings to adjust or disable the auto turn-off timer. |
If the problem persists after trying these solutions, please contact customer support.
Specifications
| Feature | Detail |
|---|---|
| Model | Mustool G600 |
| Display | 4.3 inch HD LCD display |
| Pixel | HD 3.6MP CCD |
| Resolution | 1080P, 720P, VGA |
| Magnification | 1-600x (Continuous) |
| Object Distance | 15mm - infinity |
| Light Source | 8 Adjustable High Brightness LEDs |
| Storage Support | Micro SD card up to 64GB (Not included) |
| Power Source | Built-in Li-ion battery |
| Battery Life | Approx. 6 hours continuous working |
| Auto Turn-off | Yes |
| Language Support | English, Spanish, Russian, Korean, Japanese, Thai, Hebrew, Portuguese, German, French, Italian, Turkish, Czech, Chinese |
| Material | Glass/Glass-like (Lens), Other components as per design |
| Color | Black |
| UPC | 783050248461 |
Warranty and Support
The Mustool G600 Digital Portable Microscope comes with a standard manufacturer's warranty. Please refer to the warranty card included in your package for specific terms and conditions.
For technical support, troubleshooting assistance beyond this manual, or warranty claims, please contact Mustool customer service through the retailer where you purchased the product or visit the official Mustool website.
Please have your product model (G600) and purchase information ready when contacting support.
