Introduction
This manual provides detailed instructions for the installation, operation, and maintenance of your BONTEC MFS001 Gas Spring Single Monitor Mount. Designed for screens ranging from 13 to 36 inches and supporting weights up to 12 kg (26.5 lbs), this monitor arm offers ergonomic adjustments to enhance your viewing comfort and optimize desk space. Please read this manual thoroughly before installation and use to ensure proper setup and safe operation.
Safety Information
- Ensure all components are present and undamaged before assembly. Do not use if any parts are missing or defective.
- Verify that your monitor's weight and VESA pattern are within the specified limits of this mount.
- Always follow the installation steps carefully. Improper installation can result in equipment damage or personal injury.
- Do not overtighten screws, as this may cause damage.
- Keep children away from the assembly area. Small parts may be a choking hazard.
- Adjust the gas spring tension only after the monitor is mounted to prevent the arm from springing up or down unexpectedly.
Package Contents
Before proceeding with installation, please ensure all the following components are present:
- Monitor Arm Assembly
- C-Clamp Base
- Grommet Base Components
- VESA Plate
- Hardware Kit (screws, washers, spacers)
- Allen Keys (for adjustments)
- Instruction Manual
Specifications
| Feature | Specification |
|---|---|
| Model Number | MFS001 |
| Compatible Screen Size | 13 - 36 inches |
| Weight Capacity | Up to 12 kg (26.5 lbs) |
| VESA Compatibility | 75x75mm, 100x100mm |
| Tilt Range | +85° to -50° |
| Swivel Range | ±90° |
| Rotation | 360° (Portrait to Landscape) |
| Height Adjustment | 7.1" to 19.1" (180mm to 485mm) |
| Max Extension | 23.3" (588mm) |
| Desk Thickness (C-Clamp) | 10mm - 80mm (0.39" - 3.15") |
| Desk Thickness (Grommet) | 10mm - 70mm (0.39" - 2.76") |
| Grommet Hole Diameter | 10mm - 60mm (0.39" - 2.36") |
| Material | High-grade Zinc Alloy, Metal |
Setup and Installation
The BONTEC MFS001 monitor arm offers two installation methods: C-Clamp and Grommet Base. Choose the method best suited for your desk.
1. C-Clamp Mounting
- Attach the C-clamp base to the edge of your desk. Ensure the desk thickness is between 10mm and 80mm.
- Tighten the C-clamp screw firmly until the base is stable and secure.
- Slide the main arm pole onto the C-clamp base and secure it with the provided screw.
2. Grommet Mounting
- Ensure your desk has a grommet hole with a diameter between 10mm and 60mm, and the desk thickness is between 10mm and 70mm.
- Insert the grommet bolt through the desk hole.
- Secure the grommet base plate and nut from underneath the desk, tightening until stable.
- Slide the main arm pole onto the grommet base and secure it with the provided screw.
3. Attaching the Monitor
- Attach the VESA plate to the back of your monitor using the appropriate screws and spacers from the hardware kit. Ensure the VESA pattern is 75x75mm or 100x100mm.
- Slide the VESA plate with the attached monitor onto the arm's mounting head. Ensure it clicks securely into place.
- Tighten any security screws on the VESA plate to prevent accidental detachment.

Image: Illustration of C-Clamp and Grommet mounting options, showing desk thickness and hole diameter requirements.

Image: A user working at a desk with a monitor mounted on the BONTEC arm, highlighting its compatibility with various screen sizes and VESA standards.
Operating and Adjustments
The BONTEC MFS001 monitor arm provides full motion adjustability for optimal ergonomic positioning.
1. Height Adjustment
The gas spring arm allows for smooth vertical movement. Gently push or pull the monitor to the desired height. The arm supports a height range from 7.1 inches to 19.1 inches.
2. Tilt Adjustment
The monitor can be tilted +85° upwards and -50° downwards. Loosen the tilt screw slightly with the provided Allen key, adjust the monitor to your preferred angle, and then retighten the screw to secure it.
3. Swivel Adjustment
The arm allows for a ±90° swivel movement. You can rotate the monitor horizontally to share your screen or adjust your viewing angle.
4. Rotation Adjustment
The VESA plate allows for a full 360° rotation, enabling you to switch your monitor between landscape and portrait orientations without removing it.
5. Gas Spring Tension Adjustment
If the monitor arm does not hold its position or is difficult to move, you may need to adjust the gas spring tension. Use the provided Allen key to turn the adjustment screw located on the arm. Turn clockwise to increase tension for heavier monitors, and counter-clockwise to decrease tension for lighter monitors. Adjust only after the monitor is mounted.
6. Cable Management
Utilize the integrated cable management clips along the arm to route and conceal your power, HDMI, and other cables for a tidy workspace.
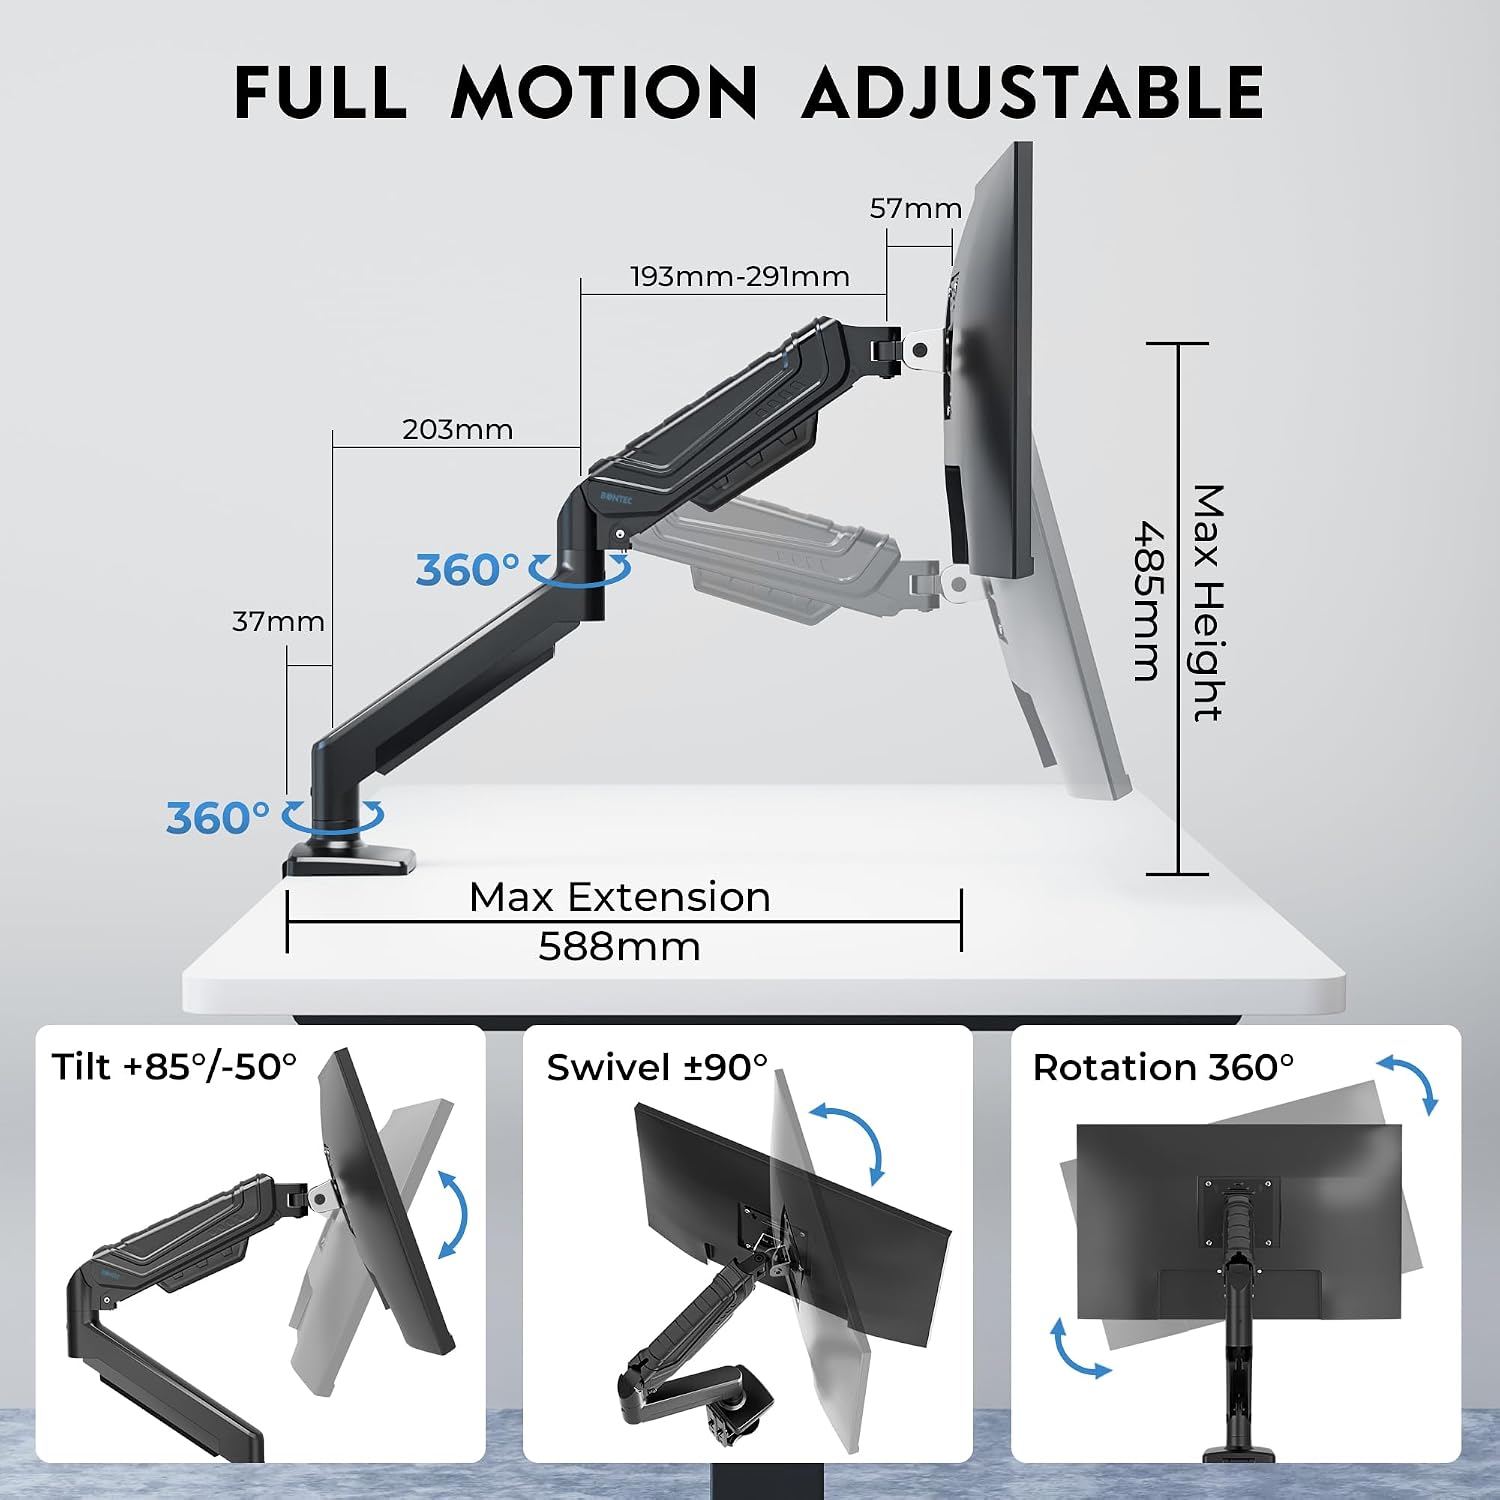
Image: Detailed illustration of the monitor arm's full motion capabilities, including tilt, swivel, rotation, and maximum extension and height.

Image: Visual representation of key features such as smooth rotation, adjustable swivel resistance, weight capacity, cable management, and the multi-position C-clamp.
Maintenance
- Cleaning: Wipe the monitor arm with a soft, damp cloth. Avoid using abrasive cleaners or solvents that could damage the finish.
- Periodic Checks: Regularly check all screws and connections to ensure they remain tight and secure. Retighten if necessary.
- Gas Spring: The gas spring is designed for long-lasting performance. No specific lubrication is required. If adjustments become difficult, refer to the 'Gas Spring Tension Adjustment' section.
Troubleshooting
- Problem: Monitor arm sags or does not stay at the desired height.
- Solution: The gas spring tension may be too low for your monitor's weight. Increase the gas spring tension by turning the adjustment screw clockwise with the provided Allen key. Ensure the monitor is mounted before adjusting.
- Problem: Monitor arm is difficult to move or too stiff.
- Solution: The gas spring tension may be too high. Decrease the gas spring tension by turning the adjustment screw counter-clockwise with the provided Allen key. Ensure the monitor is mounted before adjusting.
- Problem: Monitor wobbles or feels unstable.
- Solution: Check all mounting screws for the C-clamp or grommet base, and the VESA plate attachment to the monitor. Ensure they are securely tightened. Also, verify that your desk surface is stable.
- Problem: Monitor does not fit the VESA plate.
- Solution: Confirm your monitor's VESA pattern is either 75x75mm or 100x100mm. If it differs, your monitor is not compatible with this mount. Ensure you are using the correct screws and spacers from the hardware kit.
Warranty
The BONTEC MFS001 Monitor Arm comes with a 2-Year Warranty from the date of purchase. This warranty covers manufacturing defects and material flaws under normal use. It does not cover damage caused by improper installation, misuse, accidents, modifications, or unauthorized repairs. Please retain your proof of purchase for warranty claims.
Customer Support
If you have any questions, require assistance with installation, or encounter any issues not covered in this manual, please contact BONTEC customer support. Refer to the product packaging or the official BONTEC website for contact details.