1. Introduction
Thank you for choosing the MXT Tri-Articulated TV Wall Mount. This manual provides detailed instructions for the safe and proper installation, operation, and maintenance of your new TV mount. Please read this manual thoroughly before installation and keep it for future reference.
This mount is designed to securely hold one TV or monitor, compatible with LCD, LED, and Plasma displays. It supports VESA patterns up to 400x400 and can hold up to 35 kg. Its compact design helps save space.
2. Safety Information
WARNING: Failure to read and follow all instructions may result in personal injury, property damage, or voiding of warranty. If you have any questions, please contact customer support.
- Do not install into drywall alone. Ensure the mount is secured to a solid wall stud (wood) or concrete/brick wall.
- Verify the weight capacity of the mount (35 kg) and the VESA compatibility (up to 400x400) before attaching your TV.
- Use appropriate safety gear during installation, including eye protection.
- Ensure all screws are tightened securely, but do not overtighten.
- Keep children and pets away during installation.
- This product is intended for indoor use only.
3. Parts List
Before beginning installation, ensure all parts are present and undamaged. Refer to the diagram below for identification.
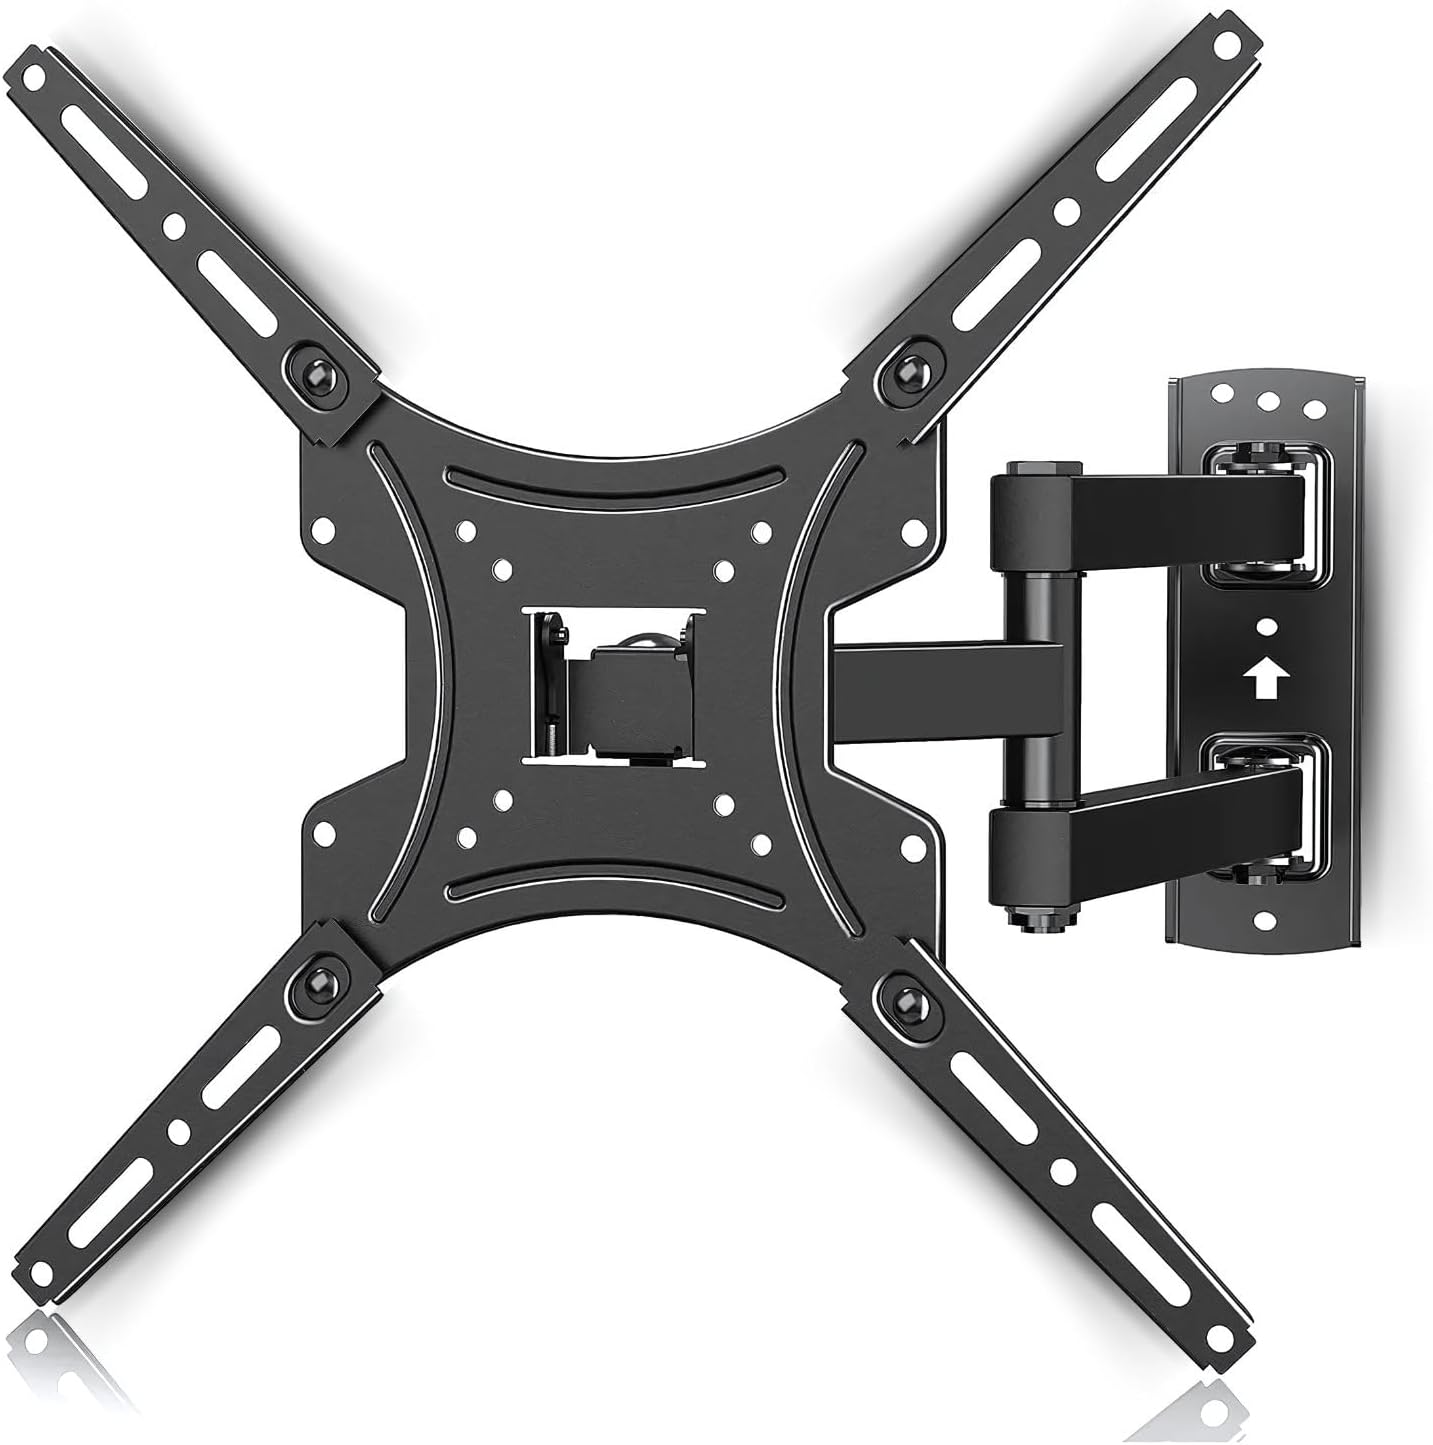
Image: Overview of the MXT Tri-Articulated TV Wall Mount, showing the wall plate, articulated arm, and TV mounting plate. This image illustrates the main components of the mount.
- Wall Plate Assembly (with articulated arm)
- TV Mounting Plate (Vesa compatible arms)
- Wall Anchors and Screws (for concrete/brick)
- Wood Stud Screws
- Various TV Screws (M4, M6, M8) and Spacers
- Level
- Wrenches/Tools (may be included or required separately)
4. Setup and Installation
Follow these steps carefully for proper installation. It is recommended to have two people for installation, especially when mounting the TV.
4.1. Check TV Compatibility and VESA Pattern
This mount is compatible with TVs from 23 to 65 inches and supports a maximum weight of 35 kg. Verify your TV's VESA mounting pattern. The mount supports VESA patterns including 75x75, 100x100, 200x100, 200x200, 400x200, 300x300, and 400x400 mm.

Image: Diagram illustrating various VESA mounting patterns (75x75, 100x100, 200x100, 200x200, 400x200, 300x300, 400x400) supported by the mount. This helps users identify if their TV is compatible.

Image: Graphic indicating compatibility for TVs ranging from 23 to 65 inches and a maximum weight capacity of 35 kg. This visually confirms the product's supported range.
4.2. Step-by-Step Installation
Refer to the installation diagram for visual guidance.

Image: A three-step visual guide for installation. Step 1 shows attaching the front panel to the TV. Step 2 shows installing the wall mount to a wooden beam or concrete/brick wall. Step 3 shows attaching the TV to the mount.
- Step 1: Install the TV Mounting Plate to your TV.
Carefully place your TV face down on a soft, clean surface. Attach the TV mounting plate (the VESA compatible arms) to the back of your TV using the appropriate screws and spacers. Ensure the plate is oriented correctly, usually with the larger opening facing upwards for easier attachment to the wall plate.
- Step 2: Install the Wall Plate Assembly to the Wall.
Choose a suitable location on your wall. Use a stud finder to locate wood studs if installing on drywall. For concrete or brick walls, use a masonry drill bit and the provided wall anchors. Mark the drilling points using the wall plate as a template. Drill pilot holes, then secure the wall plate assembly firmly to the wall using the appropriate screws. Ensure the mount is level.
- Step 3: Attach the TV to the Wall Mount.
With assistance, carefully lift the TV with the attached mounting plate. Align the TV mounting plate with the wall plate assembly and slide it into place. Ensure the TV is securely hooked onto the wall mount. Tighten any safety screws or locking mechanisms to prevent accidental dislodgement.
5. Operating the Mount
This tri-articulated mount offers flexible viewing angles.
5.1. Adjusting Distance from Wall
The mount allows you to extend your TV from the wall or push it back for a compact profile. The minimum distance from the wall is approximately 55 mm, and the maximum extension is approximately 430 mm.

Image: Illustration showing the adjustable distance of the TV from the wall, ranging from a minimum of 55 mm to a maximum of 430 mm. This highlights the mount's flexibility.
5.2. Swivel Adjustment
The articulated arm allows for significant left and right swivel, up to 90 degrees in each direction, depending on TV size and wall clearance. Gently push or pull the TV to achieve your desired viewing angle.

Image: Depiction of the TV mount's ability to swivel the TV up to 90 degrees horizontally. This demonstrates the wide range of motion for optimal viewing.
5.3. Tilt Adjustment
The mount features a tilt function, allowing you to adjust the vertical angle of your TV. It can tilt downwards by -5 degrees and upwards by +15 degrees to reduce glare or optimize viewing from different heights.

Image: Visual representation of the TV mount's tilt range, showing a downward tilt of -5 degrees and an upward tilt of +15 degrees. This illustrates the vertical angle adjustment feature.
6. Maintenance
Regular maintenance ensures the longevity and safe operation of your TV mount.
- Cleaning: Wipe the mount with a soft, dry cloth. Do not use abrasive cleaners or solvents.
- Periodic Checks: Periodically check all screws and connections to ensure they remain tight and secure. Retighten if necessary.
- Movement: If the articulated arm becomes stiff or loose, check the pivot points for any debris or adjust the tension screws if available (refer to specific product diagrams if provided).
- Damage: If any part of the mount appears damaged or worn, discontinue use immediately and contact customer support for replacement parts or advice.
7. Troubleshooting
This section addresses common issues you might encounter.
| Problem | Possible Cause | Solution |
|---|---|---|
| TV is not level after installation. | Wall plate not installed level; TV mounting plate not aligned correctly. | Remove TV, re-level wall plate, or adjust TV mounting plate if it has fine-tuning level adjustments. |
| Mount feels unstable or wobbly. | Screws not fully tightened; incorrect wall anchors used; wall structure not strong enough. | Ensure all screws are securely tightened. Verify wall type and use appropriate anchors. Consult a professional if unsure about wall strength. |
| Articulated arm is too stiff or too loose. | Pivot point tension needs adjustment. | Some mounts have adjustable tension screws on the pivot points. Refer to the specific diagram for your model or contact support. |
| Cannot find correct screws for TV. | TV requires specific screw size not included; spacers needed. | Consult your TV's manual for required screw size. Purchase appropriate screws and spacers if necessary. |
8. Specifications
- Model: AR-E15SB
- Brand: MXT
- Compatible TV Sizes: 23 to 65 inches
- Maximum Weight Capacity: 35 kg (77 lbs)
- VESA Compatibility: 75x75, 100x100, 200x100, 200x200, 400x200, 300x300, 400x400 mm
- Tilt Range: -5° to +15°
- Swivel Range: Up to 90° left/right (depending on TV size)
- Distance from Wall: 55 mm (min) to 430 mm (max)
- Material: Steel, ABS, Aluminum
- Product Weight: Approximately 2.02 kg
- Color: Black
9. Warranty and Support
Warranty: This product comes with a manufacturer's warranty of 2 years from the date of purchase. This warranty covers defects in materials and workmanship under normal use. It does not cover damage caused by improper installation, misuse, accidents, or unauthorized modifications.
Customer Support: For technical assistance, missing parts, or warranty claims, please contact MXT customer support. Refer to the product packaging or the MXT official website for contact information.
Please retain your proof of purchase for warranty purposes.
10. Additional Resources
For visual guidance, you may find the following video helpful. Please note that video content may vary slightly from your specific model but provides general installation principles.
Video: A user-submitted video demonstrating the installation and articulation of a similar TV mount. This video shows the product's movement and ease of installation, providing a practical visual aid for users.


