1. Introduction
Thank you for choosing the Electriq 6 Place Freestanding or Integrated Table Top Dishwasher. This manual provides essential information for the safe and efficient operation, installation, and maintenance of your appliance. Please read it thoroughly before first use and keep it for future reference.
This compact dishwasher is designed for small kitchens or households, offering convenience and efficiency for up to 6 place settings.
2. Safety Information
Always observe the following safety precautions to reduce the risk of fire, electric shock, injury to persons, or damage to the appliance.
- Ensure the dishwasher is properly earthed.
- Do not operate the dishwasher if the power cord or plug is damaged.
- Keep children away from the dishwasher, especially when it is operating or when the door is open.
- Use only detergents and rinse aids specifically designed for dishwashers.
- Do not open the door during operation, as hot water may spray out.
- Sharp items should be loaded with points down to prevent injury.
- Disconnect the appliance from the power supply before cleaning or maintenance.
3. Product Overview
The Electriq 6 Place Table Top Dishwasher is a compact and efficient appliance designed to fit conveniently on your countertop or integrate into your kitchen space.

Figure 3.1: Front view of the Electriq 6 Place Table Top Dishwasher.

Figure 3.2: The compact dishwasher integrated into a kitchen countertop, next to a microwave.
Key Features:
- 6 Place Setting Capacity: Ideal for small households, accommodating up to 66 pieces of crockery and cutlery.
- Compact Design: Freestanding or integrated, perfect for countertops or limited spaces.
- 6 Wash Programmes: Including Normal, Intensive, Eco, Glass, 90 Min, and Rapid cycles.
- Delay Timer: Allows you to set the wash to start 2, 4, 6, or 8 hours later.
- Energy Efficient: Rated F for energy efficiency.
- Anti-flood and Anti-leak Protection: Enhanced safety features for your kitchen.
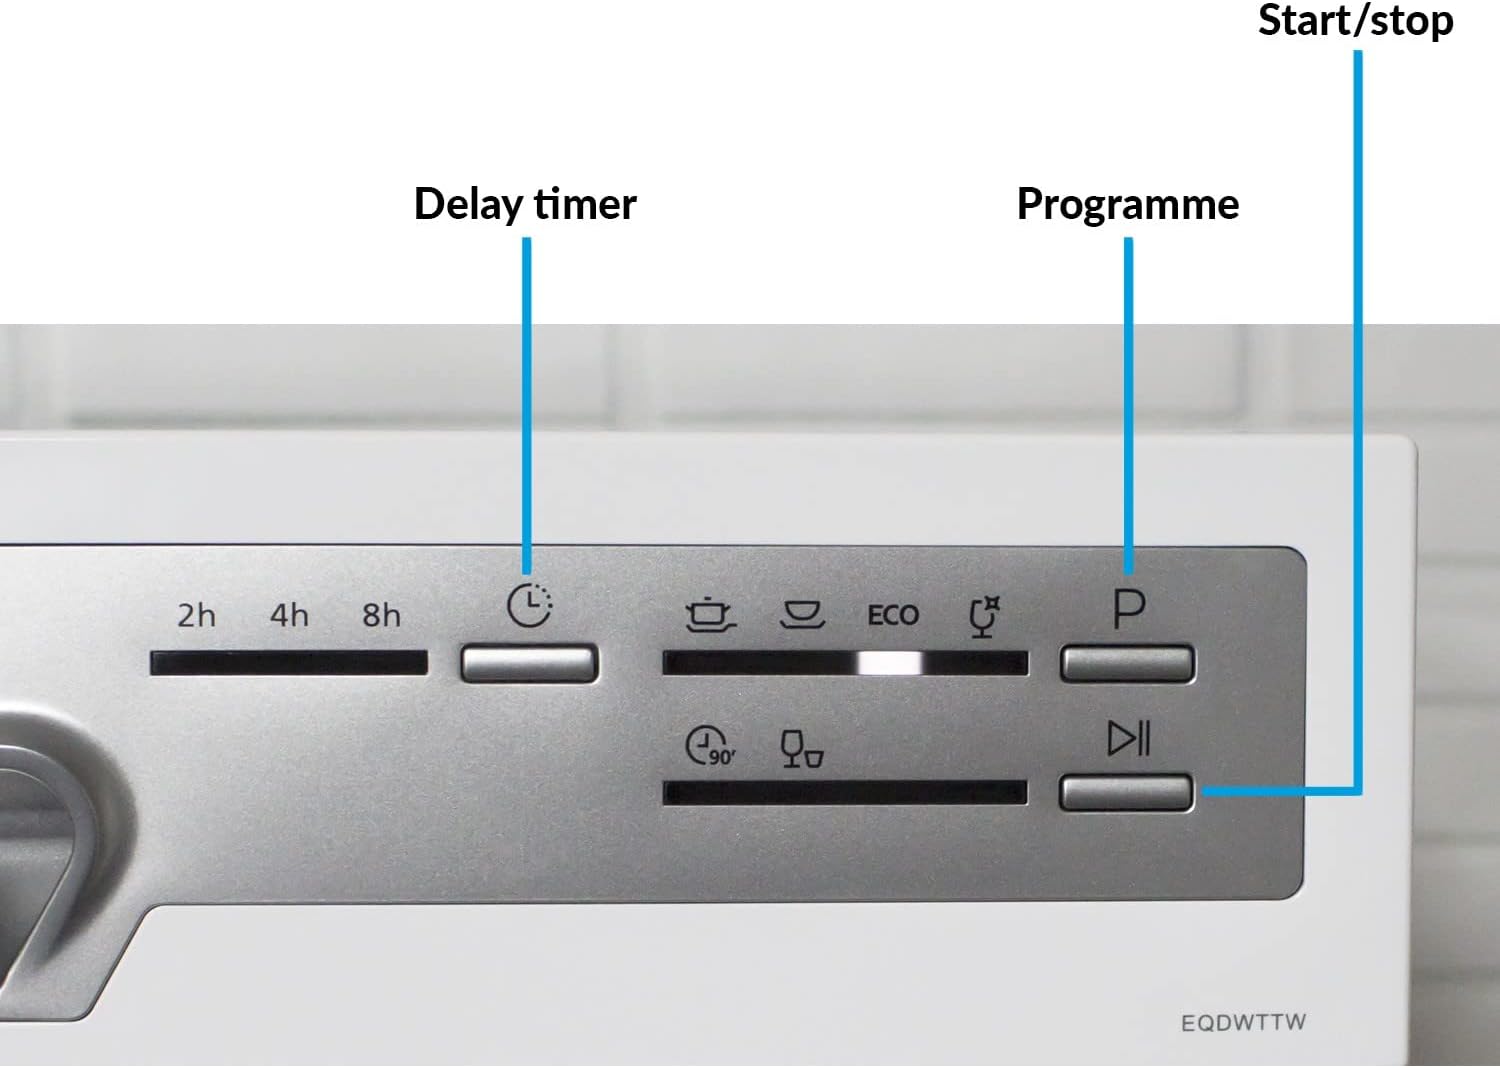
Figure 3.3: Detailed view of the control panel, showing buttons for Delay Timer, Programme selection, and Start/Stop.
4. Installation and Setup
4.1 Unpacking
Carefully remove all packaging materials. Inspect the dishwasher for any damage. Report any damage to your retailer immediately.
4.2 Positioning
The dishwasher can be placed freestanding on a stable, level surface or integrated into a suitable cabinet. Ensure there is adequate space for ventilation and door opening.

Figure 4.1: Dimensions of the dishwasher: Height 43.8cm, Width 55cm, Depth 50cm.
4.3 Water Connection
Connect the water inlet hose to a cold water supply tap. Ensure all connections are tight to prevent leaks. The dishwasher features a cold water fill system.
4.4 Drain Connection
Connect the drain hose to a suitable drain pipe or sink. Ensure the hose is not kinked or blocked.
4.5 Electrical Connection
Plug the dishwasher into a grounded electrical outlet. Ensure the voltage and frequency match the appliance's requirements (230 Volts).
4.6 Initial Setup (Salt and Rinse Aid)
Before first use, fill the salt dispenser with dishwasher salt and the rinse aid dispenser with rinse aid. Refer to the specific sections in this manual for detailed instructions on filling these compartments. The dishwasher has salt and rinse aid warning indicators.
5. Operating Instructions
5.1 Loading the Dishwasher
Load dishes carefully to ensure proper water circulation and cleaning. The dishwasher includes a cutlery basket for organized washing.

Figure 5.1: Interior view demonstrating the capacity for larger items like pots and pans.

Figure 5.2: The dishwasher can accommodate plates up to 10.15 inches (25.8cm) in diameter.

Figure 5.3: The glass stand provides stable support for delicate glassware during the wash cycle.
5.2 Adding Detergent
Add the appropriate amount of dishwasher detergent to the dispenser. Refer to the detergent manufacturer's instructions for dosage.
5.3 Selecting a Programme
Press the 'Programme' button to cycle through the available wash programmes. Indicator lights will show the selected programme.
- Normal: Standard daily wash for normally soiled dishes.
- Intensive: For heavily soiled dishes with tough, baked-on food.
- Eco: Energy-saving programme for normally soiled dishes.
- Glass: Gentle wash for delicate glassware.
- 90 Min: For lightly soiled dishes requiring a quicker wash.
- Rapid: A quick 30-minute wash for lightly soiled items without drying.

Figure 5.4: The Quick Wash feature provides fast and efficient cleaning.
5.4 Setting the Delay Timer
Press the 'Delay Timer' button to set a delayed start time of 2, 4, 6, or 8 hours. This allows you to run the dishwasher at a time that suits you, such as during off-peak energy hours.
5.5 Starting a Cycle
Close the dishwasher door firmly. Press the 'Start/Stop' button to begin the selected wash cycle. The indicator light will illuminate.
6. Maintenance and Care
6.1 Cleaning the Filter System
Regularly clean the filter system to ensure optimal washing performance. The dishwasher features an easy-clean filter system. Remove the filter, rinse it under running water, and remove any food debris. Reassemble correctly.
6.2 Refilling Salt and Rinse Aid
Monitor the salt and rinse aid warning indicators. Refill these compartments as needed to ensure effective cleaning and drying results.
6.3 Exterior and Interior Cleaning
Wipe the exterior of the dishwasher with a damp cloth. Clean the interior periodically with a dishwasher cleaner or a mixture of vinegar and water to prevent odors and build-up.
7. Troubleshooting
If your dishwasher is not functioning correctly, please consult the following table before contacting customer service.
| Problem | Possible Cause | Solution |
|---|---|---|
| Dishwasher does not start | Power cord not plugged in; Door not closed properly; Fuse blown. | Check power connection; Ensure door is latched; Check household fuse/circuit breaker. |
| Dishes not clean | Improper loading; Insufficient detergent; Clogged spray arms/filter; Incorrect program. | Reload dishes correctly; Add more detergent; Clean spray arms and filter; Select appropriate program. |
| Water not draining | Drain hose kinked or blocked; Filter clogged. | Check and clear drain hose; Clean filter system. |
| Excessive noise | Dishes rattling; Foreign object in pump; Appliance not level. | Rearrange dishes; Check for foreign objects; Level the appliance. |
| White spots on dishes | Lack of rinse aid; Hard water. | Refill rinse aid dispenser; Adjust water softener setting if applicable. |
8. Specifications
| Feature | Specification |
|---|---|
| Model Name | EQDWTTW |
| Capacity | 6 Place Settings |
| Dimensions (H x W x D) | 43.8 x 55 x 50 cm |
| Weight | 21 kg |
| Programmes | Normal, Intensive, Eco, Glass, 90 Min, Rapid |
| Temperatures | 40, 45, 60, 65, 70°C |
| Delay Timer | 2, 4, 6, or 8 hours |
| Energy Rating | F |
| Water Consumption (per cycle) | 6.5 litres |
| Noise Level | 49 dB |
| Installation Type | Freestanding |
| Voltage | 230 Volts |
| Included Components | Cutlery Basket |
9. Warranty and Support
This Electriq dishwasher comes with a 1-Year Warranty from the date of purchase. Please retain your proof of purchase for warranty claims.
For technical support, spare parts, or warranty inquiries, please contact Electriq customer service. Contact details can typically be found on the manufacturer's website or your purchase documentation.
Please have your model number (EQDWTTW) and serial number ready when contacting support.