1. Introduction
This manual provides essential information for the installation, operation, maintenance, and troubleshooting of your BAFANG Mid Drive Controller. Please read this manual thoroughly before attempting any installation or operation to ensure proper function and safety. This controller is designed for BAFANG BBS01B, BBS02B, and BBSHD mid-drive motor systems, supporting various power outputs and voltages.
2. Product Overview
The BAFANG Mid Drive Controller is a critical component of your electric bicycle's motor system, managing power delivery and communication between the battery, motor, and display. It ensures efficient and reliable performance of your e-bike.
- Rated Voltage: 36V
- Max Current: 24A
- Rated Power: 500W (Specific models support 250W, 350W, 500W, 750W, 1000W)
- All devices and parts are produced by OEM of BAFANG, ensuring reliability and good compatibility with BAFANG systems.
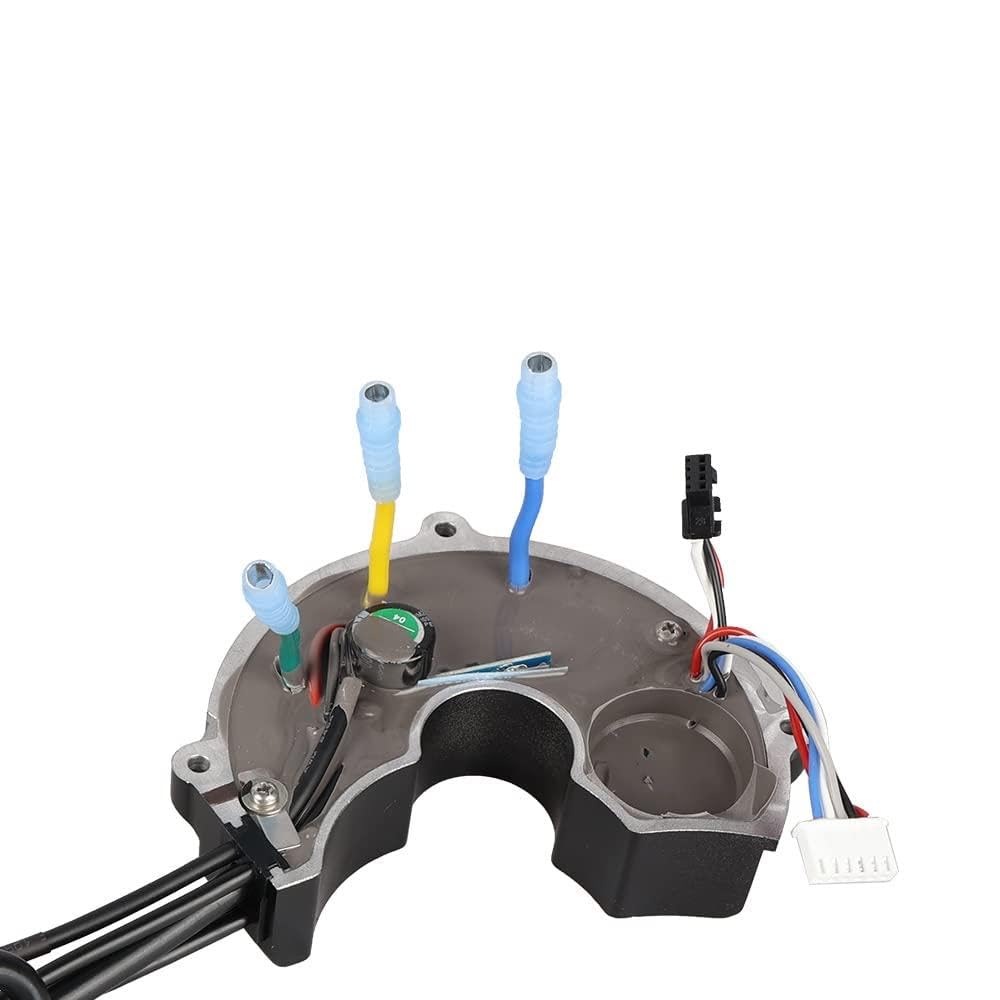
Figure 2.1: The BAFANG Mid Drive Controller unit, showing its compact design and integrated wiring harness.

Figure 2.2: A view of the BAFANG Mid Drive Controller, highlighting the various cables and connectors extending from the main unit, ready for installation.
3. Specifications
| Specification | Value |
|---|---|
| Brand | BAFANG |
| Rated Voltage | 36V (also compatible with 48V systems depending on model) |
| Max Current | 24A |
| Rated Power | 500W (available in 250W, 350W, 500W, 750W, 1000W variants) |
| UPC | 641055569618 |
| ASIN | B079FCRZ49 |
| Manufacturer | Bafang |
4. Setup and Installation
Proper installation is crucial for the safe and efficient operation of your BAFANG Mid Drive Controller. While specific steps may vary slightly based on your motor model and bicycle frame, the general principles of connection remain consistent. Always ensure the battery is disconnected before beginning any installation work.
4.1 Controller Versions

Figure 4.1: Comparison illustrating the differences between the new and old versions of the BAFANG controller. The new version includes built-in gear sensor and front lamp connections, which are absent in the old version.
4.2 Connector Identification
Familiarize yourself with the various connectors on the controller and their functions. Correct connection is vital for system integrity.

Figure 4.2: A detailed guide to the various connectors found on the BAFANG controller, including Holzer Motor Cable, Speed Transmission Cable, Motor Phase Cables, Speed Sensor Connection, 1T4 Motor Connection, Gear Shift Connection, Battery, and Front Lamp connections.
4.3 General Installation Steps
- Mount the Motor: Securely attach the BAFANG mid-drive motor to your bicycle's bottom bracket according to the motor's specific instructions.
- Connect Motor Phase Cables: Connect the three large motor phase cables (typically blue, green, yellow) from the controller to the corresponding motor cables.
- Connect Holzer Motor Cable: Connect the smaller Holzer motor cable (multi-pin connector) to the motor.
- Connect Battery: Connect the battery power cable to the controller's battery input. Ensure polarity is correct.
- Connect Display/Speed Transmission Cable: Connect the display unit via the speed transmission cable.
- Connect Speed Sensor: Attach the speed sensor to the rear wheel and connect its cable to the controller.
- Connect Gear Shift Sensor (if applicable): If your system includes a gear shift sensor, connect it to the designated port on the controller.
- Connect Front Lamp (if applicable): If your system includes a front lamp, connect it to the designated port on the controller.
- Secure Wiring: Route and secure all cables neatly to prevent snagging or damage during riding.
- Initial Test: After all connections are made, connect the battery and perform a brief test to ensure all components are functioning correctly before riding.

Figure 4.3: An internal view of the controller, showing the circuit board and the routing of cables, providing insight into the component layout.

Figure 4.4: The BAFANG Mid Drive Controller with its cover removed, revealing the internal wiring and connections, which are crucial for understanding its functionality.

Figure 4.5: An illustrative image showing the BAFANG Mid Drive Controller and motor assembly in the context of an electric bicycle, demonstrating its placement and integration.
5. Operating Instructions
Once the BAFANG Mid Drive Controller is correctly installed and connected, operating your e-bike system is straightforward. The controller works in conjunction with your display unit to manage motor assistance.
- Power On: Turn on the e-bike system using the power button on your display unit or battery. The display should illuminate.
- Select Assist Level: Use the controls on your display to select your desired pedal assist level (e.g., 0-5 or 0-9). Level 0 typically provides no motor assistance, while higher levels provide more power.
- Pedal: Begin pedaling. The motor will engage and provide assistance based on your selected assist level and pedaling input.
- Throttle (if equipped): If your system includes a throttle, it can be used to provide motor power independently of pedaling, or to boost assistance.
- Power Off: To turn off the system, press and hold the power button on your display until it shuts down. Always power off the system when not in use.
6. Maintenance
Regular maintenance helps ensure the longevity and optimal performance of your BAFANG Mid Drive Controller and e-bike system.
- Keep Clean: Periodically clean the controller and its connections to remove dirt, dust, and moisture. Use a soft, dry cloth.
- Check Connections: Regularly inspect all electrical connections for tightness and signs of corrosion or damage. Ensure cables are securely routed and not rubbing against moving parts.
- Avoid Water Exposure: While the controller is designed to be water-resistant, avoid submerging it or exposing it to high-pressure water jets.
- Temperature Control: Avoid operating or storing the e-bike in extreme temperatures, which can affect electronic components.
- Firmware Updates: If available, keep your controller's firmware updated through authorized service centers or BAFANG tools.
7. Troubleshooting
If you encounter issues with your BAFANG Mid Drive Controller, refer to the following common troubleshooting steps. For complex problems, consult a qualified e-bike technician.
- No Power to Display/Motor:
- Check if the battery is fully charged and properly connected.
- Ensure all main power cables are securely connected.
- Verify the display unit is correctly connected and powered on.
- Motor Not Assisting:
- Check the pedal assist level on your display; ensure it is not set to 0.
- Inspect the speed sensor and its magnet for proper alignment and connection.
- If equipped, check the brake cut-off sensors; ensure they are not engaged.
- Error Codes on Display:
- Refer to your specific display unit's manual for a list of error codes and their meanings.
- Common errors relate to motor, controller, or sensor communication issues.
- Intermittent Power:
- Check for loose connections, especially the battery and motor cables.
- Inspect cables for any signs of damage or fraying.
8. Warranty and Support
BAFANG products are manufactured to high standards and undergo strict quality control. For warranty information, please refer to the documentation provided with your complete BAFANG motor kit or contact your authorized BAFANG dealer or the manufacturer directly. Keep your purchase receipt as proof of purchase.
For technical support, troubleshooting assistance beyond this manual, or spare parts, please contact the retailer where you purchased your BAFANG Mid Drive Controller or visit the official BAFANG website for support resources.