Introduction
Thank you for purchasing the FanJu FJ3531B Digital Projection Alarm Clock. This device combines multiple functions including a radio-controlled projection clock, indoor temperature and humidity display, dual alarms, and a USB charging port. Please read this manual carefully to ensure proper use and operation.

Image: Front view of the FanJu FJ3531B Digital Projection Alarm Clock, displaying time, date, indoor temperature, and humidity.
Package Contents
Please check the package for the following items:
- FanJu FJ3531B Digital Projection Alarm Clock
- Power Adapter
- User Manual

Image: The FanJu FJ3531B alarm clock, its power adapter, and the user manual, as found in the product packaging.
Setup
Powering the Device
The FanJu FJ3531B can be powered by either AAA batteries or the included power adapter.
- Battery Installation: Open the battery compartment on the back of the unit. Insert 2 AAA batteries (not included), ensuring correct polarity (+/-). Batteries allow for portable use and temporary power, but continuous projection and backlight require the power adapter.
- Power Adapter Connection: Connect the provided power adapter to the DC 5.0V 1.2A port on the back of the alarm clock. Plug the adapter into a standard wall outlet. When powered by the adapter, the backlight and projection can remain continuously on.
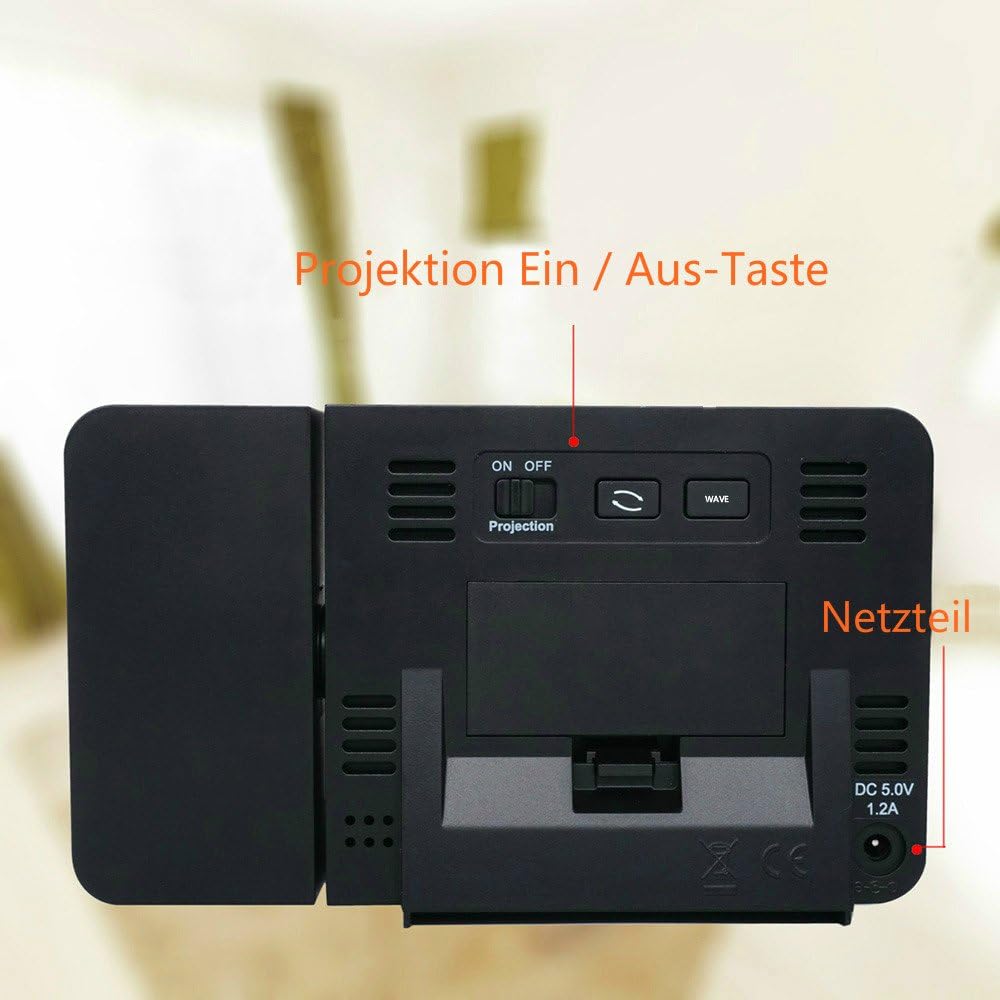
Image: Rear view of the alarm clock, highlighting the power input port and the ON/OFF switch for the projection feature.
Initial Time Setting (DCF Automatic Adjustment)
The clock features DCF automatic time adjustment. Upon initial power-up or after battery replacement, the clock will automatically search for the DCF signal to set the correct time.
- During DCF signal search, the backlight will turn off, and all buttons will be non-functional until synchronization is complete.
- You can press the "WAVE" button to stop the signal search and reactivate all functions.
- For optimal signal reception, place the device near a window and away from electronic interference.
- Note: The automatic time adjustment function (DCF) primarily works within Germany. If you are outside this region, manual time setting may be required.

Image: Close-up of the alarm clock display, showing the radio signal icon indicating DCF time synchronization.
Operating Instructions
Basic Display Information
The main display shows the current time, date, day of the week, indoor temperature, and humidity.
- Time: Displays in 12/24 hour format.
- Date & Day: Calendar with 7 language options.
- Temperature & Humidity: Indoor temperature can be displayed in °C or °F.

Image: The alarm clock's display showing current time, date, day, indoor temperature, and humidity readings.
Setting Time and Date Manually
If DCF synchronization is not available or desired, you can set the time and date manually.
- Press and hold the "TIME" button to enter time setting mode.
- Use the "+" or "-" buttons to adjust the flashing value (e.g., hour, minute, year, month, day).
- Press "TIME" again to confirm and move to the next setting.
- Repeat until all settings are complete. The clock will automatically exit setting mode if no button is pressed for a few seconds.
Alarm Settings
The device features two independent alarms with a snooze function.
- Press the "ALARM" button once to view Alarm 1 time. Press again for Alarm 2.
- Press and hold the "ALARM" button to enter alarm setting mode for the currently displayed alarm.
- Use the "+" or "-" buttons to adjust the alarm hour and minute.
- Press "ALARM" to confirm and move to the next setting.
- To activate/deactivate an alarm, press the "ALARM" button repeatedly until the alarm icon (1 or 2) appears/disappears on the display.
- When an alarm sounds, press the top button (Snooze/Light) to activate the snooze function for an extra five minutes of sleep.
Projection Function
Project the time and temperature onto a wall or ceiling for easy viewing.
- Activation: Use the ON/OFF switch located on the back of the unit to control the projection.
- Temporary Projection (Battery Power): If powered by batteries, touch the top of the clock to activate the backlight and projection for 8 seconds.
- Continuous Projection (Adapter Power): When powered by the adapter, the projection can remain continuously on.
- Adjustable Angle: The projection angle can be adjusted to suit your viewing preference.
- Image Rotation: The projected image can be rotated 180 degrees for optimal orientation.

Image: The FanJu FJ3531B projecting the time and temperature in red digits onto a wall in a bedroom setting.

Image: Diagram illustrating the projection capabilities of the alarm clock, including the adjustable projection distance (2-4m) and 180-degree image rotation.
Backlight Adjustment
When powered by the adapter, the display backlight has 4 adjustable levels.
- Press the top button (Snooze/Light) to cycle through the backlight brightness levels.

Image: Four representations of the FanJu FJ3531B display, illustrating the different backlight brightness levels available.
USB Charging Port
The alarm clock includes a USB output interface (5V 1A) for convenient charging of electronic devices.
- Connect your device's USB charging cable to the USB port on the side of the alarm clock.
- Ensure the alarm clock is connected to the power adapter for optimal charging performance.

Image: A smartphone connected to the FanJu FJ3531B via a USB cable, indicating the charging function of the alarm clock's USB port.
Maintenance
To ensure the longevity and optimal performance of your FanJu FJ3531B Digital Projection Alarm Clock, please follow these maintenance guidelines:
- Cleaning: Wipe the device with a soft, dry cloth. Do not use abrasive cleaners, solvents, or chemical agents, as these may damage the surface.
- Placement: Place the clock on a stable, flat surface. Avoid direct sunlight, extreme temperatures, and high humidity.
- Water Exposure: This device is not waterproof. Avoid exposure to water or other liquids.
- Battery Replacement: If using batteries, replace them when the display dims or functions become unreliable. Dispose of used batteries responsibly.
Troubleshooting
If you encounter issues with your FanJu FJ3531B, please refer to the following common problems and solutions:
| Problem | Possible Cause / Solution |
|---|---|
| Display is blank or dim. |
|
| Projection is unclear or blurry. |
|
| DCF automatic time adjustment fails or is inconsistent. |
|
| Projection turns off periodically. |
|
| USB charging is not working. |
|
Specifications
| Feature | Detail |
|---|---|
| Model | FJ3531B |
| Dimensions (L x W x H) | Approx. 13.5 cm x 3 cm x 8 cm |
| Weight | Approx. 30 grams |
| Power Supply | 2 x AAA batteries (not included) or DC 5.0V 1.2A power adapter (included) |
| Display Type | Digital LCD |
| Time Format | 12/24 hour selectable |
| Temperature Display | °C / °F selectable |
| Backlight Levels | 4 levels (with power adapter) |
| USB Output | 5V 1A |
| Projection Distance | Optimal between 2m and 4m |
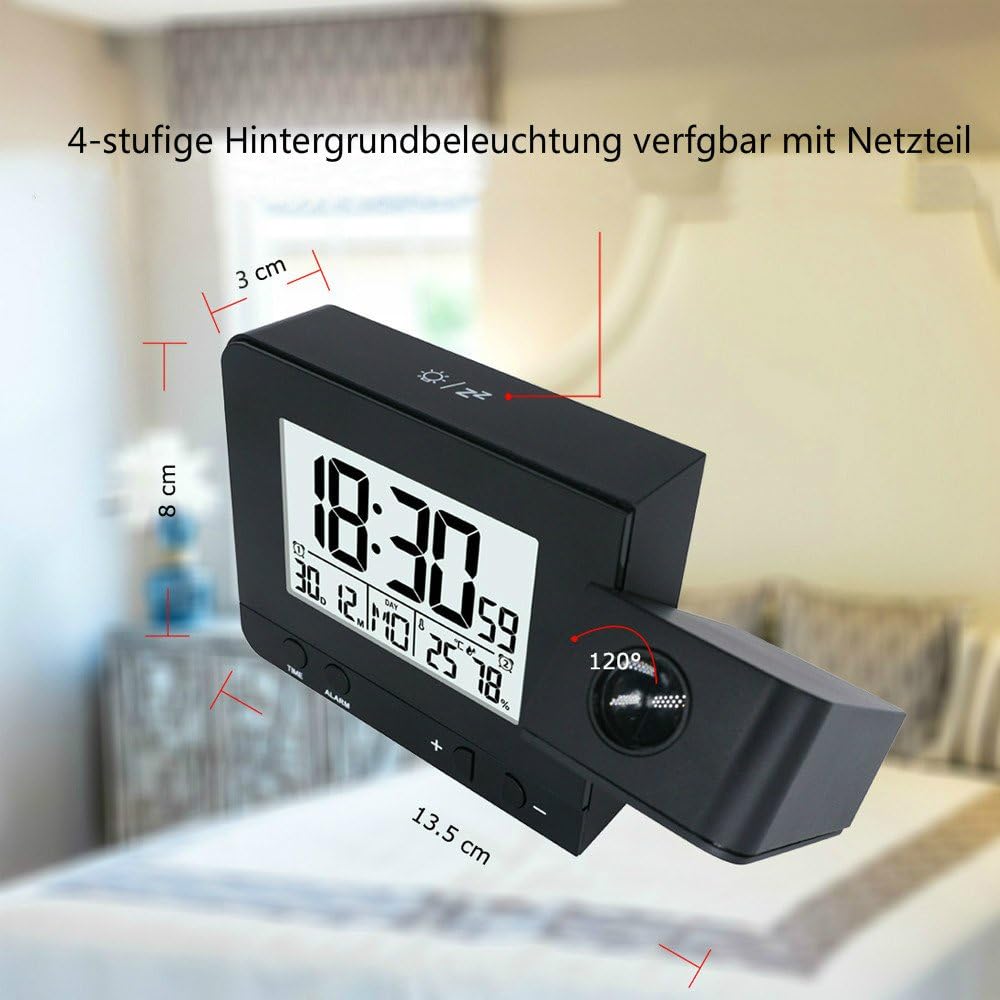
Image: The FanJu FJ3531B alarm clock with its approximate dimensions (13.5 cm length, 3 cm width, 8 cm height) overlaid.
Warranty and Support
FanJu Technology guarantees that the warranty period for this device is 1 year from the date of purchase.
For any questions, technical support, or warranty claims, please contact FanJu customer service through your purchase platform or the official FanJu website.


