
BLAZEVIDEO BVDLXJGRAY
BLAZEVIDEO WiFi Game & Trail Camera Instruction Manual
Model: BVDLXJGRAY
Introduction
Welcome to the BLAZEVIDEO WiFi Game & Trail Camera user manual. This guide provides detailed instructions for setting up, operating, and maintaining your camera to ensure optimal performance for wildlife observation, hunting, and home security. Please read this manual thoroughly before using the device.

Figure 1: BLAZEVIDEO WiFi Game & Trail Camera
The BLAZEVIDEO WiFi Game & Trail Camera is designed for capturing high-quality photos and videos of wildlife or for security surveillance. It features a durable, waterproof design and advanced functionalities like WiFi connectivity for app control and no-glow night vision.
Safety Information
- Do not expose the camera to extreme temperatures or direct sunlight for prolonged periods.
- Ensure the battery compartment is securely sealed to maintain waterproof integrity.
- Use only recommended AA batteries. Do not mix old and new batteries or different battery types.
- Keep the camera away from strong magnetic fields.
- Do not attempt to disassemble or repair the camera yourself. Contact customer support for assistance.
What's in the Box
Upon opening the package, please verify that all components are present:
- BLAZEVIDEO WiFi Game & Trail Camera (Model: BVDLXJGRAY)
- Mounting Strap
- USB Cable
- User Manual (this document)
- Note: Batteries (8x AA) and SD card (up to 256GB) are not included and must be purchased separately.
Product Overview
Familiarize yourself with the main components of your trail camera:

Figure 2: Camera Components and Controls
- Screen (LCD Display)
- Menu Button
- OK Button
- Start Button
- Mode Switch (OFF/SETUP/ON)
- Memory Card Slot
- Mini USB Connection
- Battery Compartment
- Seal Ring
This diagram illustrates the key external and internal features of the camera, including the display screen, control buttons, and various ports and compartments.
Setup
1. Battery Installation
The camera requires 8 AA batteries (not included). For best performance and battery life, use high-quality alkaline or rechargeable AA batteries.
- Open the camera housing latch and swing open the front panel.
- Locate the battery compartment (8) on the right side.
- Insert 8 AA batteries, ensuring correct polarity (+/-) as indicated inside the compartment.
- Close the battery compartment cover securely.

Figure 3: Battery Requirement
The camera operates on 8 AA batteries, which are inserted into the designated compartment.
2. SD Card Installation
A Class 10 SD/SDHC card (up to 256GB) is recommended for optimal performance (not included).
- With the camera open, locate the SD card slot (6).
- Insert the SD card with the metal contacts facing down until it clicks into place.
- To remove, gently push the card in until it springs out.

Figure 4: SD Card Compatibility
The camera supports SD/SDHC cards up to 256GB for extensive storage of photos and videos.
3. Mounting the Camera
The camera can be mounted using the included strap or a tripod (not included).
- Strap Mounting: Thread the strap through the slots on the back of the camera and secure it around a tree or pole.
- Tripod Mounting: Use the 1/4"-20 threaded insert on the bottom of the camera to attach it to a tripod or other mounting accessory.

Figure 5: Camera Mounted for Observation
The camera can be easily mounted on a tree or other stable surface for optimal field of view.
4. App Installation and Connection
The camera features WiFi and Bluetooth connectivity for easy control via a mobile application. Download the "TrailCam Mobile" app from your device's app store.

Figure 6: Easy App Installation and Connection
The mobile application allows for convenient setup and management of your camera settings and captured media.
- Enable WiFi and Bluetooth on your mobile phone.
- Turn on the camera by setting the Mode Switch (5) to "SETUP".
- Open the "TrailCam Mobile" app on your phone and select "WiFi camera".
- Follow the in-app instructions to connect to the camera's WiFi network. Once connected, you can configure settings and view media.

Figure 7: Remote Viewing via App
View captured images and videos directly on your smartphone through the dedicated app.
Operating the Camera
1. Basic Operation Modes
The camera offers three primary operation modes, selectable via the Mode Switch (5):
- Photo Only: Captures still images when motion is detected.
- Video Only: Records video clips when motion is detected.
- Photo + Video: Captures a still image followed by a video clip when motion is detected.

Figure 8: High-Resolution Capture
The camera supports 24MP still images and 1296P H.264 video recording for clear and detailed captures.

Figure 9: Image and Video Quality
Experience superior image quality with 32MP photos and smooth 1296P H.264 video.
2. Motion Detection and Trigger Speed
The camera features a fast 0.5-second trigger speed and a 110° detection angle (with side motion sensors enabled) to capture subjects quickly. The trigger distance can extend up to 23 meters (75 feet) under optimal conditions (below 77°F/25°C at normal/high sensitivity).
3. Night Vision
Equipped with no-glow infrared LEDs, the camera provides clear night vision without disturbing wildlife. The night vision range is up to 81 feet (20 meters).

Figure 10: Night Vision Capability
The camera's infrared technology ensures clear images and videos even in complete darkness.
4. Advanced Functions
- Loop Recording: When the SD card is full, the camera will automatically overwrite the oldest files.
- Time Lapse: Capture images at set intervals to observe slow processes.
- Timer: Set specific working periods for the camera to be active.
- Password Protection: Secure your camera settings with a password.
- Date/Time/Moon Phase Imprint: Information is stamped onto captured media.
- Serial Number: Assign a unique serial number for identifying multiple cameras.

Figure 11: Wide Angle Lens Coverage
The 110-degree wide-angle lens provides an expansive field of view, ideal for capturing a broader area.
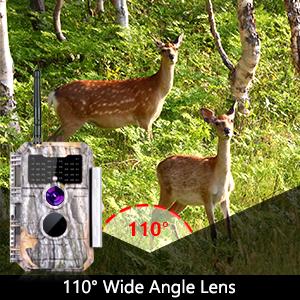
Figure 12: Enhanced Field of View
The wide-angle lens is perfect for capturing a larger area, ensuring you don't miss any activity.
Maintenance
1. Cleaning
Gently wipe the lens and camera body with a soft, dry cloth. Do not use abrasive cleaners or solvents.
2. Battery Replacement
Replace batteries when the low battery indicator appears on the screen or in the app. Always replace all 8 batteries at once.
3. SD Card Management
Regularly format the SD card using the camera's menu or the app to ensure optimal performance and prevent data corruption. Back up important files before formatting.
4. Waterproofing
The camera has an IP66 waterproof rating, protecting it from dust and strong jets of water. Ensure the seal ring (9) is clean and properly seated, and all latches are securely closed to maintain water resistance.

Figure 13: IP66 Waterproof Design
The camera's robust IP66 rating ensures reliable operation in various weather conditions, including rain.
Troubleshooting
| Problem | Possible Cause | Solution |
|---|---|---|
| Camera not turning on | Low or dead batteries; incorrect battery polarity. | Replace all 8 AA batteries with new ones, ensuring correct polarity. |
| Poor image/video quality at night | Infrared LEDs obstructed; subject too far; lens dirty. | Ensure no obstructions in front of IR LEDs. Check subject distance (max 81ft). Clean the lens. |
| WiFi connection issues with app | Phone too far from camera; WiFi/Bluetooth not enabled on phone; app not updated. | Ensure phone is within WiFi range. Verify WiFi and Bluetooth are enabled. Update the "TrailCam Mobile" app. Restart both camera and phone. |
| Camera not detecting motion | PIR sensitivity too low; obstructions in detection zone; camera placed too high. | Increase PIR sensitivity in settings. Clear obstructions. Adjust camera height and angle. |
| SD card error | SD card full; corrupted; incompatible type; improperly inserted. | Format the SD card (backup data first). Try a different Class 10 SD/SDHC card (up to 256GB). Reinsert the card correctly. |
| No audio in videos | This model does not record audio. | This is a characteristic of the product. |
Specifications
| Feature | Detail |
|---|---|
| Brand | BLAZEVIDEO |
| Model Number | BVDLXJGRAY |
| Effective Still Resolution | 32 MP |
| Video Capture Resolution | 1296p, 1080P, 720P |
| Video Encoding | H.264 MP4/MOV |
| Frame Rate | 30fps |
| Max Shutter Speed | 0.5 Seconds |
| Viewing Angle / Field Of View | 110 Degrees |
| Night Vision Range | 81 Feet (20 meters) |
| Number of IR LEDs | 36 |
| Connectivity Technology | Wireless (Wi-Fi, Bluetooth) |
| Controller Type | App control |
| Power Source | Battery Powered (8 AA batteries required) |
| Flash Memory Type | SD (supports up to 256 GB SDHC) |
| Water Resistance Level | Waterproof (IP66) |
| Material | Acrylonitrile Butadiene Styrene (ABS) |
| Item Dimensions (L x W x H) | 6.4 x 4.4 x 3 inches |
| Item Weight | 1 pounds (16 ounces) |
| Operating Temperature | Up to 60 Degrees Celsius |
| Recommended Uses | Game & Trail, Animal Tracking, Wildlife Observation, Security Surveillance, Intrusion Monitoring |
Warranty and Support
BLAZEVIDEO stands behind the quality of its products. For warranty information, technical support, or any inquiries regarding your camera, please visit the official BLAZEVIDEO website or contact their customer service directly. Keep your purchase receipt as proof of purchase for warranty claims.
For further assistance, you may refer to the BLAZEVIDEO store on Amazon: BLAZEVIDEO Amazon Store.
Related documentsBVDLXJGRAY


Ask a question about this manual
Ask about setup, troubleshooting, compatibility, parts, safety, or missing instructions. Manuals+ will review the question and use this page’s manual context to help answer it.