Introduction
This instruction manual provides comprehensive guidance for the installation, maintenance, and proper use of the TONE RK-RH3B Repair Kit. This kit is designed to replace worn or damaged internal components of compatible TONE 3/8 inch drive ratchet handles, restoring their functionality and extending their lifespan. Please read this manual thoroughly before proceeding with any repair work.
Safety Information
Always observe the following safety precautions when working with tools and performing repairs:
- Wear appropriate personal protective equipment, such as safety glasses, to protect against flying debris.
- Ensure your work area is clean, well-lit, and free from obstructions.
- Use the correct tools for disassembly and assembly to prevent damage to components or injury.
- Keep small parts away from children and pets to prevent choking hazards.
- If you are unsure about any step, consult a qualified professional.
Package Contents
The TONE RK-RH3B Repair Kit includes the following components:

Figure 1: Exploded view diagram of a ratchet handle, illustrating the position of each numbered component within the assembly. This diagram helps identify where each part of the repair kit is installed.
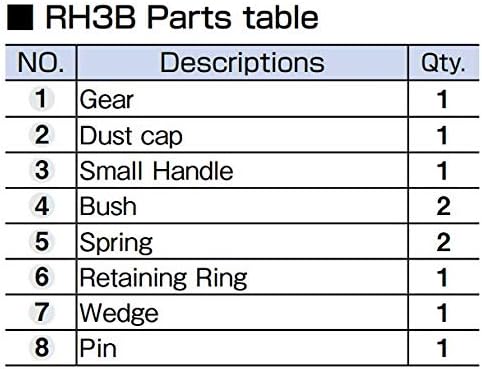
Figure 2: Parts table for the RH3B repair kit, detailing each component by number, description, and quantity included in the kit.
| No. | Description | Quantity |
|---|---|---|
| 1 | Gear | 1 |
| 2 | Dust Cap | 1 |
| 3 | Small Handle (Reversing Lever) | 1 |
| 4 | Bush | 2 |
| 5 | Spring | 2 |
| 6 | Retaining Ring | 1 |
| 7 | Wedge | 1 |
Installation Instructions
Compatible Models:
This repair kit is specifically designed for TONE ratchet handle model RH3B.
Preparation:
- Gather all components from the RK-RH3B kit.
- Ensure you have a clean workspace and appropriate tools for disassembly (e.g., small screwdriver, retaining ring pliers if necessary, cleaning cloth).
Step-by-Step Assembly:
- Disassembly: Carefully remove the existing retaining ring (6) from the ratchet head. Once the retaining ring is removed, extract the wedge (7), small handle (3), springs (5), bushes (4), dust cap (2), and gear (1). Note the orientation of each part during removal.
- Cleaning: Thoroughly clean the internal cavity of the ratchet head, removing any old grease, dirt, or debris. Inspect the ratchet body for any damage that might affect the new components.
- Install New Gear: Place the new gear (1) into the ratchet head cavity, ensuring it sits correctly.
- Install Dust Cap: Position the new dust cap (2) over the gear.
- Install Bushes and Springs: Insert the two new springs (5) into their respective slots. Then, place the two new bushes (4) over the springs.
- Install Small Handle: Carefully align and insert the new small handle (3) into its position, ensuring it engages with the gear and the bushes/springs.
- Install Wedge: Place the new wedge (7) into its designated slot, securing the small handle.
- Secure with Retaining Ring: Finally, install the new retaining ring (6) into its groove to hold all components in place. Ensure the retaining ring is fully seated and secure.
- Test Functionality: After assembly, test the ratchet's mechanism by rotating the drive square and operating the reversing lever (small handle) to ensure smooth operation and proper engagement in both directions.
Operation (After Repair)
Once the repair kit components are correctly installed, your TONE ratchet handle should function as intended. To operate:
- Attach the appropriate socket to the 3/8 inch drive square.
- Use the small handle (reversing lever) to select the desired direction of rotation (tightening or loosening).
- Apply steady, controlled force to the ratchet handle. Avoid excessive force or using the ratchet as a pry bar, as this can damage the internal mechanism.
Maintenance
Regular maintenance will ensure the longevity and reliable performance of your repaired ratchet handle:
- Cleaning: After each use, wipe down the ratchet handle to remove dirt, grease, and debris.
- Lubrication: Periodically apply a small amount of high-quality grease to the internal gear mechanism to ensure smooth operation and prevent wear. Avoid over-lubrication, which can attract dirt.
- Storage: Store the ratchet handle in a clean, dry environment, protected from moisture and extreme temperatures.
- Inspection: Regularly inspect the ratchet head for any signs of wear, damage, or loose components. Address any issues promptly.
Troubleshooting
If you encounter issues after installing the repair kit, consider the following:
- Ratchet not engaging: Ensure the gear (1) is correctly seated and the small handle (3) and wedge (7) are properly installed and aligned. Check that the springs (5) and bushes (4) are in place.
- Loose components: Verify that the retaining ring (6) is fully seated in its groove. If components feel loose, disassemble and reassemble carefully, ensuring each part is correctly positioned.
- Stiff operation: This could indicate insufficient lubrication or incorrect assembly. Disassemble, clean, lubricate, and reassemble the components. Ensure no parts are binding.
- Clicking sound but no engagement: The gear teeth might be worn or damaged, or the pawl (part of the small handle assembly) is not engaging properly. Re-check the installation of the gear and small handle.
Specifications
| Feature | Detail |
|---|---|
| Brand | TONE |
| Model Number | RK-RH3B |
| Compatible Ratchet Model | RH3B |
| Drive Size | 3/8 inch (9.5 mm) |
| Material | Alloy Steel |
| Finish | Powder Coated (components) |
| Item Weight | 100 g |
| Parcel Dimensions | 5 x 5 x 3 cm |
Warranty and Support
For specific warranty information or technical support regarding your TONE RK-RH3B Repair Kit or compatible ratchet handles, please refer to the official TONE product documentation or contact TONE customer service directly. Keep your purchase receipt as proof of purchase.