1. Introduction
Thank you for purchasing the DONYER POWER Electric Sewing Machine. This portable mini sewing machine is designed for ease of use, making it suitable for beginners, craftspeople, and DIY enthusiasts. It features 12 built-in stitch patterns, two speed settings, and options for hand switch or foot pedal operation. This manual provides detailed instructions for setup, operation, maintenance, and troubleshooting to ensure optimal performance and longevity of your sewing machine.
Please read this manual thoroughly before operating the machine and keep it for future reference.
2. Important Safety Instructions
When using an electrical appliance, basic safety precautions should always be followed, including the following:
- Always unplug the machine from the electrical outlet immediately after using and before cleaning, removing covers, or performing any user servicing.
- Do not allow to be used as a toy. Close attention is necessary when this appliance is used by or near children.
- Use this appliance only for its intended use as described in this manual. Use only attachments recommended by the manufacturer.
- Never operate this appliance if it has a damaged cord or plug, if it is not working properly, if it has been dropped or damaged, or dropped into water.
- Never drop or insert any object into any opening.
- Do not use outdoors.
- Do not operate where aerosol (spray) products are being used or where oxygen is being administered.
- To disconnect, turn all controls to the off position, then remove plug from outlet.
- Keep fingers away from all moving parts. Special care is required around the sewing machine needle.
- Always use the correct needle plate. The wrong plate can cause the needle to break.
- Do not use bent needles.
- Do not pull or push fabric while stitching. This may deflect the needle causing it to break.
- Turn the sewing machine off when making any adjustments in the needle area, such as threading the needle, changing the needle, threading the bobbin, or changing the presser foot.
- Always unplug the sewing machine from the electrical outlet when removing covers, lubricating, or when making any other adjustments mentioned in the instruction manual.
3. Product Components and Features
Familiarize yourself with the various parts of your DONYER POWER sewing machine.
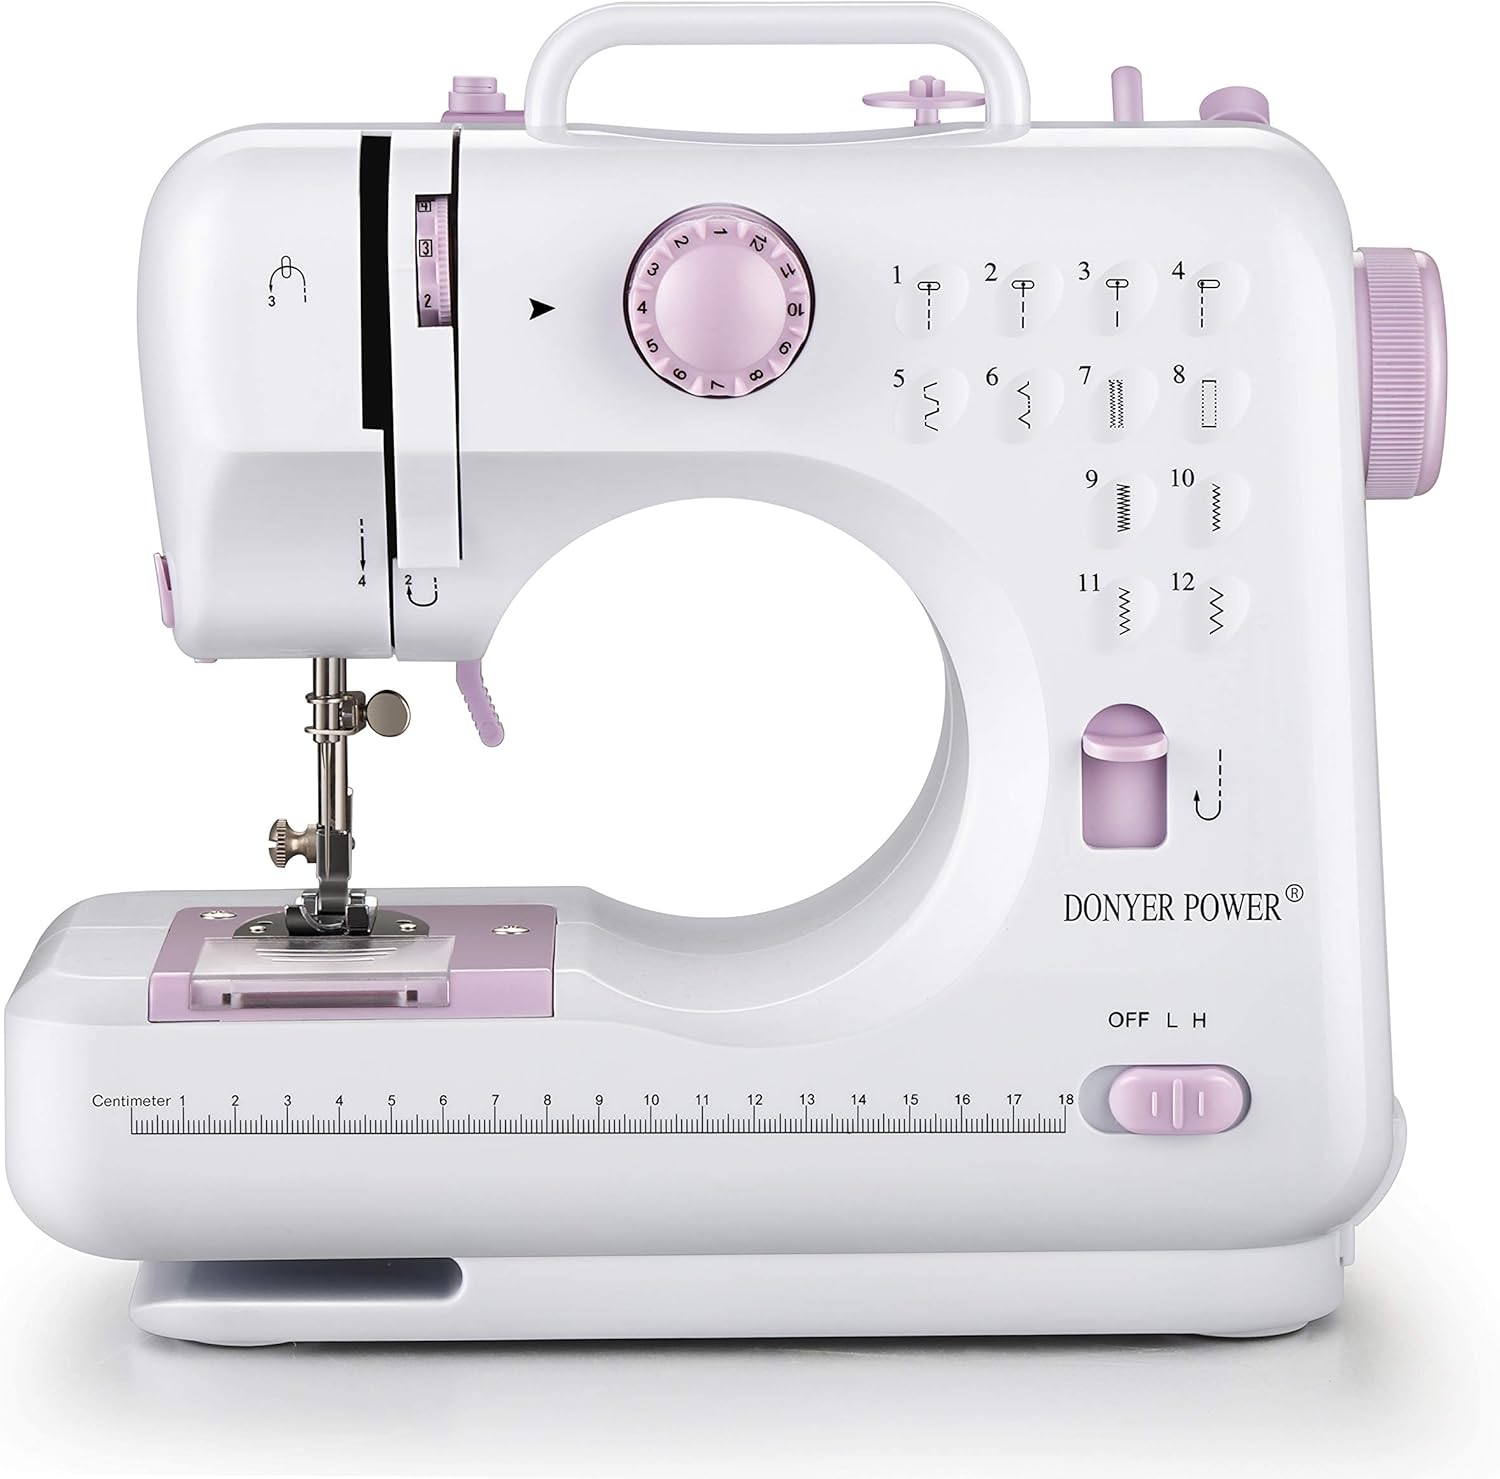
Figure 3.1: Front view of the DONYER POWER Electric Sewing Machine, showing the main body, needle area, stitch selector dial, and speed switch.

Figure 3.2: Detailed view of key features including the LED light for illumination, integrated cutting knife, convenient accessory drawer, bobbin winding function, and the reverse key for backstitching.

Figure 3.3: The sewing machine shown with its compact dimensions (10.8 inches wide, 10.2 inches high, 4.8 inches deep), alongside the included power adapter and foot pedal.
Key Components:
- Stitch Selector Dial: Choose from 12 built-in stitch patterns.
- Speed Switch: Select between High (H) and Low (L) sewing speeds.
- Foot Pedal Jack: Connect the foot pedal for hands-free speed control.
- Hand Switch: Alternative to foot pedal for starting/stopping the machine.
- LED Light: Illuminates the sewing area.
- Thread Cutter: Conveniently cut threads after sewing.
- Accessory Drawer: Storage for small sewing accessories.
- Bobbin Winding Function: For easy bobbin preparation.
- Reverse Key: For reinforcing stitches at the beginning and end of seams.
- Free Arm: Allows for easy sewing of cuffs, sleeves, and other small, circular items.
4. Setup
4.1 Power Connection
- Ensure the machine's power switch is in the "OFF" position.
- Connect the power adapter to the DC input jack on the machine.
- Plug the power adapter into a suitable electrical outlet.
- If using the foot pedal, plug the foot pedal cable into the foot pedal jack on the machine.
4.2 Threading the Machine
Proper threading is crucial for smooth operation and good stitch quality.
4.2.1 Winding the Bobbin
- Place an empty bobbin onto the bobbin winder spindle.
- Place a spool of thread on the spool pin.
- Guide the thread through the bobbin winding tension disc.
- Wind the thread a few times manually around the bobbin.
- Push the bobbin winder spindle to the right.
- Turn on the machine (using hand switch or foot pedal) to start winding. Stop when the bobbin is full.
- Cut the thread and push the bobbin winder spindle back to the left. Remove the bobbin.
4.2.2 Inserting the Bobbin
- Open the bobbin cover plate.
- Insert the wound bobbin into the bobbin case, ensuring the thread unwinds in the correct direction (usually counter-clockwise).
- Pull the thread through the tension spring and into the thread guide slot.
- Leave a tail of about 4-6 inches of thread. Close the bobbin cover.
4.2.3 Threading the Upper Thread
- Raise the presser foot lever.
- Place a spool of thread on the spool pin.
- Guide the thread through the upper thread guide.
- Follow the numbered threading path indicated on the machine, passing the thread through the tension discs and up through the take-up lever.
- Thread the needle from front to back. The built-in needle threader can assist with this.
- Pull the upper thread under the presser foot, leaving a tail of about 4-6 inches.
4.2.4 Bringing Up the Bobbin Thread
- Hold the upper thread gently with your left hand.
- Turn the handwheel towards you (counter-clockwise) to lower the needle completely and then raise it again.
- As the needle rises, it will catch the bobbin thread, forming a loop.
- Pull the loop to bring the bobbin thread up through the needle plate opening.
- Pull both the upper and bobbin threads under the presser foot and towards the back of the machine.
5. Operating Instructions
5.1 Selecting a Stitch Pattern
Your machine offers 12 built-in stitch patterns. Rotate the Stitch Selector Dial to choose the desired stitch (numbered 1-12).
- Stitches 1-4: Straight stitches for basic sewing.
- Stitches 5-8: Zigzag stitches for finishing edges or decorative purposes.
- Stitches 9-12: Decorative or specialized stitches.
5.2 Adjusting Speed
Use the Speed Switch (L/H) to select between two sewing speeds:
- L (Low): Recommended for beginners or intricate work.
- H (High): For faster sewing on straight seams.
5.3 Starting to Sew
- Place the fabric under the presser foot.
- Lower the presser foot lever.
- Turn the handwheel to lower the needle into the fabric at the starting point.
- Choose your preferred method to start sewing:
- Foot Pedal: Press the foot pedal to start sewing. Release to stop.
- Hand Switch: Slide the hand switch to the "ON" position to start sewing. Slide back to "OFF" to stop.
- Guide the fabric gently as it feeds through the machine. Do not pull or push the fabric forcefully.
5.4 Reverse Stitching
To reinforce the beginning and end of a seam, press and hold the Reverse Key while sewing. The machine will sew backward. Release the key to resume forward sewing.
5.5 Finishing a Seam
- Sew a few reverse stitches at the end of your seam to secure it.
- Stop the machine.
- Raise the needle to its highest position by turning the handwheel.
- Raise the presser foot lever.
- Pull the fabric gently towards the back of the machine.
- Use the built-in thread cutter or a pair of scissors to cut the threads, leaving a tail of about 4-6 inches.
6. Maintenance
Regular maintenance ensures your sewing machine remains in good working condition.
- Cleaning: Regularly clean lint and dust from the bobbin area and feed dogs using a small brush. Always unplug the machine before cleaning.
- Needle Replacement: Replace the needle frequently, especially if it becomes bent, dull, or if you notice skipped stitches. Ensure the flat side of the needle faces the back of the machine when inserting.
- Storage: When not in use, store the machine in a dry, dust-free environment.
7. Troubleshooting
Here are some common issues and their solutions:
| Problem | Possible Cause | Solution |
|---|---|---|
| Skipped Stitches | Incorrectly threaded needle, bent needle, wrong needle for fabric. | Re-thread the machine, replace the needle, use appropriate needle size/type. |
| Thread Breaking | Incorrect tension, poor quality thread, needle inserted incorrectly, burr on needle plate. | Check tension settings, use good quality thread, re-insert needle correctly, check for burrs. |
| Machine Jamming | Thread tangled in bobbin area, fabric pulled forcefully. | Turn off and unplug, clear tangled threads from bobbin case, ensure fabric is fed gently. |
| Uneven Stitches | Incorrect tension, improper threading, fabric not feeding smoothly. | Adjust tension, re-thread both upper and bobbin threads, guide fabric evenly. |
If problems persist, please contact customer support.
8. Specifications
- Model Number: UFR-705
- Product Dimensions: 10.8" (W) x 10.2" (H) x 4.8" (D)
- Item Weight: 5.21 pounds
- Built-in Stitches: 12
- Speed Settings: 2 (High/Low)
- Power Source: Electric
- Color: Pink
- Manufacturer: YOUBAO
- UPC: 712885845781
9. Warranty and Support
This DONYER POWER Electric Sewing Machine comes with a 1 Year Limited Warranty. Please refer to your purchase documentation for specific terms and conditions.
For technical support, troubleshooting assistance, or warranty claims, please contact DONYER POWER customer service through the retailer where the product was purchased or visit the official DONYER POWER website for contact information.
Note: As every product needs to be verified for feasibility in the final step of the production process, you may observe a small square piece of fabric with sewing marks upon receipt. This is normal and indicates quality testing.
10. Important Note Regarding Videos
While this product may have associated videos, the provided data does not include specific URLs or creator information necessary to embed them according to the specified requirements (e.g., creator_type: "Seller"). Therefore, no videos are embedded in this manual.