
1. Introduction
This manual provides essential information for the safe and effective use of your genuine Mountfield/Castel Garden Ride-on Mower High Lift Blade. This blade is designed for specific Castel Garden ride-on mower models to ensure optimal cutting performance. Please read this manual thoroughly before installation and operation to prevent injury and ensure proper function.
2. Safety Information
WARNING: Mower blades are extremely sharp and can cause severe injury. Always handle with extreme caution.
- Always wear heavy-duty gloves when handling the blade.
- Ensure the mower engine is off, the spark plug wire is disconnected, and the parking brake is engaged before performing any maintenance or blade replacement.
- Never attempt to sharpen or modify the blade unless you are properly trained and equipped. Improper sharpening can lead to blade imbalance and dangerous operation.
- Keep hands, feet, and clothing away from the blade area during operation.
- Inspect the blade regularly for damage, cracks, or excessive wear. Replace damaged blades immediately.
3. Package Contents
Verify that your package contains the following item:
- 1 x Genuine Mountfield/Castel Garden Ride-on Mower High Lift Blade (Part No. 182004359/0)
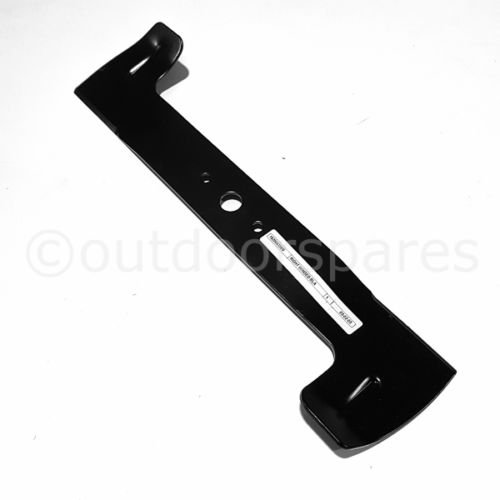
Image: Genuine Mountfield Castel Garden Ride-on Mower High Lift Blade. This image displays the high lift blade, typically featuring a curved design at the ends to create an upward airflow for better grass collection.
4. Setup (Installation)
Follow these steps to safely install the new high lift blade:
- Prepare the Mower: Park the ride-on mower on a flat, stable surface. Turn off the engine, remove the ignition key, disconnect the spark plug wire, and engage the parking brake. Allow the engine and blade to cool if recently operated.
- Access the Blade: Depending on your mower model, you may need to raise the front of the mower or remove the cutting deck to access the blade. Consult your specific mower's owner's manual for detailed instructions on accessing the blade.
- Remove the Old Blade: While wearing heavy-duty gloves, use a wrench or a blade removal tool to loosen and remove the blade bolt(s) holding the old blade in place. Note the orientation of the old blade for correct installation of the new one.
- Inspect Components: Before installing the new blade, inspect the blade spindle, washers, and bolts for any damage or wear. Replace any worn components as necessary.
- Install the New Blade: Position the new high lift blade (Part No. 182004359/0) onto the spindle, ensuring the cutting edge is facing the correct direction (typically upwards towards the deck). The curved ends of the blade should point upwards to create the high lift action. Secure it with the blade bolt(s) and washers.
- Tighten the Bolt(s): Tighten the blade bolt(s) securely to the torque specifications provided in your mower's owner's manual. Overtightening or undertightening can be dangerous.
- Reassemble and Test: Reattach the cutting deck (if removed) and reconnect the spark plug wire. Start the mower and engage the blade briefly to ensure it spins smoothly without excessive vibration. If vibration occurs, immediately shut off the mower and recheck the blade installation.
5. Operating
Once the blade is correctly installed, operate your ride-on mower according to its owner's manual. The high lift design of this blade is optimized for efficient grass collection and a clean cut, especially in conditions where grass bagging is desired.
- Always ensure the cutting deck is clear of debris before starting.
- Maintain a safe distance from the discharge chute during operation.
- Avoid striking hard objects (rocks, roots, metal) as this can damage the blade and mower.
6. Maintenance
Regular maintenance of your blade ensures safety and extends its lifespan.
- Cleaning: After each use, clean grass clippings and debris from the blade and underside of the cutting deck. This prevents buildup that can affect cutting performance and balance.
- Inspection: Before each use, visually inspect the blade for any signs of damage, such as bends, cracks, nicks, or excessive wear. A damaged blade can be dangerous and should be replaced immediately.
- Sharpening: While this blade can be sharpened, it is recommended to have this done by a qualified service technician to ensure proper balance and angle. An unbalanced blade can cause excessive vibration and damage to the mower.
- Replacement: Replace the blade when it becomes excessively worn, bent, or damaged beyond safe repair. The typical lifespan of a blade varies depending on usage and conditions.
7. Troubleshooting
If you experience issues related to the blade, consider the following:
| Problem | Possible Cause | Solution |
|---|---|---|
| Uneven cut | Dull or bent blade; incorrect blade installation; uneven tire pressure on mower. | Inspect and replace/sharpen blade; re-install blade correctly; check mower tire pressure. |
| Excessive vibration | Unbalanced blade (bent or improperly sharpened); loose blade bolt; debris on blade/spindle. | Inspect blade for damage/balance; tighten blade bolt to specification; clean blade and spindle area. |
| Poor grass collection | Dull blade; wet grass; cutting too much grass at once; clogged deck. | Sharpen or replace blade; mow when grass is dry; raise cutting height; clean underside of deck. |
8. Specifications
- Part Number: 182004359/0 (Right Hand High Lift Blade)
- Length: Approximately 42 cm (420 mm)
- Type: High Lift
- Compatibility: Designed for various Castel Garden ride-on mower models, including but not limited to: CG 84 (2012-2017), CG 84 H (2013-2017), XDC 135 HD (2012-2017), XDC 140 (2012-2018), XDC 140 G (2015-2018), XDC 140 HD (2012-2018), XDC 140 HDG (2015), XDC 150 (2015-2018), XDC 150 HD (2015-2018).
- Manufacturer: Genuine UK Supplied Part
- ASIN: B078TGN4PK
9. Warranty and Support
For warranty information, please refer to the documentation provided with your original purchase or contact the seller directly. This genuine replacement part is manufactured to high standards, and any specific warranty claims should be directed to the point of purchase or the official Mountfield/Castel Garden service network.
For technical support or further assistance, please contact your authorized Mountfield or Castel Garden dealer or the seller from whom you purchased this blade.