Introduction
This manual provides comprehensive instructions for the assembly, operation, maintenance, and troubleshooting of your Mcage Extra Large Heavy Duty Stacker Breeding Breeder Parrot Aviary Bird Rolling Cage. Designed for breeding and housing various bird species, from small to large parrots, this durable wrought iron cage offers a secure and spacious environment. Please read this manual thoroughly before assembly and use to ensure proper setup and long-term functionality.

Image: The Mcage Double Stacker Breeding Bird Cage, showcasing its two-tier design and spacious interior, suitable for multiple birds.
Product Features
- Spacious and Durable Wrought Iron Construction: Designed for longevity and security.
- Double Stackable Design: Allows for two independent cage sections.
- Safety Locks: Equipped on main doors for enhanced security.
- Tight 1/2-inch Bar Spacing: Suitable for small to large size parrots and birds, with 4mm bar thickness.
- Large Main Swing Out Doors: Two per cage section, with safety locks.
- Side Breeding/Feeding Doors: Two per cage section for convenience.
- Slide-Out Metal Trays: Two per cage section for easy cleaning.
- Slide-Out Metal Grates: Two per cage section, positioned above trays.
- Stainless Steel Feeder Cups: Six included, designed for easy access.
- Wooden Stand Perches: Two included for bird comfort.
- Heavy Duty Rolling Casters: Four casters for mobility.
Components List
Before assembly, ensure all components are present and undamaged. If any parts are missing or damaged, contact customer support.
- Cage Panels (Front, Back, Sides, Top, Bottom for each section)
- Connecting Rods/Bars
- Base Frame with Caster Mounts
- 4 x Heavy Duty Rolling Casters
- 2 x Slide-Out Metal Trays (one per cage section)
- 2 x Slide-Out Metal Grates (one per cage section)
- 6 x Stainless Steel Feeder Cups (3 per cage section)
- 2 x Wooden Stand Perches (1 per cage section)
- Hardware (various screws, nuts, washers for assembly)
- Feeder Door Mechanisms
- Main Door Latches
- Side Door Latches
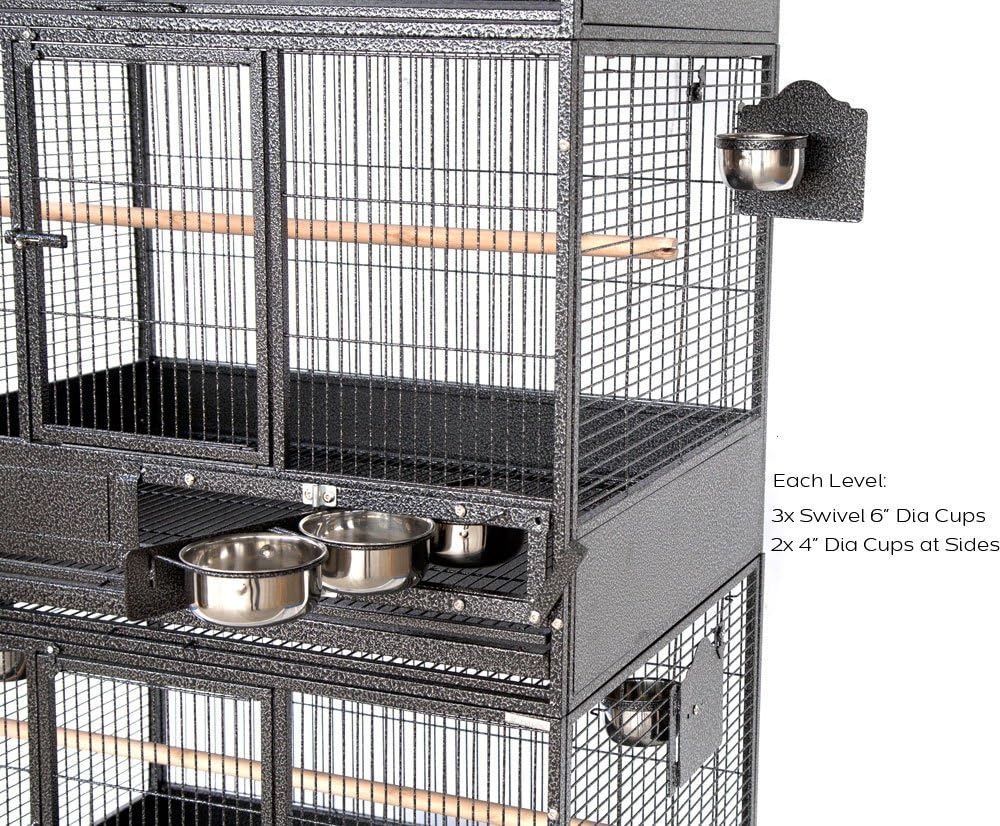
Image: Detail of the stainless steel feeder cups and their secure mounting within the cage structure.

Image: View of the pull-out metal tray and grate system for easy cleaning access.
Setup and Assembly
Assembly requires careful attention to detail. It is recommended to have two people for easier assembly. Lay out all parts and identify them before beginning.
- Unpack and Identify Parts: Carefully remove all components from the packaging. Refer to the Components List and the provided diagrams (if any) to identify each piece. Note that screws come in various sizes; organize them by length and head type.
- Assemble the Base Frame: Attach the four heavy-duty rolling casters to the designated points on the bottom frame of the cage. Ensure they are securely tightened.
- Assemble the Lower Cage Section:
- Connect the side panels to the front and back panels using the appropriate medium-sized screws, nuts, and washers. Ensure all connections are firm.
- Attach the bottom grate and tray support rails.
- Install the main swing-out doors and side breeding/feeding doors. Ensure the latches are correctly oriented to face the middle of the cage for the main doors.
- For the feeder door assembly (the one holding three bowls), use the thickest short screws, washers, and nuts for the swivel mechanism. The longer screws are for the overall feeder door assembly.
- Insert the slide-out metal grate and metal tray into their respective slots.
- Assemble the Upper Cage Section: Repeat the steps for assembling the lower cage section.
- Stack the Cage Sections: Carefully lift the assembled upper cage section and align it directly on top of the lower cage section. Secure the two sections together using the designated connecting hardware. This step may require two people due to the weight and size. Be mindful of finger placement when tightening screws in tight spaces.
- Install Feeder Cups and Perches: Place the stainless steel feeder cups into the designated swivel feeder doors and side feeder openings. Insert the wooden stand perches through the cage bars at desired heights.
- Final Inspection: Double-check all screws, nuts, and latches to ensure they are securely fastened. Test all doors and moving parts for proper function.
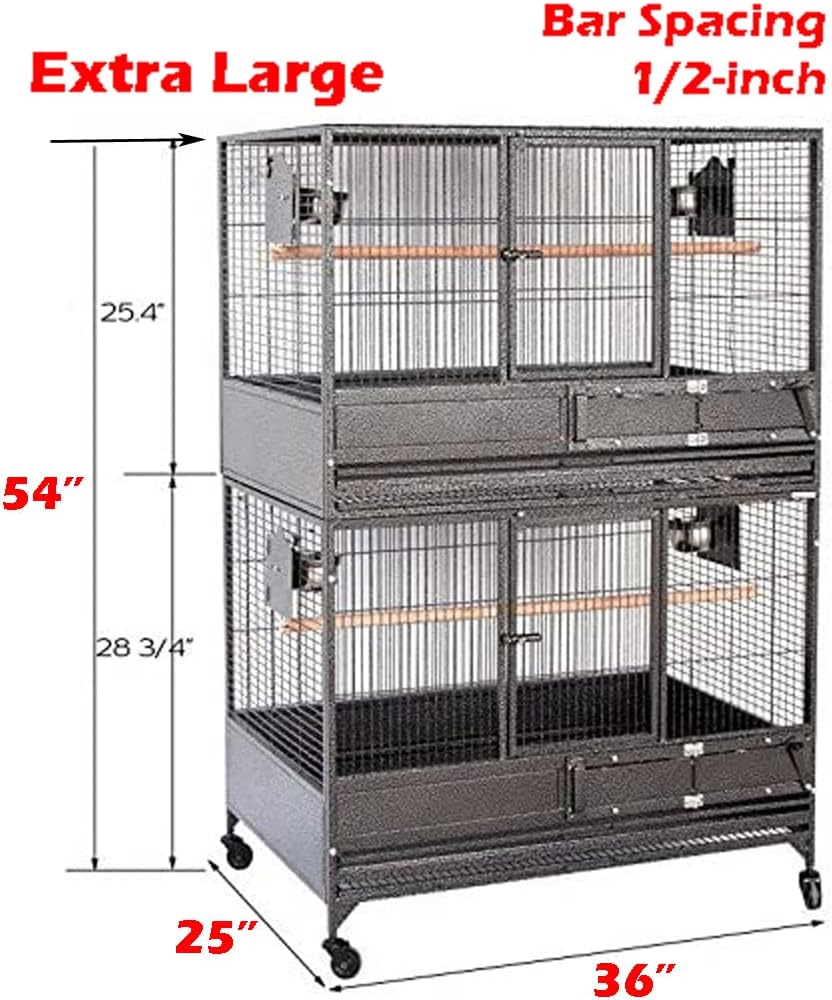
Image: Diagram illustrating the overall dimensions of the double stacker cage, including height, width, and depth, along with bar spacing.

Image: Detail of the advanced lock mechanism on the cage door, designed for enhanced security.
Operating Instructions
- Feeding: Utilize the swing-out feeder doors to easily replenish food and water without opening the main cage doors. Ensure feeder cups are securely placed to prevent spills and bird escape. The side doors can also be used for feeding smaller dishes.
- Accessing Birds: Use the large main swing-out doors for bird entry and exit, or for reaching inside the cage. Always ensure the safety locks are engaged after opening and closing.
- Cleaning: The slide-out metal grates and trays allow for convenient waste removal. Simply pull them out, empty, clean, and slide back into place. This minimizes disturbance to your birds.
- Mobility: The heavy-duty rolling casters allow for easy movement of the cage. Engage the wheel locks when the cage is in its desired position to prevent accidental movement.

Image: The swing-out feeder door mechanism, allowing for easy access to food and water bowls without fully opening the cage.
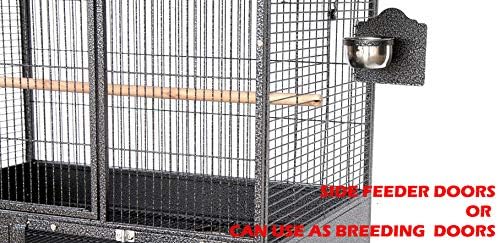
Image: The side doors of the cage, which can be utilized for additional feeding access or as breeding box attachments.
Maintenance
- Daily Cleaning: Remove and clean feeder cups daily. Empty and wipe down the slide-out trays.
- Weekly Deep Cleaning: Remove birds (if possible), perches, and toys. Thoroughly clean all cage surfaces, grates, and trays with a bird-safe disinfectant. Rinse thoroughly and allow to dry completely before returning birds.
- Regular Inspection: Periodically inspect the cage for any signs of wear, damage, or loose components. Pay close attention to bar integrity, door latches, and wheel functionality. Tighten any loose screws.
- Perch Maintenance: Clean wooden perches regularly. Replace them if they become excessively chewed or soiled to prevent bacterial growth.
Troubleshooting
- Issue: Difficulty during assembly.
- Solution: The assembly process can be intricate. Refer to the "Setup and Assembly" section carefully. Pay close attention to screw lengths and their corresponding parts. It is highly recommended to have a second person assist with assembly, especially when connecting larger panels and stacking sections. If specific parts do not align, re-check their orientation and ensure no components are bent.
- Issue: Cage wires appear thin or bend easily, especially with larger birds.
- Solution: While the cage is designed for various bird sizes, very large and strong-beaked parrots (e.g., African Greys, large Cockatoos) may exert significant force on the bars. Regularly inspect the cage for any bent or compromised bars. If damage occurs, consider reinforcing affected areas or consulting with the manufacturer for potential solutions or alternative cage options for extremely powerful birds.
- Issue: Feeder doors are difficult to operate or bowls are not easily accessible.
- Solution: Ensure the feeder door mechanisms are correctly installed and aligned. The swivel mechanism for the three-bowl feeder door requires specific screws for proper rotation. Check that no cage bars or other components are obstructing the door's movement. Ensure bowls are fully seated in their holders.
- Issue: Rolling casters break or do not move smoothly.
- Solution: The casters are designed for mobility but may experience wear, especially with frequent movement of a heavy, loaded cage. Avoid dragging the cage over uneven surfaces. If a caster breaks at the shaft, replacement may be difficult if the shaft is lodged. Contact the manufacturer or a hardware specialist for advice on replacement casters that can support the cage's weight and for assistance with removal if necessary.
Specifications
| Attribute | Detail |
|---|---|
| Brand | Mcage |
| Model Name | 11028 |
| Overall Cage Dimensions (Double Stacker) | 36"W x 24"D x 54"H inches |
| Each Cage Section Dimensions | 36"W x 24"D x 23"H inches |
| Bar Spacing | 1/2-inch (12.7 mm) |
| Bar Thickness | 4mm |
| Material | Wrought Iron (Metal), Stainless Steel (Bowls) |
| Color | Black Vein |
| Target Audience | Birds (Breeding Parrots, Aviary Birds) |
| Recommended Breeds | Small, Medium, and Large Breeds (e.g., African Greys, Cockatoos, Amazons, Conures, Cockatiels, Parakeets) |
| Specific Uses | Indoor, Outdoor |
Safety Information
- Always ensure all cage doors and latches are securely closed to prevent bird escape.
- Regularly check for any sharp edges or broken wires that could injure your bird.
- Position the cage in a stable location, away from direct sunlight, drafts, and extreme temperatures.
- Keep cleaning supplies and other hazardous materials out of reach of birds.
- Supervise children and other pets around the bird cage.
- Ensure the cage is appropriate for the size and species of your bird to prevent injury or escape.
Warranty and Support
For specific warranty information, return policies, or technical support regarding your Mcage bird cage, please refer to the documentation provided at the time of purchase or contact the seller directly. Keep your purchase receipt as proof of purchase.
For general inquiries or to purchase replacement parts, you may visit the official Mcage store or contact their customer service department. Contact details are typically available on the product packaging or the seller's website.