
Introduction
This manual provides essential instructions for the proper installation, operation, and maintenance of your Panini Franking Roller, model CA100443-0. This roller is designed as a replacement component for Panini I:Deal, mI:Deal, and wI:Deal check scanners. It applies an "ELECTRONICALLY DEPOSITED" stamp to the front of scanned items.
Please read this manual thoroughly before attempting any procedures to ensure correct usage and to maximize the lifespan of the product.
Product Overview
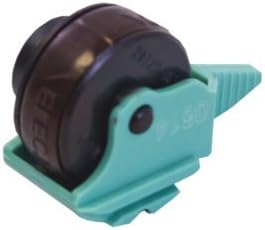
Image 1: Panini Franking Roller CA100443-0. This image displays the franking roller, which is a compact, cylindrical component with a teal-colored plastic housing. The roller itself is dark brown/black, and the housing features a small lever or tab for installation/removal. The word "ELEC" is visible on the side of the roller, indicating its function.
The Panini Franking Roller is a critical consumable part for compatible Panini check scanners. Its primary function is to imprint a clear "ELECTRONICALLY DEPOSITED" message on physical checks or documents as they are processed, providing a physical record of electronic deposit.
- Compatibility: Designed for Panini I:Deal, mI:Deal, and wI:Deal scanner models.
- Function: Stamps "ELECTRONICALLY DEPOSITED" on items.
- Impressions: Capable of printing up to 10,000 impressions.
- Shelf Life: Approximate shelf life of 12 months.
Setup and Installation
Before installing the new franking roller, ensure your scanner is powered off and disconnected from its power source to prevent accidental operation or injury.
- Locate Roller Compartment: Refer to your specific Panini scanner's user manual to identify the franking roller compartment. This is typically accessible via a small door or panel on the scanner.
- Remove Old Roller: Carefully unlatch or slide out the existing franking roller. Dispose of the old roller responsibly.
- Unpack New Roller: Remove the new Panini Franking Roller (CA100443-0) from its packaging. Avoid touching the roller surface directly to prevent contamination.
- Insert New Roller: Align the new roller with the guides in the compartment. Gently push or slide it into place until it clicks or locks securely. Ensure it is seated correctly.
- Close Compartment: Close the roller compartment door or panel.
- Power On: Reconnect the scanner to its power source and power it on.
- Software Verification: Verify that the franking function is enabled and recognized by your scanner's software. Consult your scanner's software documentation for specific instructions on enabling or testing the franking feature.
Note: Franking functionality must be supported and enabled by your scanner's software for the roller to operate correctly.
Operating Instructions
Once installed and verified by the scanner software, the franking roller operates automatically during the scanning process.
- Document Placement: Place checks or documents into the scanner's feeder as per your scanner's standard operating procedures.
- Initiate Scan: Start the scanning process through your scanner's software application.
- Automatic Franking: As each item passes through the scanner, the franking roller will automatically apply the "ELECTRONICALLY DEPOSITED" stamp.
- Verify Impression: Periodically inspect scanned documents to ensure the franking impression is clear, legible, and correctly positioned.
Important: The quality of the franking impression may degrade over time as the roller approaches its impression limit or shelf life.
Maintenance
Regular maintenance ensures optimal performance and longevity of your franking roller and scanner.
- Inspection: Regularly inspect the franking roller for signs of wear, damage, or debris accumulation.
- Cleaning: If necessary, gently clean the roller surface with a lint-free cloth lightly dampened with isopropyl alcohol. Ensure the roller is completely dry before re-use. Avoid harsh chemicals.
- Replacement: Replace the franking roller when the impression quality degrades significantly, or after approximately 10,000 impressions, or after 12 months of shelf life, whichever comes first.
- Storage: Store new, unused franking rollers in their original sealed packaging in a cool, dry place away from direct sunlight.
Troubleshooting
This section addresses common issues you might encounter with the franking roller.
| Problem | Possible Cause | Solution |
|---|---|---|
| No franking impression or faint impression. |
|
|
| Smudged or unclear impression. |
|
|
If troubleshooting steps do not resolve the issue, please contact Panini customer support or your authorized service provider.
Specifications
| Feature | Detail |
|---|---|
| Model Number | CA100443-0 |
| Brand | Panini |
| Compatibility | Panini I:Deal, mI:Deal, wI:Deal scanners |
| Impression Capacity | Up to 10,000 impressions |
| Approximate Shelf Life | 12 months |
| Item Weight | 0.634 ounces (approx. 18 grams) |
| Package Dimensions | 2.6 x 1.42 x 1.26 inches |
| UPC | 742436741101 |
Warranty Information
Panini franking rollers are consumable items. Specific warranty details for consumable parts may vary. Please refer to the warranty documentation provided with your Panini scanner or contact Panini customer support for detailed information regarding the warranty coverage for replacement parts like franking rollers.
Typically, consumable items are covered against manufacturing defects for a limited period from the date of purchase. Wear and tear from normal use, or damage due to improper installation or maintenance, are generally not covered.
Customer Support
For technical assistance, troubleshooting beyond this manual, or to inquire about replacement parts, please contact Panini customer support:
- Panini Official Website: www.panini.com
- Support Contact: Refer to the "Support" or "Contact Us" section on the official website for regional contact information, phone numbers, and email addresses.
When contacting support, please have your scanner model number and the franking roller model number (CA100443-0) readily available.