LoraTap HU-XI-201
LoraTap Wireless E27 Lamp Socket Kit User Manual
Model: HU-XI-201
Product Overview
The LoraTap Wireless E27 Lamp Socket Kit provides a convenient solution for controlling your lighting remotely without the need for complex wiring. This kit includes two E27 lamp sockets with integrated receivers and a wireless remote control. It is designed for use with LED, CFL, and fluorescent bulbs, offering a maximum power output of 30W per socket.

Image: The LoraTap Wireless E27 Lamp Socket Kit, showing two white E27 lamp sockets and a round white remote control with ON/OFF buttons.
Package Contents
- 2 x E27 Lamp Sockets (with integrated receiver)
- 1 x Wireless Remote Control (transmitter)
- 1 x CR2032 Battery (pre-installed in remote)
- Installation Accessories (e.g., double-sided adhesive for remote base)
- 1 x User Manual (this document)
Specifications
| Feature | Detail |
|---|---|
| Lamp Socket (Receiver) | |
| Voltage | 85-265 VAC, 50/60 Hz |
| Max Current | 2.5 A |
| Max Power | 30W |
| Socket Type | E27 |
| Compatible Bulb Types | LED, CFL, Fluorescent lamps |
| Incompatible Bulb Types | Incandescent, Tungsten, Halogen bulbs (will damage socket) |
| Dimensions (Socket) | 6.8 cm (Diameter) x 4 cm (Height added to fixture) |
| Remote Control (Transmitter) | |
| Buttons | 2 ON / 2 OFF (for controlling two sockets separately) |
| Wireless Range (Indoor) | Up to 30 meters (through walls) |
| Wireless Range (Outdoor) | Further than indoor (without obstacles) |
| Radio Frequency | 868 MHz (self-learning program) |
| Button Lifespan | > 220,000 clicks |
| Battery Type | CR2032 (included) |
| Battery Life | > 10 years |
| Dimensions (Remote) | 6.8 cm (Diameter) x 1.6 cm (Thickness) |
| General | |
| Model Number | HU-XI-201 |
| Certifications | CE, RoHS |
| Manufacturer | LoraTap |

Image: Detailed diagram illustrating the dimensions of the E27 lamp socket (68mm diameter, 40mm added length) and indicating compatibility with LED, fluorescent, and CFL bulbs, while explicitly showing incompatibility with incandescent, tungsten, and halogen lamps.
Setup and Installation
- Prepare the Lamp Fixture: Ensure the power to your lamp fixture is turned off at the main switch before installation.
- Install the Lamp Socket: Screw the LoraTap E27 lamp socket into your existing E27 lamp fixture. Ensure it is securely tightened.
- Install the Bulb: Screw your compatible E27 LED, CFL, or fluorescent bulb into the LoraTap lamp socket.
- Power On: Restore power to your lamp fixture.
- Remote Control Pairing (Pre-paired): The lamp sockets and remote control are typically pre-paired at the factory. If they are not responding, or if you wish to pair additional remotes/sockets, refer to the "Pairing Instructions" section.
- Mount the Remote Control: The remote control features a magnetic base, allowing it to be attached to metallic surfaces. Alternatively, use the included double-sided adhesive to fix the remote's base to a wall or any flat surface. The remote can be detached from its base for portable use.

Image: A person demonstrating the easy installation by screwing a standard E27 bulb into the LoraTap lamp socket, which is then ready to be screwed into a light fixture.
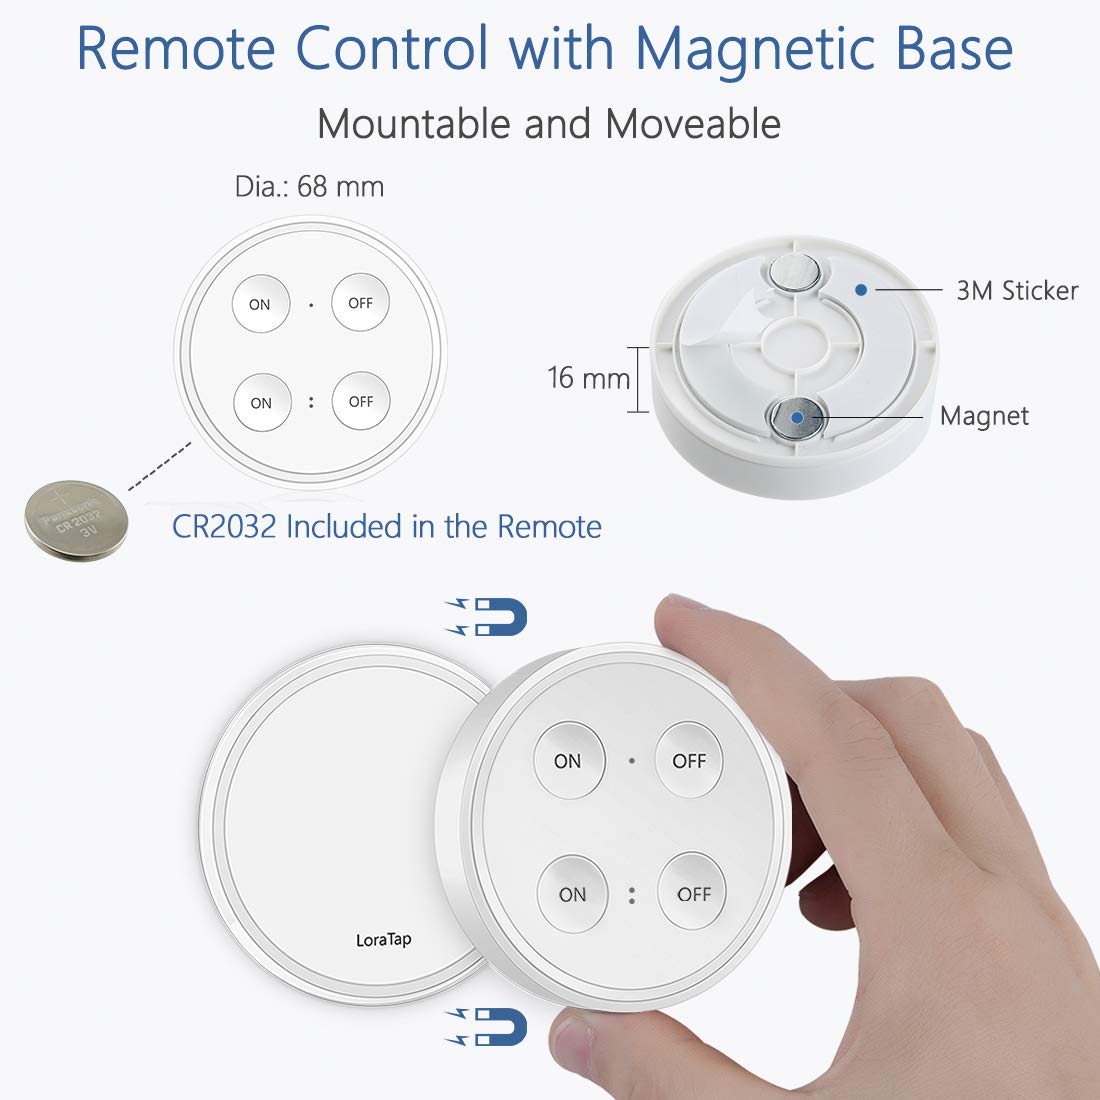
Image: An exploded view of the remote control showing its magnetic base, the 3M adhesive sticker for mounting, and the CR2032 battery compartment. The remote can be easily removed from its wall-mounted base.
Operating Instructions
The LoraTap remote control is designed to operate two lamp sockets independently. Each socket corresponds to a specific set of ON/OFF buttons on the remote.
- Turning On/Off Socket 1: Press the top "ON" button to turn on the first lamp socket. Press the top "OFF" button to turn it off.
- Turning On/Off Socket 2: Press the bottom "ON" button to turn on the second lamp socket. Press the bottom "OFF" button to turn it off.

Image: An illustration showing the remote control with its four buttons (two ON, two OFF) and a visual representation of how it can control two separate light sockets, such as pendant lights in a kitchen.
Pairing Instructions (If needed)
If a lamp socket does not respond to the remote control, or if you wish to pair a new remote or socket, follow these steps:
- Ensure the lamp socket is powered off.
- Turn on the lamp socket. Within 5 seconds of powering on, press and hold the desired "ON" button on the remote control for approximately 3 seconds until the connected bulb flashes once. This indicates successful pairing.
- To unpair a socket from a remote button, turn on the lamp socket. Within 5 seconds, press and hold the desired "OFF" button on the remote control for approximately 3 seconds until the connected bulb flashes once.
Note on Multi-Control:
- One remote control can manage up to 20 lamp sockets.
- One lamp socket can be controlled by up to 5 remote controls.
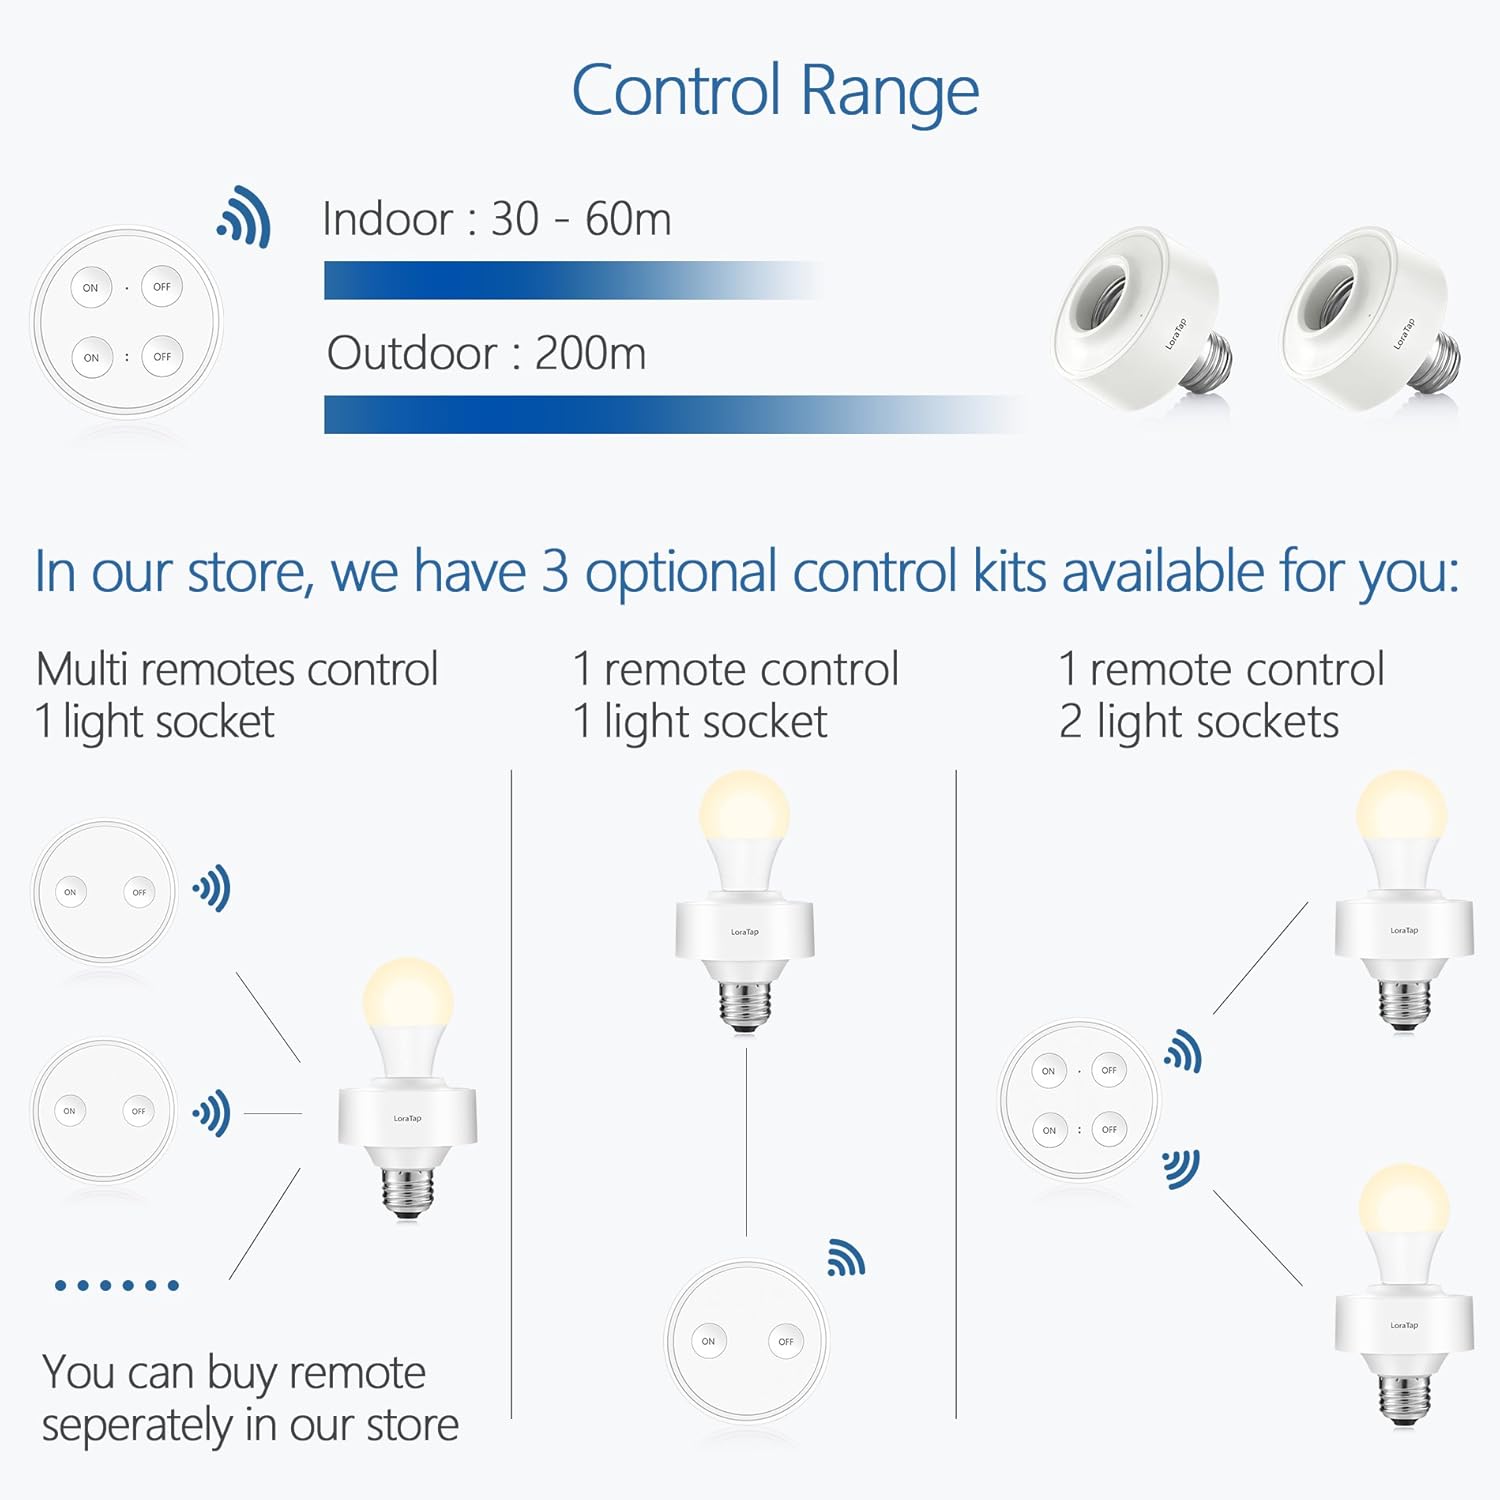
Image: A diagram showing the indoor control range of 30-60 meters and outdoor range of 200 meters. It also illustrates various control configurations: multiple remotes controlling one socket, one remote controlling one socket, and one remote controlling two sockets.
Compatibility and Usage Notes
- This product is designed for use with E27 LED, CFL (Compact Fluorescent Lamp), and fluorescent bulbs only.
- DO NOT use with incandescent, tungsten, or halogen bulbs. Using these types of bulbs will damage the lamp socket and void the warranty.
- Ensure the total power of the connected bulb does not exceed 30W.
- The lamp socket adds approximately 4 cm (1.6 inches) to the length of your light fixture. Please verify that your fixture has sufficient space before installation.
Maintenance
- Cleaning: Wipe the lamp sockets and remote control with a soft, dry cloth. Do not use abrasive cleaners or immerse in water.
- Battery Replacement: The remote control uses a CR2032 battery with an expected lifespan of over 10 years. When the remote's range decreases or it becomes unresponsive, replace the battery. To replace, gently pry open the remote's casing to access the battery compartment. Ensure correct polarity when inserting the new battery.
- Storage: Store the product in a cool, dry place away from direct sunlight and extreme temperatures.
Troubleshooting
| Problem | Possible Cause / Solution |
|---|---|
| Lamp does not turn on/off with remote. |
|
| Remote control range is poor. |
|
| Lamp socket gets hot. |
|
Warranty and Support
LoraTap provides a 2-year warranty for this product from the date of purchase. This warranty covers manufacturing defects and ensures the product meets its specified performance. Please retain your proof of purchase for warranty claims.
For technical support, troubleshooting assistance, or warranty inquiries, please contact LoraTap customer service through the retailer where you purchased the product or visit the official LoraTap website for contact information.
This product is CE and RoHS certified, ensuring compliance with European safety, health, and environmental protection requirements.
Ask a question about this manual
Ask about setup, troubleshooting, compatibility, parts, safety, or missing instructions. Manuals+ will review the question and use this page’s manual context to help answer it.