Waterpik SG_B078J32XBK_US
Waterpik Ultra Plus and Nano Water Flosser Instruction Manual
Model: SG_B078J32XBK_US
Product Overview
The Waterpik Ultra Plus (WP-150W) and Nano (WP-310W) Water Flosser combo pack provides comprehensive oral care. The Ultra Plus model is designed for home use with advanced features, while the Nano Water Flosser offers a compact design ideal for travel. Both models are recognized by the American Dental Association (ADA) for their safety and effectiveness.
Key benefits include effective plaque removal, improved gum health, and suitability for braces and dental work.

Image: Waterpik Ultra Plus and Nano Water Flosser Combo Pack, showing both units and accessories.
Setup Instructions
Waterpik Ultra Plus Water Flosser (WP-150W)
- Fill Reservoir: Lift the hinged lid of the reservoir and fill it with warm water. You may also add mouthwash as desired. Place the reservoir back onto the base.
- Insert Tip: Select the desired Waterpik tip and firmly insert it into the center of the handle until it clicks into place.
- Prime Unit (First Use): If using for the first time, set the pressure control dial to the highest setting (10). Direct the tip into the sink. Turn the unit ON (I) until water flows from the tip. Turn the unit OFF (O).
- Position Handle: Place the handle back into its cradle on the unit.
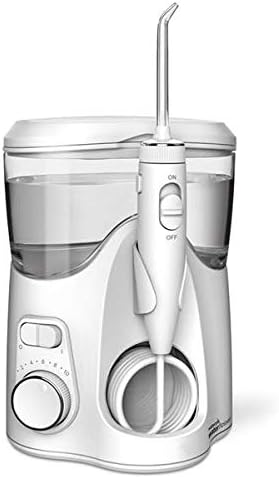
Image: The Waterpik Ultra Plus Water Flosser, showing the main unit with reservoir and handle.
Waterpik Nano Water Flosser (WP-310W)
- Fill Reservoir: Remove the reservoir from the base and fill it with warm water or mouthwash. Place the reservoir back onto the base.
- Insert Tip: Select the desired Waterpik tip and firmly insert it into the center of the handle until it clicks into place.
- Prime Unit (First Use): If using for the first time, set the pressure control dial to the highest setting (3). Direct the tip into the sink. Turn the unit ON (I) until water flows from the tip. Turn the unit OFF (O).
- Position Handle: Place the handle back into its cradle on the unit.

Image: The Waterpik Nano Water Flosser, a compact unit with reservoir and handle.
Operating Instructions
General Usage for Both Models
- Adjust Pressure: For the Ultra Plus, rotate the pressure control dial on the base to your desired setting (1-10). For the Nano, use the dial on its base (1-3). Start with the lowest setting and gradually increase as comfortable.
- Position Yourself: Lean over the sink and place the tip in your mouth. Close your lips enough to prevent splashing, but allow water to flow from your mouth into the sink.
- Start Flossing: Turn the unit ON using the power switch on the base. For the Ultra Plus, you can also use the convenient On/Off slide switch on the handle to start and stop water flow during use.
- Flossing Technique: Direct the water stream at a 90-degree angle to your gumline. Guide the tip along your gumline, pausing briefly between teeth. Continue until you have cleaned all areas of your mouth.
- Finish: Turn the unit OFF when finished. Empty any remaining water from the reservoir.
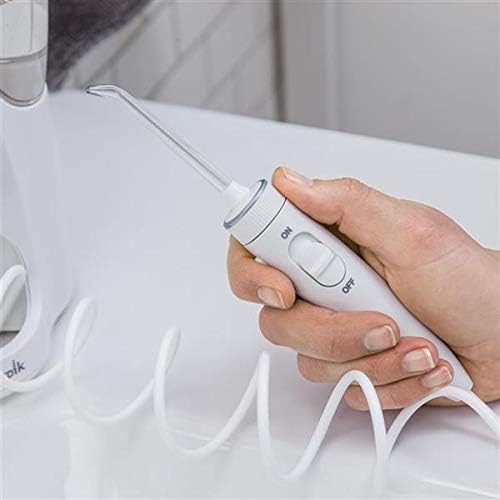
Image: Close-up of the Waterpik Ultra Plus handle, highlighting the on/off slide switch for convenient control.
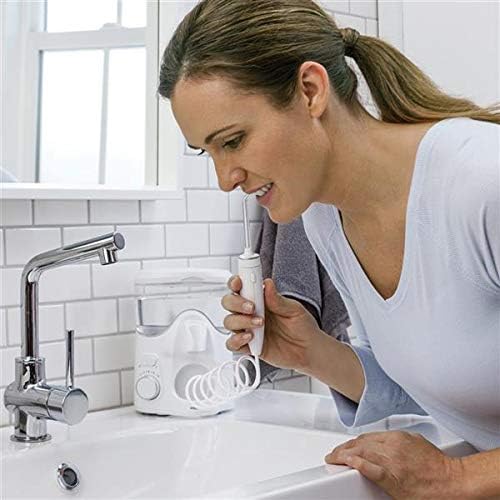
Image: A person using the Waterpik Ultra Plus Water Flosser over a sink, demonstrating proper usage posture.
Maintenance
- Daily Cleaning: After each use, empty any remaining water from the reservoir. For best results, rinse the reservoir with clean water.
- Tip Storage: The Ultra Plus features in-lid storage to keep tips clean and organized. The Nano comes with a premium travel case for compact storage and transport.
- General Cleaning: Wipe the exterior of the unit with a soft cloth and mild, non-abrasive cleaner as needed. Do not immerse the unit in water.
- Mineral Deposits: If hard water is an issue, mineral deposits may build up in your unit. To clean, add 2 tablespoons of white vinegar to a full reservoir of warm water. Run the unit until the reservoir is empty. Rinse by filling the reservoir with clean warm water and running the unit until empty.
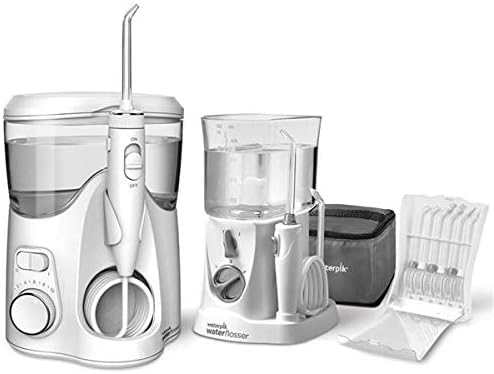
Image: Both Waterpik units displayed with various accessory tips and storage solutions.
Troubleshooting
| Problem | Possible Cause | Solution |
|---|---|---|
| Unit does not turn on. | Not plugged in; power outlet not working. | Ensure unit is securely plugged into a working electrical outlet. |
| Water does not flow. | Reservoir empty; tip not fully inserted; unit not primed. | Fill reservoir; ensure tip clicks into place; prime unit as per setup instructions. |
| Low pressure. | Pressure setting too low; mineral buildup. | Increase pressure setting; perform mineral deposit cleaning. |
| Excessive noise. | Air in pump; unit not on a stable surface. | Ensure reservoir is full and unit is on a flat, stable surface. Some operational noise is normal. |
Specifications
- Brand: Waterpik
- Model Number: SG_B078J32XBK_US (Combo Pack)
- Power Source: Corded Electric (Compatible With 120VAC/60Hz Outlets, For Use In North America Only)
- Special Features: Multiple Pressure Settings, Multiple Tips
- Product Benefits: Removes Plaque, Gum Health
- Package Dimensions: 11.65 x 10.91 x 5.67 inches
- Weight: 4.08 Pounds
- Batteries: 1 Lithium Ion batteries required (likely for internal components or a specific accessory, though the main units are corded).
- First Available: December 19, 2017
Warranty and Support
The Waterpik Ultra Plus model includes a three-year warranty, and the Nano model includes a two-year warranty. For warranty claims, technical support, or additional product information, please contact Waterpik customer service or visit the official Waterpik website.
Manufacturer: Waterpik
For further assistance, refer to the contact information provided on the product packaging or the official Waterpik website: www.waterpik.com
Ask a question about this manual
Ask about setup, troubleshooting, compatibility, parts, safety, or missing instructions. Manuals+ will review the question and use this page’s manual context to help answer it.