1. Introduction
The Cooler Master MasterCase MC500P is a mid-tower PC cabinet designed for enthusiasts seeking flexibility and performance. It features the FreeForm Modular System, allowing for extensive customization of both the exterior and interior layout. This manual provides essential information for setting up, operating, maintaining, and troubleshooting your MC500P cabinet.
Key features include:
- FreeForm Modular System: Customize the case's structure and aesthetics with interchangeable panels and components.
- Flexible Dual Chamber Design: Optimize component layout and cable management.
- Clear View Inside: A tempered glass side panel provides a view of internal components.
- 360mm Liquid Cooling Support: Accommodates large radiators for advanced cooling solutions.
- Drop-Proof Side Panels: Designed for secure handling and durability.
2. Safety Information
Please read and understand these safety instructions before installing or using the product. Failure to do so may result in damage to the product, personal injury, or property damage.
- Always disconnect power from all components before installation or maintenance.
- Handle tempered glass panels with care to prevent breakage.
- Ensure proper grounding for all electrical components.
- Keep the product away from water, moisture, and extreme temperatures.
- Do not attempt to open or repair the product yourself. Refer to qualified service personnel.
- Keep small parts and packaging materials away from children.
3. Package Contents
Verify that all items are present in your package:
- Cooler Master MasterCase MC500P Cabinet
- Accessory Box (containing screws, zip ties, and other small parts)
- User Manual (this document)
4. Setup and Installation
The MasterCase MC500P is designed for easy assembly and customization. Follow these general steps for component installation.
4.1. Understanding the FreeForm Modular System
The FreeForm Modular System allows you to adjust the case's exterior and interior. This includes changing front panels, top covers, and internal layouts.
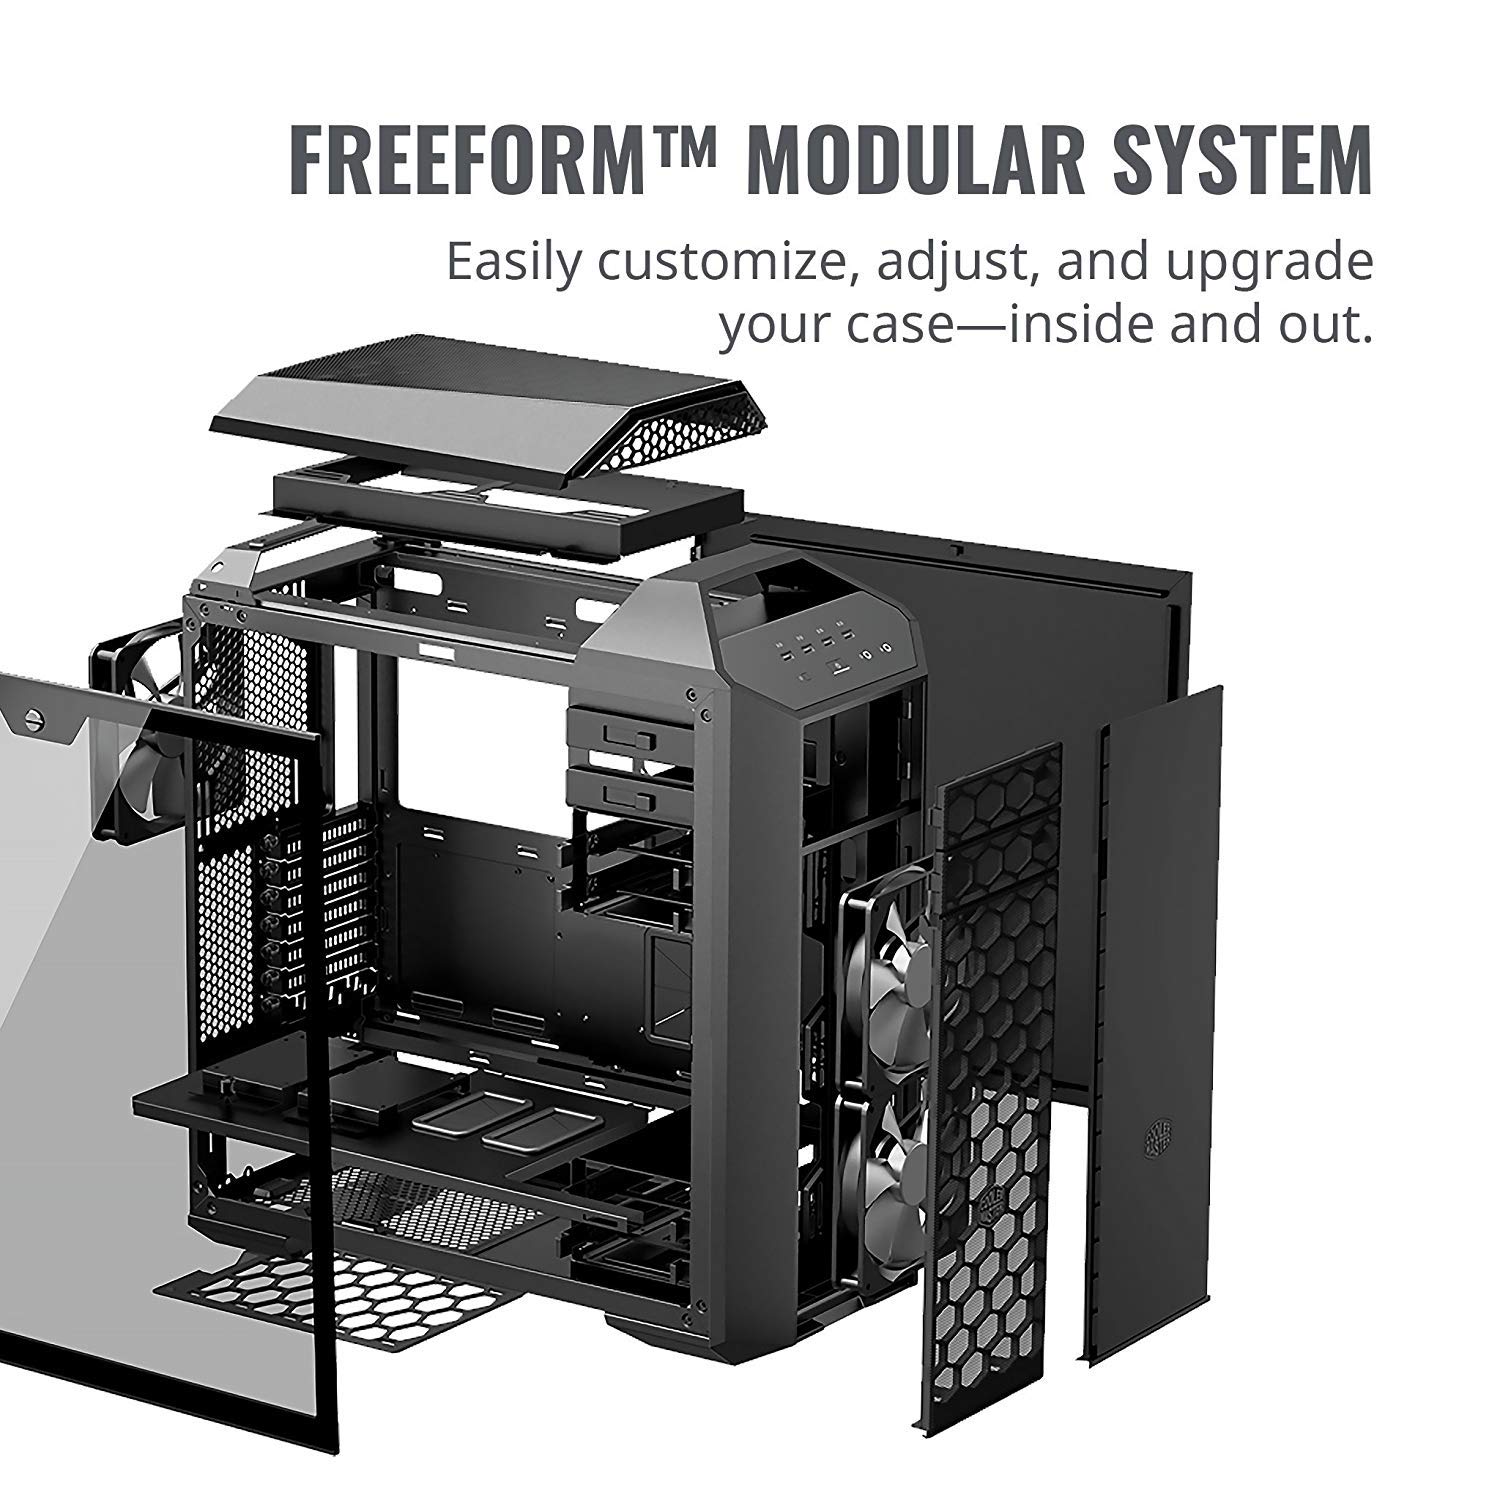
Image: Exploded view illustrating the various modular components of the MasterCase MC500P, including side panels, top cover, and internal brackets.
4.2. Choosing Your Front Panel
The MC500P offers options for front panel aesthetics and airflow, including a solid panel for a minimal look or a mesh panel for enhanced ventilation.

Image: Comparison of the MasterCase MC500P with a solid front panel and a mesh front panel, demonstrating aesthetic and airflow choices.
4.3. Removable Partition Plate
A removable partition plate helps isolate the Power Supply Unit (PSU) and cables for a cleaner build. It can be removed for more flexible build options or to accommodate larger PSUs.

Image: Internal view of the PC cabinet highlighting the removable partition plate designed to separate the PSU and cables from the main compartment.
4.4. General Installation Steps
- Prepare the Case: Remove the side panels. The tempered glass panel is on the left side.
- Install Motherboard: Secure your ATX motherboard to the standoffs.
- Install Power Supply Unit (PSU): Mount the PSU in its designated compartment.
- Install Storage Drives: Mount 2.5-inch SSDs and 3.5-inch HDDs in the drive bays.
- Install Graphics Card and Expansion Cards: Secure PCIe cards into their slots.
- Cable Management: Route cables through the designated cutouts and tie-down points for a clean build and improved airflow.
- Connect Front Panel I/O: Connect the front panel USB, audio, power, and reset cables to your motherboard.
- Reattach Panels: Once all components are installed and cables managed, reattach the side panels.

Image: Internal view of the MasterCase MC500P from the rear-right, showing the spacious interior ready for component installation.

Image: Internal view of the MasterCase MC500P from the front-right, highlighting drive bays and cable routing options.

Image: The MasterCase MC500P with a full system build, showcasing internal components and lighting through the tempered glass panel.
5. Operating the PC Cabinet
The PC cabinet serves as the enclosure for your computer components. Its operation primarily involves using the front panel controls and ensuring proper airflow.
5.1. Front Panel Controls and Ports
The top front panel provides convenient access to essential controls and ports:
- Power Button: Initiates or shuts down the system.
- Reset Button: Restarts the system.
- USB 3.0 Ports: For high-speed data transfer with compatible devices.
- USB 2.0 Ports: For connecting various peripherals.
- Audio Jacks: For headphones and microphones.

Image: Top-front perspective of the MasterCase MC500P, clearly showing the accessible front I/O panel with USB ports and audio jacks.
5.2. Airflow and Cooling
Ensure adequate airflow by keeping the case's vents clear. The MC500P supports multiple fan configurations and liquid cooling solutions to maintain optimal component temperatures.

Image: Three views of the MasterCase MC500P: a solid front panel, a mesh front panel for improved airflow, and the rear panel showing exhaust fan and I/O cutouts.
6. Maintenance
Regular maintenance helps ensure the longevity and optimal performance of your PC cabinet and its components.
- Dust Cleaning: Periodically clean dust filters and internal components using compressed air or a soft brush. Dust accumulation can hinder airflow and cooling efficiency.
- Exterior Cleaning: Wipe the exterior surfaces with a soft, damp cloth. Avoid harsh chemicals that may damage the finish.
- Cable Management: Periodically check cable routing to ensure no cables are obstructing airflow or fan operation.
7. Troubleshooting
This section addresses common issues you might encounter with your PC cabinet.
7.1. No Power / System Not Starting
- Check PSU: Ensure the Power Supply Unit (PSU) is properly connected to the wall outlet and the power switch on the PSU is in the 'ON' position.
- Front Panel Connections: Verify that the front panel power button cable is correctly connected to the motherboard's power header.
- Internal Components: Confirm all internal power cables (24-pin ATX, CPU, GPU, drives) are securely connected.
7.2. Overheating Issues
- Airflow Obstruction: Ensure no cables or components are blocking airflow paths.
- Dust Filters: Clean any accumulated dust from fan filters and vents.
- Fan Configuration: Verify that case fans are installed in the correct orientation (intake/exhaust) for optimal airflow.
7.3. Front Panel USB/Audio Not Working
- Motherboard Connections: Check that the front panel USB and audio cables are securely connected to the corresponding headers on your motherboard.
- Driver Issues: Ensure your motherboard's USB and audio drivers are installed and up to date.
8. Specifications
Detailed technical specifications for the Cooler Master MasterCase MC500P cabinet:
| Feature | Specification |
|---|---|
| Brand | Cooler Master |
| Model Number | MCM-M500P-KG5N-S00 |
| Series | MC500P |
| Case Type | Mid Tower |
| Motherboard Compatibility | ATX |
| Color | Black |
| Material | Alloy Steel |
| Product Dimensions (LxWxH) | 51.2 x 23.5 x 54.8 cm |
| Item Weight | 12.7 kg |
| USB 2.0 Ports | 2 |
| Hardware Platform | Windows 10 |
9. Warranty and Support
9.1. Warranty Information
The Cooler Master MasterCase MC500P cabinet typically comes with a 2-year warranty from the date of purchase. This warranty covers manufacturing defects and ensures the product meets specified quality standards. Please retain your proof of purchase for warranty claims.
For specific warranty terms and conditions, refer to the official Cooler Master website or contact their customer support.
9.2. Customer Support
If you encounter any issues not covered in this manual or require further assistance, please contact Cooler Master customer support through their official website. You may need to provide your product model number (MCM-M500P-KG5N-S00) and proof of purchase.
Cooler Master Official Website: www.coolermaster.com