Introduction
This manual provides essential information for setting up, operating, maintaining, and troubleshooting your JDH Labs Tech Mega 2560 Ultra Starter Kit. This comprehensive kit is designed for electronics enthusiasts, students, and professionals, offering a wide range of components and modules for various projects compatible with the Arduino IDE.
Kit Contents
The JDH Labs Tech Mega 2560 Ultra Starter Kit includes a diverse selection of components to facilitate a broad spectrum of electronic projects. Please verify all items are present upon unboxing.

Image: A complete overview of the JDH Labs Tech Mega 2560 Ultra Starter Kit components.
- Arduino MEGA R3 (high quality generic) + USB cable
- WiFi ESP8266 Module
- Bluetooth Master/Slave HC-05 Module
- Plastic storage box with compartments
- AC-DC 12V 2A Adapter (EU/UK)
- Prototype Shield + Mini-Breadboard
- Large Breadboard (830 points)
- Dupont Cables: 10x Female-Female, 10x Male-Female, 10x Male-Male
- Jumper Wires for breadboard
- 6 Buttons with multicolor caps
- PS2-type Joystick Module
- RC-522 RFID Module with white RFID card and RFID keychain
- High-precision Real-Time Clock (RTC) DS3231 Module and EEPROM AT24C32
- PIR Presence Sensor HC-SR501
- Ultrasonic Distance Measurement Sensor HCSR04
- Sound Detector Sensor with programmable threshold
- LM35 Temperature Sensor
- Tilt Detector Sensor
- SG90 Servo Motor
- Stepper Motor (5V)
- ULN2003 Stepper Motor Driver Module
- Active Buzzer 5V
- Passive Buzzer 5V
- LCD 1602 (16 characters * 2 lines)
- MAX7219 LED Display Driver Circuit
- 8x8 LED Matrix Display
- 1-Digit 7-Segment Display
- 4-Digit 7-Segment Display
- Single Relay Module
- Infrared Remote Control 38kHz
- 38kHz Infrared Decoder Receiver (1838 type)
- Infrared Phototransistor (Flame Sensor)
- Infrared LED
- Light Sensor (Photoresistor)
- 10x 5mm RED diffuse LEDs
- 10x 5mm GREEN diffuse LEDs
- 10x 5mm YELLOW diffuse LEDs
- 5x 5mm WHITE ultrabright diffuse LEDs
- 3x 5mm Red/Green/Blue RGB diffuse LEDs
- 74HC595 Shift Register Circuit (Serial to Parallel)
- NPN Transistor SS8050
- 1kOhm Adjustable Knob Resistor (Potentiometer)
- 10kOhm Adjustable Knob Resistor (Potentiometer)
- Resistor Pack 1/4W 1% precision (10pcs each: 100, 220, 330, 470, 1K, 2K2, 4k7, 10K, 22K, 47K, 100K, 220K, 1M)
- 40-pin 2.54mm Header Strip
- 40-pin 2.54mm Right-Angle Header Strip
- 5x 0.1uF Tantalum Bypass Capacitors
- 5x Header Jumpers
Setup
1. Initial Inspection
Upon receiving your kit, carefully unpack all components. Refer to the 'Kit Contents' section to ensure all items are present and undamaged. The kit is organized in a two-level plastic box for easy transport and storage.
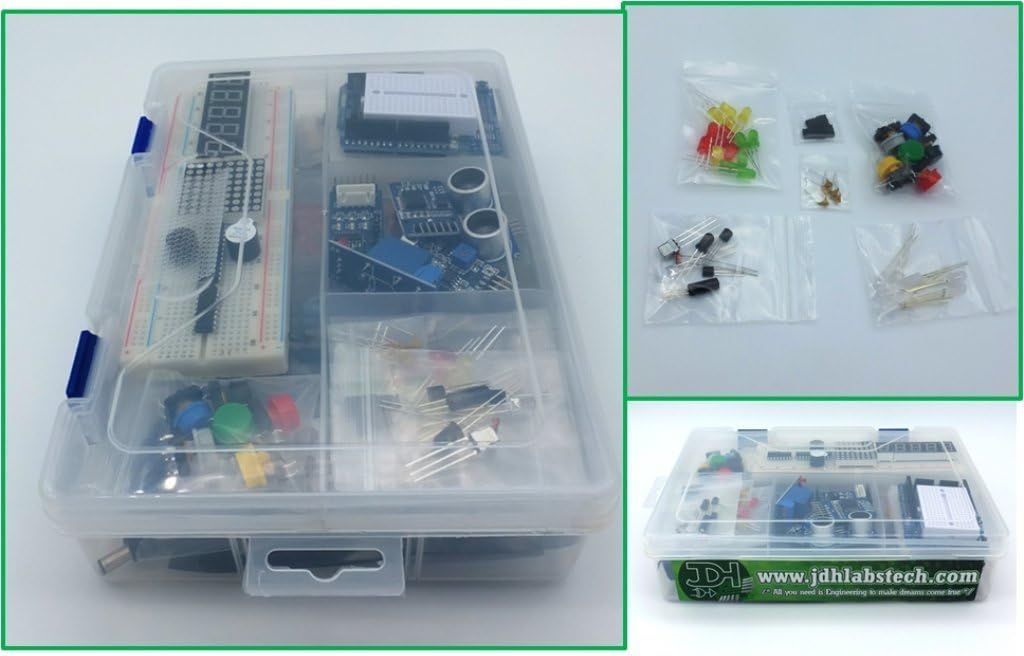
Image: The kit components neatly stored in the provided organizer box.
2. Power Supply Connection
The Mega 2560 board can be powered via the USB connection from your computer or an external power supply. For standalone projects or when more power is required, use the included AC-DC 12V 2A adapter.
- USB Power: Connect the USB cable from the Mega 2560 board to your computer. This will power the board and allow for program uploads.
- External Power: Plug the 12V 2A AC-DC adapter into the DC power jack on the Mega 2560 board. Ensure the adapter is connected to a suitable power outlet (EU/UK compatible).
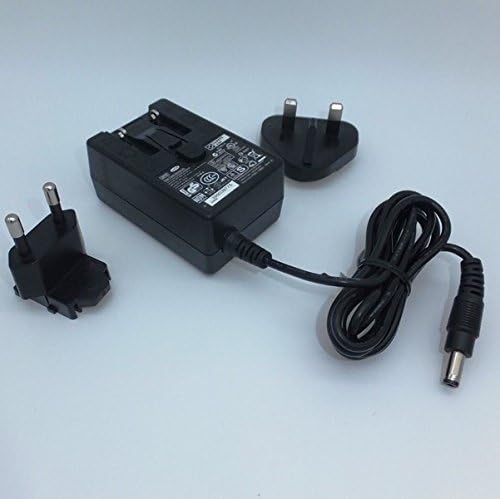
Image: The included 12V 2A power adapter with EU and UK plug options.
3. Software Installation (Arduino IDE)
To program the Mega 2560 board, you will need the Arduino Integrated Development Environment (IDE).
- Download the latest version of the Arduino IDE from the official Arduino website (www.arduino.cc/en/software).
- Follow the installation instructions for your operating system.
- Once installed, open the Arduino IDE.
- Go to Tools > Board > Arduino AVR Boards and select Arduino Mega or Mega 2560.
- Connect your Mega 2560 board to your computer via USB.
- Go to Tools > Port and select the serial port corresponding to your Mega 2560 board. (It may appear as 'COMx' on Windows or '/dev/tty.usbmodemxxxx' on macOS/Linux).
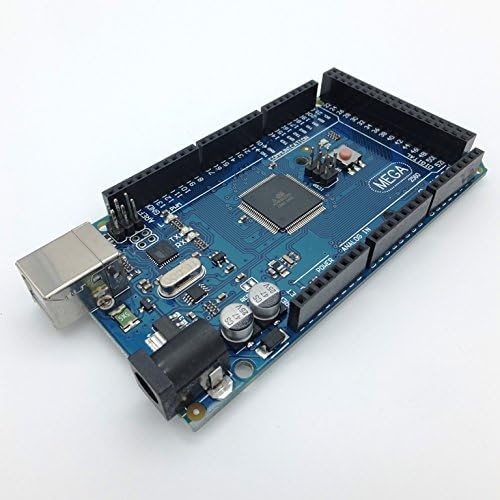
Image: The JDH Labs Tech Mega 2560 R3 compatible development board.
Operating Instructions
1. Basic Project: LED Blink
This simple project demonstrates how to upload a program to your Mega 2560 board and make an LED blink.
- Connect one of the included LEDs to your breadboard. Connect the longer leg (anode) of the LED to a 220 Ohm resistor, and the other end of the resistor to digital pin 13 on your Mega 2560. Connect the shorter leg (cathode) of the LED to GND.
- Open the Arduino IDE.
- Go to File > Examples > 01.Basics > Blink. This will open a new sketch with the standard Blink program.
- Ensure your board and port are correctly selected (as described in Setup).
- Click the 'Upload' button (right arrow icon) in the Arduino IDE. The IDE will compile and upload the code to your Mega 2560 board.
- Once uploaded, the LED connected to pin 13 should start blinking on and off every second.
2. Using Specific Modules
The kit includes various modules like WiFi (ESP8266), Bluetooth (HC-05), RFID, and different sensors. Each module requires specific wiring and libraries to function correctly. Refer to online tutorials and documentation for detailed instructions on integrating these modules with your Mega 2560 board.
- WiFi ESP8266 Module: This module allows your Mega 2560 to connect to WiFi networks. It typically communicates via serial (UART) and requires specific AT commands or firmware.
- Bluetooth HC-05 Module: Enables wireless serial communication between your Mega 2560 and other Bluetooth-enabled devices. It can operate in both master and slave modes.
- RC-522 RFID Module: Used for reading and writing RFID tags. Requires SPI communication and a dedicated library.
- Sensors (PIR, Ultrasonic, Temperature, etc.): Each sensor has specific pinouts and requires corresponding code to read data. Consult datasheets or example code for proper implementation.
Maintenance
Proper maintenance ensures the longevity and optimal performance of your kit components.
- Storage: Always store components in the provided plastic organizer box when not in use. This protects them from dust, moisture, and physical damage.
- Handling: Handle electronic components with care. Avoid touching pins directly to prevent electrostatic discharge (ESD).
- Cleaning: Use a soft, dry brush or compressed air to remove dust from boards and components. Avoid liquid cleaners unless specifically designed for electronics.
- Power Off: Disconnect power from the Mega 2560 board before making any wiring changes to prevent short circuits or damage.

Image: The kit's storage box, designed for organized component storage.
Troubleshooting
Here are some common issues and their potential solutions:
- Board not recognized by computer:
- Ensure the USB cable is securely connected.
- Check if the correct drivers are installed (usually part of the Arduino IDE installation).
- Verify the correct port is selected in the Arduino IDE (Tools > Port).
- Try a different USB cable or USB port on your computer. - Program upload failed:
- Confirm the correct board (Arduino Mega or Mega 2560) and port are selected.
- Ensure no other software is using the serial port.
- Disconnect any components from pins 0 and 1 (RX/TX) during upload, as they interfere with serial communication.
- Check for syntax errors in your code. - Component not working:
- Double-check all wiring connections for correctness and secure contact.
- Verify the component's datasheet or example code for proper pinout and usage.
- Ensure the correct library for the component is installed in the Arduino IDE (Sketch > Include Library > Manage Libraries...).
- Test with a simple sketch to isolate the issue. - Power issues:
- If using external power, ensure the 12V 2A adapter is correctly plugged in and the power LED on the Mega 2560 is lit.
- If powering via USB, ensure your computer's USB port is providing sufficient power.
Specifications
| Feature | Detail |
|---|---|
| Brand | JDH Labs Tech |
| Model Name | Mega 2560 Ultra |
| Manufacturer Reference | MEGA_Ultra3 |
| Hardware Interface | Bluetooth, USB, WiFi |
| Wireless Connection Type | Bluetooth, Infrared, WiFi |
| Power Adapter | AC-DC 12V 2A (EU/UK compatible) |
| Programmable | Yes (via Arduino IDE) |
| Batteries Included | No |
| Country/Region of Origin | China |
Warranty Information
JDH Labs Tech products are designed for quality and reliability. Specific warranty details may vary by region and retailer. Please retain your proof of purchase for any warranty claims. For detailed warranty terms, refer to the documentation provided at the point of purchase or contact JDH Labs Tech customer support.
Support
For further assistance, technical support, or inquiries regarding your JDH Labs Tech Mega 2560 Ultra Starter Kit, please refer to the following resources:
- Online Resources: Many tutorials and community forums exist for Arduino-compatible kits. Search for 'Arduino Mega 2560 tutorials' or specific module guides.
- Manufacturer Support: Contact JDH Labs Tech directly through their official website or the retailer where the product was purchased for specific product support.