1. Product Overview
The Carpuride Dash Cam Hardwire Kit provides a reliable power solution for your dash camera, enabling continuous recording and parking surveillance. It converts a vehicle's 12V or 24V power supply to a stable 5V/2A output, compatible with most Mini USB powered dash cams. This kit features integrated low voltage protection to prevent vehicle battery drain.
What's in the Box:
- Dash Cam Hardwire Kit (Mini USB)
- Power Cable
- User Manual
- 4 Types of Dual-Slot Fuse Holders (Mini, Low Profile Mini, Standard ATO, Micro2)

Image 1.1: Contents of the Carpuride Dash Cam Hardwire Kit package.
2. Safety Information and Features
This hardwire kit is designed with multiple safety features to protect your vehicle and dash camera.
Key Safety Features:
- Low Voltage Protection: Automatically cuts off power output when the vehicle battery voltage drops below 11.6V (for 12V systems) or 23.5V (for 24V systems). This ensures sufficient power remains to start your vehicle.
- Overcurrent Protection: Safeguards against excessive current flow.
- Overheating Protection: Prevents damage from high temperatures.
- Short-circuit Protection: Protects against electrical shorts.
- Reverse Connection Protection: Prevents damage from incorrect wiring polarity.

Image 2.1: Low voltage protection mechanism, preventing battery drain.

Image 2.2: Visual representation of the hardwire kit's integrated protection features.
3. Setup and Installation
Proper installation is crucial for the optimal performance and safety of your dash cam and vehicle. If you are unsure about any steps, it is recommended to seek professional assistance.
Installation Steps:
- Identify Fuse Box: Locate your vehicle's fuse box. This is typically found under the dashboard, in the glove compartment, or under the hood. Consult your vehicle's owner's manual for the exact location.
- Select a Fuse Slot:
- For continuous power (e.g., for parking monitoring), select a fuse slot that is always live (e.g., hazard lights, interior lights).
- For switched power (power only when ignition is on), select a fuse slot that is active only when the ignition is on (e.g., radio, cigarette lighter).
Use a circuit tester to confirm the power status of the chosen fuse slot.
- Connect Red Wire (ACC/BAT): Choose the appropriate dual-slot fuse holder for your vehicle's fuse type (Mini, Low Profile Mini, Standard ATO, or Micro2). Insert an existing fuse from your vehicle into the bottom slot of the fuse holder, and the provided 5A fuse into the top slot. Plug the fuse holder into the selected fuse slot in your vehicle's fuse box. The red wire from the hardwire kit connects to this fuse holder.

Image 3.1: Example of a 5A add-a-fuse tap.
- Connect Black Wire (GND): Securely connect the black wire (ground) to any unpainted metal bolt or screw on the vehicle's chassis. This provides a stable ground connection.
- Route the Cable: Carefully route the Mini USB cable from the hardwire kit to your dash camera, tucking it along the windshield trim, headliner, or A-pillar for a clean installation.
- Connect to Dash Cam: Plug the Mini USB connector into your dash camera's power input port.
- Test Installation: Turn on your vehicle's ignition to verify the dash cam powers on correctly. If using continuous power, ensure it remains on after turning off the ignition (until low voltage protection activates).
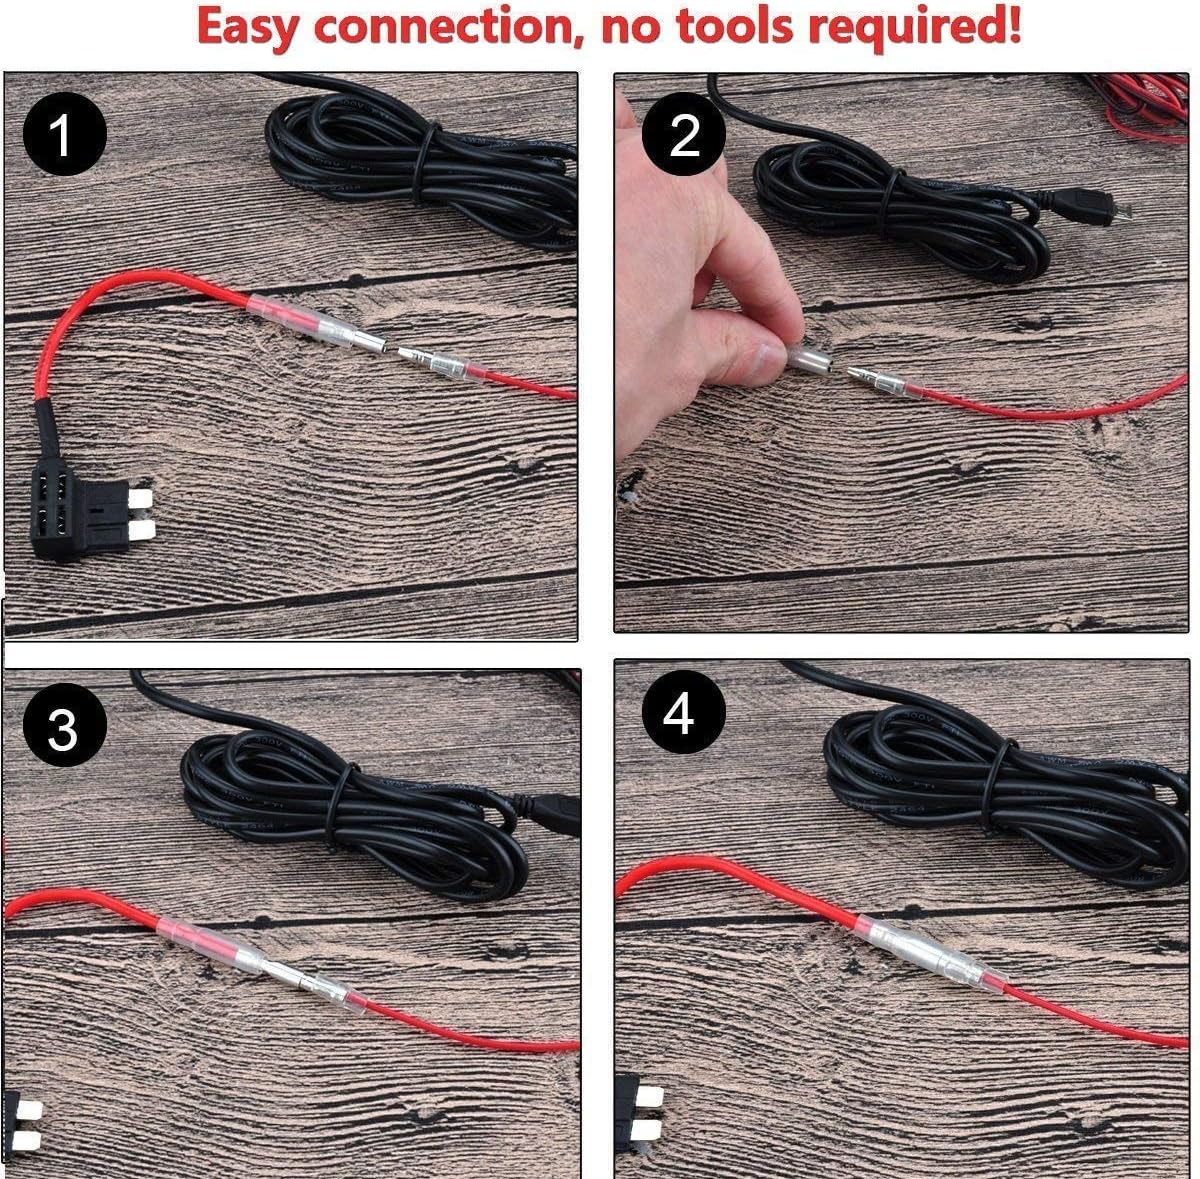
Image 3.2: Simple connection process for the hardwire kit.

Image 3.3: Visual guide for hardwire kit installation in a vehicle.

Image 3.4: Wiring diagram for the Carpuride Hardwire Kit.
4. Operating Instructions
Once installed, the Carpuride Dash Cam Hardwire Kit operates automatically.
- Automatic Power Conversion: The kit automatically converts your vehicle's 12V or 24V input to a stable 5V, 2A output required by your dash camera.
- Parking Monitoring: If connected to a continuous power source, the kit will provide power to your dash cam for parking monitoring, allowing it to record even when the vehicle is off.
- Battery Protection: The integrated low voltage protection feature will automatically cut off power to the dash cam if your vehicle's battery voltage drops below the safe threshold (11.6V or 23.5V), preventing your car battery from being completely drained.
5. Maintenance
To ensure continued reliable operation of your hardwire kit and dash cam, consider the following maintenance points:
- Check Connections: Periodically inspect all connections (fuse tap, ground wire, Mini USB to dash cam) to ensure they remain secure and free from corrosion.
- Fuse Integrity: If your dash cam stops receiving power, check the 5A fuse in the hardwire kit's fuse tap. Replace it with a new 5A fuse if it is blown. Ensure the original vehicle fuse in the lower slot of the fuse tap is also intact.
- Cable Condition: Inspect the power cable for any signs of wear, damage, or pinching, especially where it passes through vehicle panels or trim.
6. Troubleshooting
If you encounter issues with your Carpuride Dash Cam Hardwire Kit, refer to the following troubleshooting guide:
- Issue: Dash cam not powering on.
Solution:- Verify all connections are secure, especially the fuse tap and ground wire.
- Check both fuses in the dual-slot fuse holder (the original vehicle fuse and the 5A fuse for the hardwire kit). Replace any blown fuses.
- Ensure the Mini USB connector is fully inserted into the dash cam.
- Confirm the chosen fuse slot in the vehicle's fuse box is providing power (use a circuit tester).
- Issue: Car battery draining after extended parking.
Solution:- The low voltage protection should prevent complete battery drain. If this occurs, verify the hardwire kit is functioning correctly.
- If parking monitoring is not essential for long periods without driving, consider connecting the red wire to a switched fuse (ACC) instead of a continuous power source.
- For vehicles parked for many days, a manual switch on the power line can be installed to completely cut power to the dash cam.
- Issue: Loose or intermittent power connection.
Solution:- Ensure the crimped connections on the fuse tap are secure. If they appear loose, re-crimp or reinforce them.
- Verify the ground connection is tight and on an unpainted metal surface.
7. Specifications
- Brand: Carpuride
- Model Name: RM
- Model Number: HARDKIT-MIC
- Input Voltage: DC 12V - 24V
- Output Voltage: DC 5V
- Output Current: 2A Max
- Working Temperature: -40°F to 160°F (-40°C to 71°C)
- Low Voltage Protection (12V System): Cuts off at 11.6V
- Low Voltage Protection (24V System): Cuts off at 23.5V
- Cable Length: 4 meters (13 feet)
- Connector Type: Mini USB
- Included Fuse Holders: Mini, Low Profile Mini, Standard ATO, Micro2
8. Warranty and Support
For warranty information, technical support, or further assistance, please refer to the official Carpuride website or contact Carpuride customer service directly. Details are typically provided with your purchase documentation or on the manufacturer's product page.