1. Introduction
This manual provides essential instructions for the safe and efficient operation, installation, and maintenance of your FridayParts 24V 25A Battery Charger. This charger is designed to provide reliable power for various Genie Lift models. Please read this manual thoroughly before using the product and retain it for future reference.
2. Safety Information
WARNING: Failure to follow these safety instructions may result in electric shock, fire, or serious injury.
- Always ensure the charger is disconnected from the power source before making or breaking connections to the battery.
- Operate the charger in a well-ventilated area.
- Avoid charging frozen batteries.
- Keep sparks, flames, and smoking materials away from batteries. Batteries can produce explosive gases.
- Wear appropriate personal protective equipment, including eye protection and gloves, when working with batteries.
- Do not expose the charger to rain or excessive moisture.
- Ensure the charger is compatible with the battery type and voltage before connecting. This charger is for 24V systems.
- If the power cord is damaged, it must be replaced by the manufacturer, its service agent, or similarly qualified persons to avoid a hazard.
3. Product Overview
The FridayParts 24V 25A Battery Charger (Part Numbers 105739, 105739GT) is an aftermarket replacement part designed for various Genie Lift models. It provides a 24V output with a 25A current, delivering 700 watts of power for efficient battery charging.
This charger is compatible with the following Genie Lift models:
- GS-1530, GS-1532
- GS-1930, GS-1932
- GS-2032, GS-2046
- GS-2632, GS-2646, GS-2646 AV, GS-2646 AV35
- GS-3232, GS-3246
- GS-4047

Figure 3.1: Front view of the FridayParts 24V 25A Battery Charger, showing the main unit, AC input cable, and DC output cables with ring terminals and interlock wires.

Figure 3.2: Detail of the charger's output and interlock ports, indicating where the DC output cables and interlock wires connect.
4. Specifications
| Feature | Specification |
|---|---|
| Part Numbers | 105739, 105739GT |
| Output Voltage | 24 Volts (DC) |
| Current Rating | 25 Amps |
| Power Output | 700 Watts |
| Input Voltage | 100-240V AC, 50-60Hz (Autoselect Dual AC Input) |
| Dimensions (Approx.) | 12.5 x 9.25 x 8.5 inches (Package) |
| Item Weight | 9.38 pounds |
| UPC | 635838400373 |
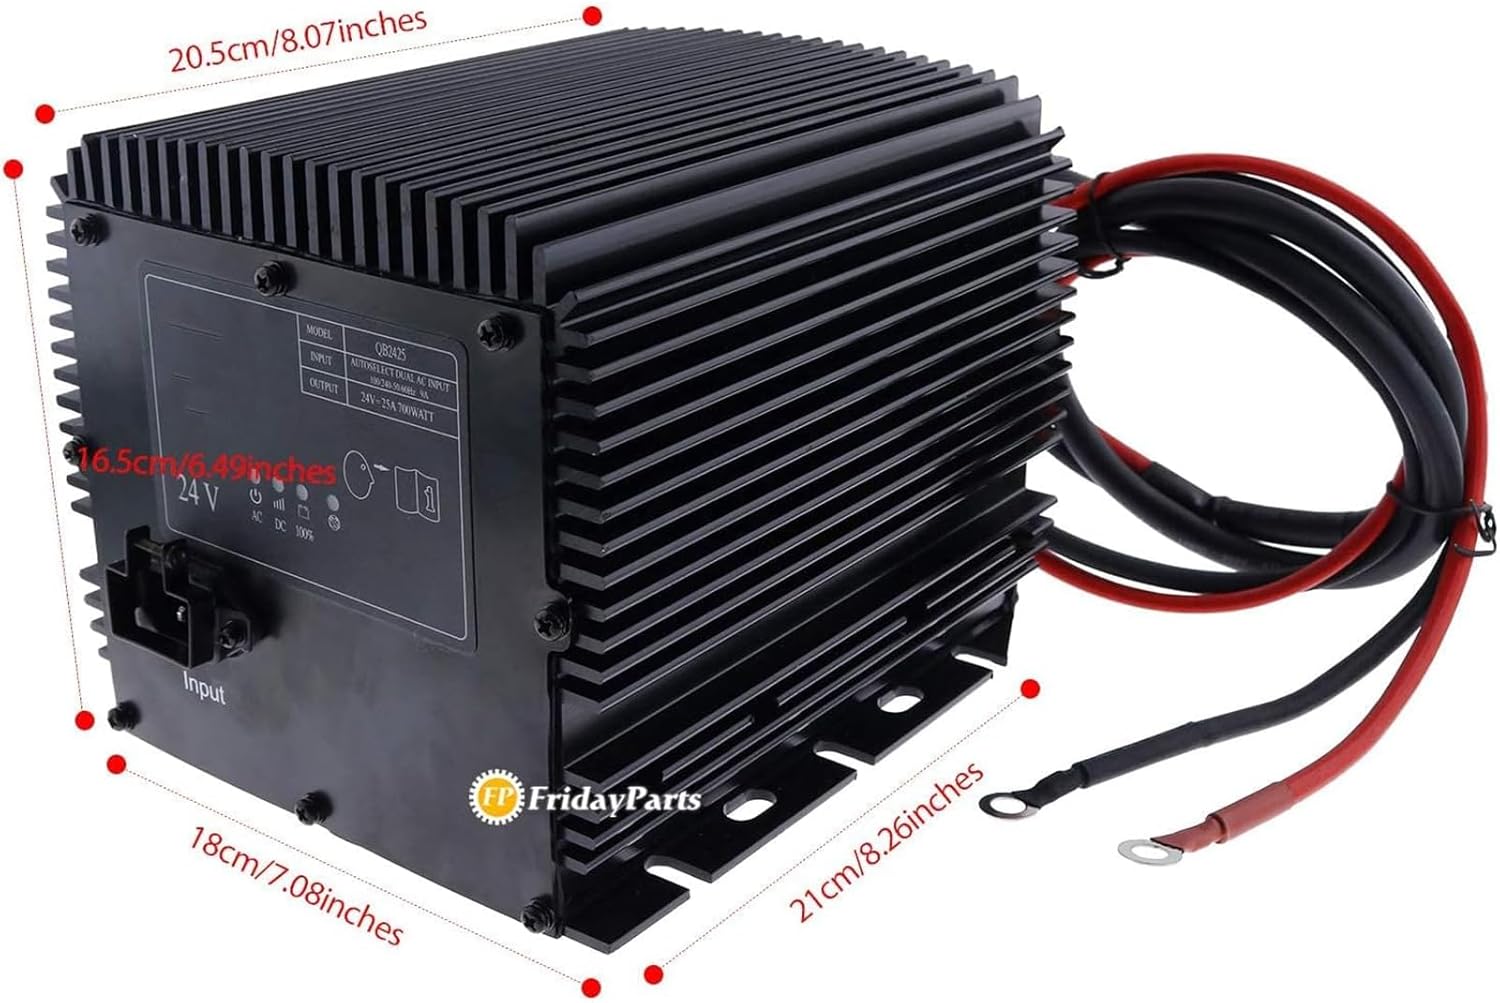
Figure 4.1: Dimensional drawing of the charger, indicating approximate measurements in centimeters and inches.
5. Setup
Before connecting the charger, ensure the Genie Lift is turned off and secured. Verify that the battery system is 24V.
- Mounting (if applicable): If the charger is to be permanently mounted, choose a location that is dry, well-ventilated, and away from flammable materials. Ensure there is sufficient space for air circulation around the cooling fins.
- Connect DC Output Cables: Connect the positive (red) output cable from the charger to the positive terminal of the battery bank. Connect the negative (black) output cable to the negative terminal. Ensure connections are clean and secure.
- Connect Interlock Wires: If your Genie Lift system utilizes an interlock feature, connect the yellow interlock wires from the charger to the corresponding terminals on the lift's control system. This typically prevents the lift from operating while charging. Refer to your Genie Lift's specific wiring diagram for correct connection points.
- Connect AC Input Power: Plug the AC power cord into the charger's input port, then plug the other end into a grounded electrical outlet (100-240V AC, 50-60Hz).
- Initial Check: Once all connections are made, observe the charger's indicator lights (if present) to confirm it is receiving power and detecting the battery.
6. Operating Instructions
The FridayParts 24V 25A Battery Charger operates automatically once connected correctly.
- Initiate Charging: After connecting the charger to the battery and AC power as described in the Setup section, the charger will automatically begin the charging cycle.
- Monitor Charging Status: The charger typically features indicator lights to show the charging status (e.g., charging, fully charged, fault). Refer to the label on the charger for specific light indications.

Figure 6.1: Charger label displaying input/output details and status icons for AC, DC, and 100% charge.
- Completion of Charge: The charger will automatically stop charging when the battery reaches full capacity. The indicator light will typically change to a "fully charged" status.
- Disconnecting: To disconnect the charger, first unplug the AC power cord from the wall outlet. Then, disconnect the DC output cables from the battery terminals, followed by the interlock wires (if applicable).
7. Maintenance
Regular maintenance ensures optimal performance and longevity of your battery charger.
- Cleaning: Keep the charger clean and free from dust and debris. Use a dry cloth to wipe the exterior. Do not use solvents or abrasive cleaners.
- Cable Inspection: Periodically inspect the AC power cord and DC output cables for any signs of damage, fraying, or corrosion. Replace damaged cables immediately.
- Connection Integrity: Ensure all electrical connections remain tight and free of corrosion. Loose connections can lead to overheating and inefficient charging.
- Ventilation: Ensure the cooling fins and ventilation openings are not obstructed to prevent overheating.
- Storage: When not in use, store the charger in a cool, dry place, away from direct sunlight and extreme temperatures.
8. Troubleshooting
If you encounter issues with your charger, refer to the following table for common problems and solutions.
| Problem | Possible Cause | Solution |
|---|---|---|
| Charger not turning on / No indicator lights | No AC power; Faulty power cord; Blown fuse (internal) | Check AC outlet and power cord connection. Try a different outlet. Inspect power cord for damage. If fuse is suspected, contact support. |
| Charger not charging battery | Incorrect battery connection; Battery deeply discharged or faulty; Incorrect voltage; Charger fault | Verify positive and negative connections. Check battery voltage; if extremely low, it may not be recognized. Ensure battery is 24V. If problem persists, contact support. |
| Charger overheating | Poor ventilation; Overload; Internal fault | Ensure charger is in a well-ventilated area and cooling fins are clear. Reduce load if possible. Disconnect and allow to cool. If problem persists, contact support. |
| Charger does not fit Genie Lift | Incorrect part number or model compatibility | Verify the part number (105739 or 105739GT) and compatibility with your specific Genie Lift model. Compare physical dimensions and connector types. |
9. Warranty and Support
For warranty information or technical support regarding your FridayParts 24V 25A Battery Charger, please contact FP FRIDAYPARTS directly. Ensure you have your product model number (105739 or 105739GT) and purchase details available when contacting support.
You can typically find contact information on the product packaging or the official FP FRIDAYPARTS website.