1. Introduction
The ViewHD Prosumer HDMI 3x1 Switch, Model VHD-PH3X1GS, is an advanced HDMI switch designed to manage up to three HDMI input sources and output to a single HDMI display. This device features unique audio injection and extraction capabilities, allowing users to modify or replace the original HDMI audio signal. It supports 4K@30Hz resolution, HDMI v1.4, and includes functions such as MIC audio injection/combiner, HDMI audio extractor, and Audio Return Channel (ARC).
2. Product Features
- HDMI v1.4 3x1 auto or manual switch with exclusive audio injection and extraction features.
- Supports Audio Return Channel (ARC) functionality.
- Enables HDMI audio injection from Toslink, Coaxial, RCA L/R, or MIC inputs to replace the original HDMI input audio soundtrack.
- Features HDMI audio mixer/combiner function to add MIC audio input to the HDMI stereo input signal with adjustable MIC volume control. Note: MIC mixing does not occur if the HDMI audio format is higher than stereo.
- Converts SPDIF Toslink, Coaxial, RCA L/R, or MIC (3.5mm jack) audio input signals to HDMI audio output signals.
- Supports HDMI input audio signal conversion to Toslink & Coaxial outputs (up to DD+ & DD5.1CH).
- Converts HDMI stereo audio to RCA L/R & 3.5mm analog stereo outputs.
- Compact dimensions: 205mm x 74mm x 26mm.
3. Package Contents
Verify that all items are present in the package:
- ViewHD Prosumer HDMI 3x1 Switch (VHD-PH3X1GS)
- Universal AC 100V - 240V to DC 5V Power Adapter
- User Manual (this document)
4. Product Diagram and Port Descriptions
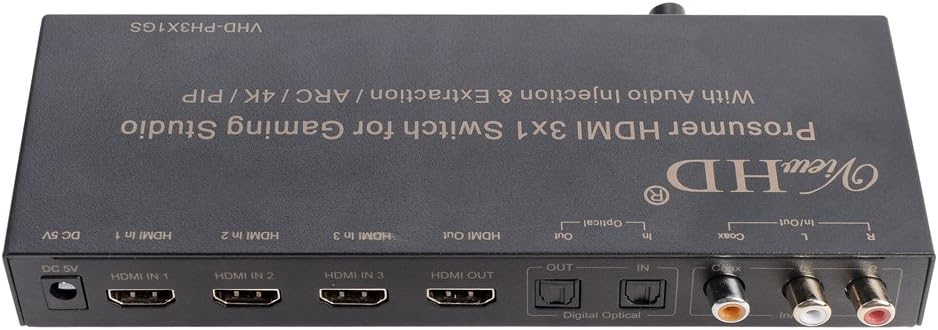
Figure 1: Top view of the ViewHD Prosumer HDMI 3x1 Switch, illustrating the layout of all input and output ports for connectivity.

Figure 2: Top view of the ViewHD Prosumer HDMI 3x1 Switch, highlighting the model number VHD-PH3X1GS.
4.1. Front Panel
The front panel typically contains indicators and control buttons (if any). Specific details are not visible in the provided images, but common elements include input selection buttons and status LEDs.
4.2. Rear Panel (Refer to Figure 1)
- DC 5V: Power input port for the included 5V DC power adapter.
- HDMI IN 1, 2, 3: HDMI input ports for connecting source devices such as Blu-ray players, gaming consoles, or PCs.
- HDMI OUT: HDMI output port for connecting to a display device like a TV or monitor.
- Digital Optical OUT: Optical (Toslink) audio output port for connecting to an audio receiver or soundbar.
- Coax OUT: Coaxial digital audio output port.
- RCA L/R OUT: Analog stereo audio output ports (Red for Right, White for Left).
- Optical IN: Optical (Toslink) audio input port for audio injection.
- Coax IN: Coaxial digital audio input port for audio injection.
- RCA L/R IN: Analog stereo audio input ports for audio injection.
- MIC IN (3.5mm jack): Microphone input port for audio injection/mixing.
5. Setup Instructions
- Power Off Devices: Ensure all source devices, display, and the HDMI switch are powered off before making connections.
- Connect HDMI Sources: Connect your HDMI source devices (e.g., Blu-ray player, game console) to the HDMI IN 1, 2, or 3 ports on the switch using high-quality HDMI cables.
- Connect Display: Connect your HDMI display (e.g., TV, monitor) to the HDMI OUT port on the switch using a high-quality HDMI cable.
- Connect Audio Inputs (Optional): If using audio injection, connect your external audio sources (e.g., optical, coaxial, RCA L/R, microphone) to the corresponding Optical IN, Coax IN, RCA L/R IN, or MIC IN ports.
- Connect Audio Outputs (Optional): If using audio extraction, connect your audio receiver or soundbar to the Digital Optical OUT, Coax OUT, or RCA L/R OUT ports.
- Connect Power: Plug the included 5V DC power adapter into the DC 5V port on the switch, then plug the adapter into a power outlet.
- Power On Devices: Power on the display first, then the HDMI switch, and finally your HDMI source devices.
6. Operating Instructions
6.1. HDMI Input Selection
The switch supports both automatic and manual input selection. Use the input selection button on the device (if available) or a remote control (if included) to cycle through HDMI IN 1, 2, and 3. The switch may automatically detect and switch to an active HDMI input.
6.2. Audio Injection
The audio injection feature allows you to replace the audio from the selected HDMI input with an external audio source.
- Connect your external audio source (e.g., CD player, audio mixer) to the Optical IN, Coax IN, or RCA L/R IN ports.
- The switch will automatically detect the active external audio input and replace the HDMI input's audio with it.
6.3. MIC Audio Injection/Combiner
This feature allows you to inject or combine microphone audio with the HDMI signal.
- Connect a microphone to the MIC IN (3.5mm jack) port.
- MIC Mixer Mode: If the incoming HDMI audio is stereo (2-channel), the microphone audio can be mixed with the HDMI audio. Use the MIC volume control (if available) to adjust the microphone's level.
- MIC Replacement Mode: If the incoming HDMI audio signal is higher than stereo (e.g., 5.1CH), the microphone input audio signal will completely replace the original HDMI input audio signal.
6.4. Audio Extraction
The switch can extract audio from the HDMI signal and output it through dedicated audio ports.
- Digital Audio: The HDMI input audio signal can be converted and output via the Digital Optical OUT and Coax OUT ports. This supports formats up to Dolby Digital Plus (DD+) and Dolby Digital 5.1CH.
- Analog Stereo Audio: HDMI stereo audio can be converted to analog and output via the RCA L/R OUT and 3.5mm analog outputs (if available, not explicitly listed as a separate output port but mentioned in features).
6.5. Audio Return Channel (ARC)
ARC allows audio from your TV's built-in tuner or smart apps to be sent back to the switch via the HDMI cable and then output through the switch's audio extraction ports.
- Ensure your TV's HDMI port supports ARC and that ARC is enabled in your TV's settings.
- Connect the HDMI OUT port of the switch to the ARC-enabled HDMI input on your TV.
- When ARC is active, the TV's audio can be output from the switch's Digital Optical OUT, Coax OUT, and RCA L/R OUT ports. Note that ARC audio format is typically stereo when converted to analog.
7. Maintenance
- Cleaning: Use a soft, dry cloth to clean the exterior of the device. Do not use liquid cleaners or aerosols.
- Ventilation: Ensure the device is placed in a well-ventilated area to prevent overheating. Do not block any ventilation openings.
- Power: Always use the provided 5V DC power adapter. Disconnect power during electrical storms or when unused for long periods.
- Environment: Keep the device away from excessive moisture, heat, and direct sunlight.
8. Troubleshooting
| Problem | Possible Cause | Solution |
|---|---|---|
| No video output. | Loose HDMI cables; Incorrect input selection; Power issue; Incompatible resolution. | Check all HDMI cable connections. Ensure the correct HDMI input is selected on the switch and the display. Verify the power adapter is connected and working. Try a different resolution on the source device. |
| No audio output. | Loose audio cables; Incorrect audio settings on source/display; Audio format incompatibility; Volume too low. | Check all audio cable connections. Ensure audio settings on source and display are correct. Verify the audio format is supported by the output device. Increase volume on all connected devices. |
| MIC audio not mixing. | HDMI audio format is not stereo; MIC volume too low. | Ensure the HDMI input audio is in stereo format for mixing. If it's higher than stereo, MIC audio will replace it. Adjust MIC volume. |
| ARC not working. | TV ARC not enabled; Incorrect HDMI port used; HDMI cable not ARC compatible. | Verify ARC is enabled in your TV's settings. Ensure the HDMI cable is connected to the ARC-enabled HDMI port on your TV. Use a high-speed HDMI cable. |
| Intermittent signal loss. | Long or low-quality HDMI cables; Signal interference; Power fluctuations. | Use shorter, high-quality HDMI cables. Ensure cables are properly shielded. Try connecting the power adapter to a different outlet or a surge protector. |
9. Specifications
- Model: VHD-PH3X1GS
- HDMI Version: v1.4
- Max Resolution: 4K@30Hz
- HDMI Inputs: 3
- HDMI Outputs: 1
- Audio Input Ports: Optical (Toslink), Coaxial, RCA L/R, 3.5mm MIC
- Audio Output Ports: Digital Optical (Toslink), Coaxial, RCA L/R
- Supported Audio Formats (Digital Out): Up to DD+ & DD5.1CH
- Supported Audio Formats (Analog Out): Stereo (from HDMI stereo or ARC stereo)
- Power Supply: DC 5V (Universal AC 100V - 240V adapter included)
- Dimensions (LxWxH): Approximately 205mm x 74mm x 26mm
- Compatible Devices: Blu-Ray Player, Gaming Console, Monitor, Personal Computer, Projector, Television
10. Warranty and Support
The ViewHD Prosumer HDMI 3x1 Switch (VHD-PH3X1GS) comes with a one-year replacement warranty from the date of purchase. This warranty covers manufacturing defects and malfunctions under normal use.
For technical support, troubleshooting assistance, or warranty claims, please contact ViewHD customer service through their official website or the retailer where the product was purchased. Please have your product model number and purchase information ready when contacting support.