1. Introduction and Overview
The HTRC T240 Duo is a versatile dual-channel RC battery charger and discharger designed for a wide range of battery types. It features a 3.2-inch color touch screen for intuitive operation and real-time monitoring of charging processes. This charger supports both AC (100-240V) and DC (11-18V) input, offering flexibility for various charging environments. With a maximum charging current of 10A per channel and a total power output of 150W (AC) or 240W (DC), it ensures efficient and rapid battery management.
The T240 Duo is equipped with advanced functions including battery metering, internal resistance checking, adjustable digital DC power, and storage/data loading capabilities. Its robust design incorporates flame-retardant plastic and a powerful built-in cooling fan for optimal heat dissipation during operation.

2. Safety Instructions
Please read and understand all safety instructions before operating the HTRC T240 Duo charger. Failure to do so may result in property damage, injury, or fire.
- Always use the charger in a well-ventilated area, away from flammable materials.
- Never leave the charger unattended while in use.
- Ensure the correct battery type and parameters are selected before initiating any charging or discharging process. Incorrect settings can damage batteries and pose a fire risk.
- Do not charge damaged or swollen batteries.
- Keep the charger away from moisture, direct sunlight, and extreme temperatures.
- Use only original or approved charging cables and adapters.
- Keep out of reach of children.
3. Package Contents
Verify that all items are present in the package upon unboxing:
- 1x HTRC T240 Charger
- 1x AC Power Cable
- 1x DC Power Cable
- 2x Banana Connector to Deans Output Cables
- 2x T-Plug to XT60 Extension Cables
- 2x T-Plug to Alligator Clip Extension Cables
- 2x T-Plug to Tamiya Extension Cables
- 1x User Manual


Video 3.1: HTRC T240 Unboxing and Overview. This video demonstrates the unboxing process and provides a brief overview of the charger and its components.
4. Product Features
4.1 Dual-Channel Charging
The T240 Duo features two independent charging channels, allowing simultaneous charging or discharging of two different battery types. This significantly improves efficiency and saves time.

4.2 Wide Battery Type Compatibility
This charger is compatible with a broad range of RC battery types, making it suitable for various applications including RC cars, boats, drones, and airsoft models.
- LiPo / Lilon / LiFe / LiHV: 1S-6S (3.7V, 7.4V, 11.1V, 14.8V, 22.2V options)
- NiMH / NiCD: 1-15S (3.6V, 4.8V, 6V, 7.2V, 9.6V, 12V options)
- PB (Lead-Acid): 1-10S (2-20V)
- Smart Battery: I / II / III

4.3 AC/DC Power Input
The charger supports both AC 100-240V and DC 11-18V input, providing flexibility for home or field use. AC input offers a total charging power of 150W (distributable), while DC input allows each channel to reach up to 120W.
4.4 3.2-inch Color Touch Screen
The intuitive 3.2-inch color LCD touch screen simplifies operation and allows for easy switching between channels. It provides clear, real-time charging status through digital graphics, giving you full control over the charging process.

4.5 Additional Functions
- Battery Meter: Displays lithium battery cell counts, voltage, and capacity percentage.
- Internal Resistance Check: Checks the internal resistance of lithium batteries (except 1S).
- Adjustable Digital DC Power: Provides adjustable DC power output.
- TVC (Terminal Voltage Control): Allows setting the final charge/discharge voltage.
- Data Storage & Load: Stores and loads up to 20 groups of data per channel.
4.6 Efficient Cooling System
A powerful built-in fan ensures good heat dissipation, preventing overheating during prolonged charging or discharging cycles. Note that the fan may produce some noise during operation.

5. Setup
5.1 Power Connection
- Connect the appropriate power cable (AC or DC) to the charger's input port.
- If using AC power, plug the AC cable into a wall outlet.
- If using DC power, connect the DC cable to a compatible power source (e.g., 12V car battery).
- Flip the power switch on the side of the charger to the 'ON' position. The screen should illuminate.
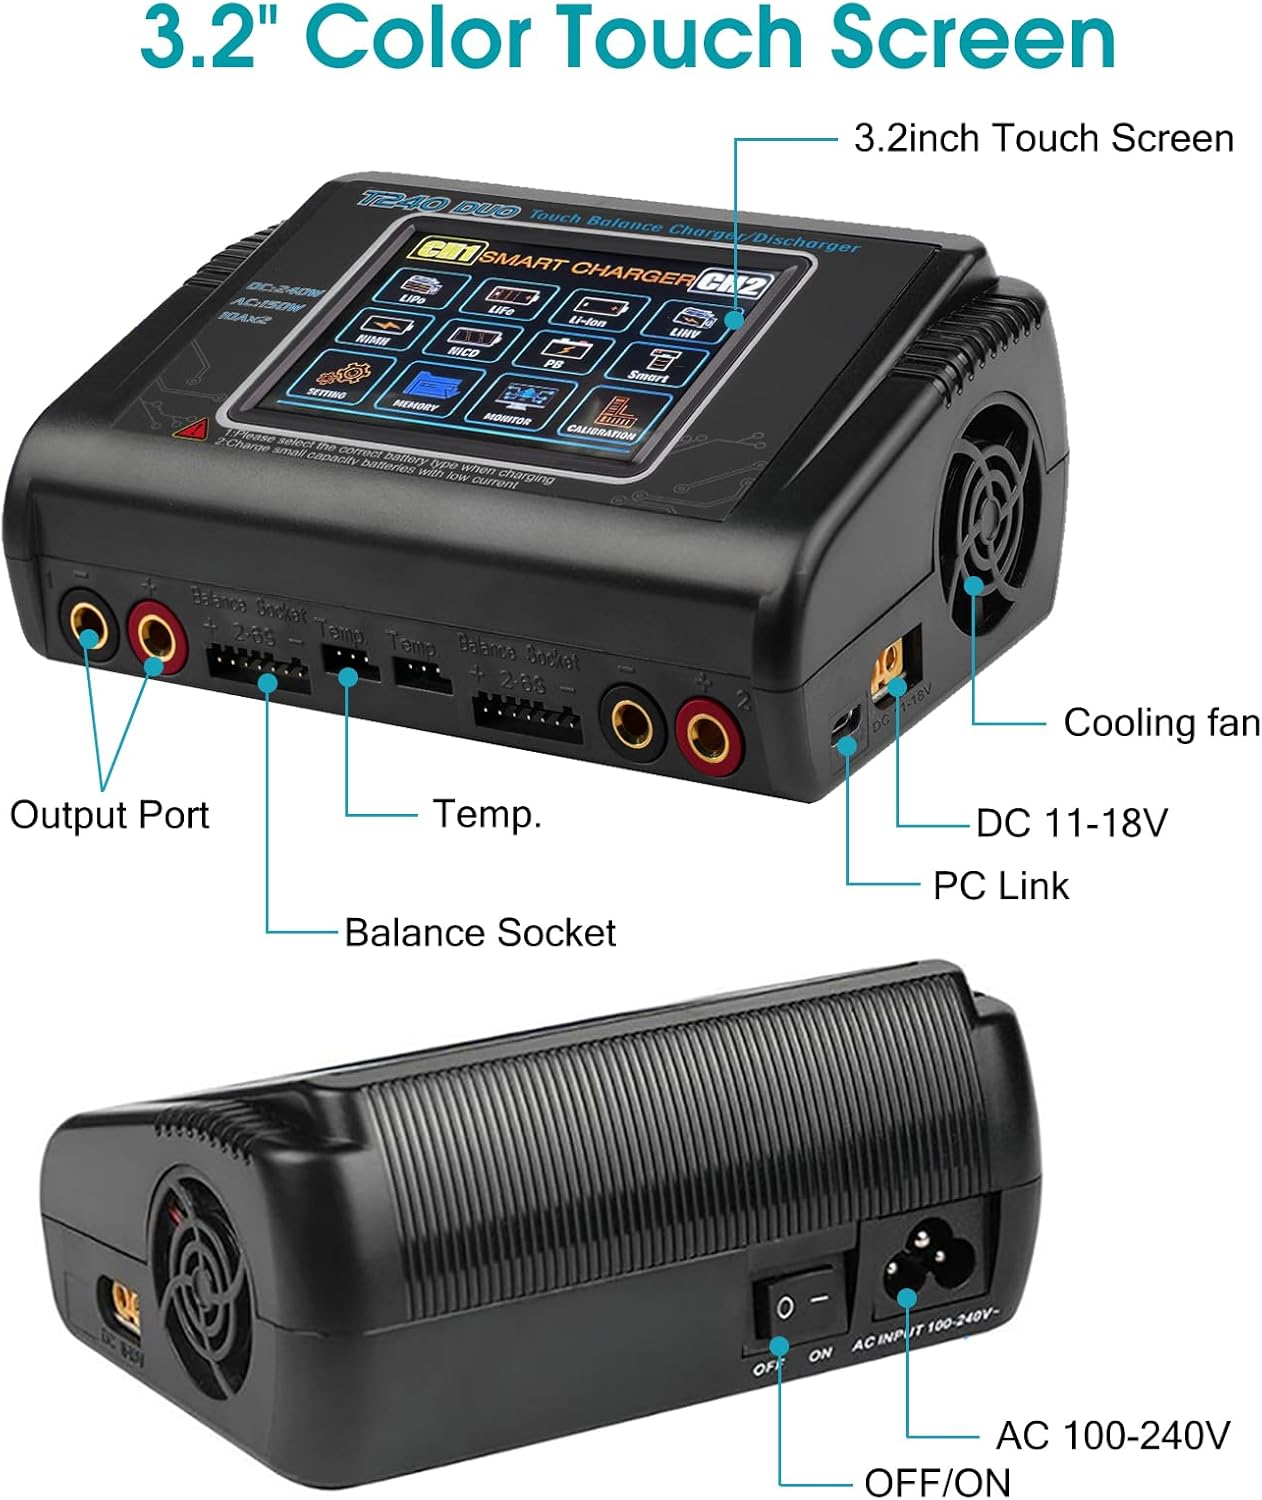
5.2 Battery Connection
- Identify the correct charging cable for your battery type.
- Connect the main charging lead of your battery to one of the charger's output ports (CH1 or CH2).
- For balance charging, connect the battery's balance lead to the corresponding balance socket on the charger. Ensure the balance lead is inserted correctly.
6. Operating Instructions
The HTRC T240 Duo offers various operating modes for different battery management needs. Use the touch screen to navigate and select options.
6.1 Selecting Battery Type and Mode
- On the main screen, select the desired channel (CH1 or CH2).
- Tap on the battery type icon (e.g., LiPo, NiMH) that matches your battery.
- Select the desired operating mode:
- Charge: Standard charging.
- Balance Charge: Charges and balances individual cell voltages for lithium batteries.
- Fast Charge: Faster charging without balancing.
- Storage: Charges or discharges lithium batteries to a safe storage voltage.
- Discharge: Discharges the battery to a set voltage.
6.2 Setting Parameters
- After selecting the mode, adjust the charging/discharging current and voltage (or cell count for lithium batteries) using the on-screen controls.
- Confirm the settings. The charger will perform a battery check.
- Once the check is complete and confirmed, press 'Start' to begin the operation.
Video 6.1: HTRC C150 LiPo Charger Operation. This video demonstrates the operation of a similar HTRC charger (C150 model), showing how to perform LiPo balance charging, storage, and discharge functions. The interface and steps are largely applicable to the T240 Duo.
6.3 Monitoring and Stopping
- The screen will display real-time information such as current, voltage, charged capacity, and individual cell voltages (for balance charging).
- To stop the operation at any time, press the 'Stop' button on the screen.
7. Maintenance
- Cleaning: Regularly wipe the charger's exterior with a soft, dry cloth. Do not use solvents or abrasive cleaners. Ensure no dust accumulates in the cooling fan vents.
- Storage: Store the charger in a cool, dry place away from direct sunlight and extreme temperatures. Disconnect all batteries and power sources before storing.
- Cable Inspection: Periodically inspect all charging cables for signs of wear, damage, or frayed wires. Replace damaged cables immediately.
8. Troubleshooting
- Charger not powering on: Ensure the power cable is securely connected and the power switch is in the 'ON' position. Check the power source.
- Charging error message: This often indicates incorrect battery type selection, incorrect cell count, or a faulty battery. Double-check all settings and battery condition.
- Fan noise: The built-in fan operates to dissipate heat during charging/discharging. Some noise is normal. Excessive or unusual noise may indicate a blockage or malfunction; ensure vents are clear.
- Slow charging: Verify that the charging current is set appropriately for your battery's capacity. Ensure the power input (AC/DC) is sufficient for the desired output.
9. Specifications
| Feature | Specification |
|---|---|
| Model Number | T240 / HT-0099 |
| Dimensions (L x W x H) | 14.5 x 10.5 x 6 cm (5.71 x 4.13 x 2.36 inches) |
| Weight | 480 g |
| AC Input Voltage | 100-240 V |
| DC Input Voltage | 11-18 V |
| AC Charge Power | 150 W (distributed) |
| DC Charge Power | 240 W (120W per channel) |
| Discharge Power | 10 W |
| Charge Current Range | 0.1-10 A per channel |
| Discharge Current Range | 0.1-2 A per channel |
| Output Voltage | Up to 22.2 V (depending on battery type) |
| Number of Ports | 2 |
| Display | 3.2-inch Color Touch Screen |
| Supported Battery Types | LiPo/Lilon/LiFe/LiHV (1-6S), NiMH/NiCD (1-15S), PB (1-10S), Smart Battery (I/II/III) |
| Connector Types | XT60, Deans, Tamiya (via included adapters) |
10. Warranty and Support
The HTRC T240 Duo RC Balance Charger comes with a one-year warranty against manufacturing defects. For technical support, troubleshooting assistance, or warranty claims, please contact HTRC customer service through the retailer where the product was purchased or visit the official HTRC website for contact information.