1. Introduction
This manual provides detailed instructions for the safe and effective use of your EDC Zeus Handheld 8 Mode E-STIM Unit (Model AC204). Please read this manual thoroughly before operating the device and retain it for future reference. This device is designed for personal use to provide electrical stimulation. It is not intended for medical diagnosis, treatment, or prevention of any disease or health condition. Consult a healthcare professional before use if you have any medical conditions or concerns.
2. Safety Information and Warnings
Important: Failure to follow these safety instructions may result in injury or device damage.
- Do not use if you have a pacemaker, defibrillator, or any implanted electronic device.
- Do not use if you are pregnant.
- Do not use on broken, irritated, or sensitive skin.
- Do not use near water or in damp environments.
- Keep out of reach of children.
- Discontinue use immediately if you experience any discomfort or adverse reactions.
- Consult a physician before use if you have any pre-existing medical conditions.
3. Package Contents
Verify that all items are present in your package:
- 1 x EDC Zeus Handheld E-STIM Unit (Model AC204)
- 2 x Silicone Electrode Pads
- 1 x Electrode Wire
- 1 x USB Charging Cable (if applicable, not specified in product data)
- 1 x User Manual (this document)
4. Product Overview
The EDC Zeus Handheld E-STIM Unit is a compact device designed for personal electrical stimulation. It features 8 distinct modes and adjustable intensity levels for a customizable experience.

Figure 1: Front view of the E-STIM unit, highlighting the display screen and control buttons including ON/OFF, MODE, TIME, STRONG, and HEAT.
Key Components:
- LCD Display: Shows current mode, intensity level, and timer.
- ON/OFF Button: Powers the device on or off.
- MODE Button: Cycles through the 8 stimulation modes.
- TIME Button: Adjusts the session duration.
- STRONG Button: Increases stimulation intensity.
- HEAT Button: Activates a heating function or specific mode.
- Electrode Ports: Connects the electrode wires.
- Silicone Electrode Pads: Apply to the skin for stimulation.
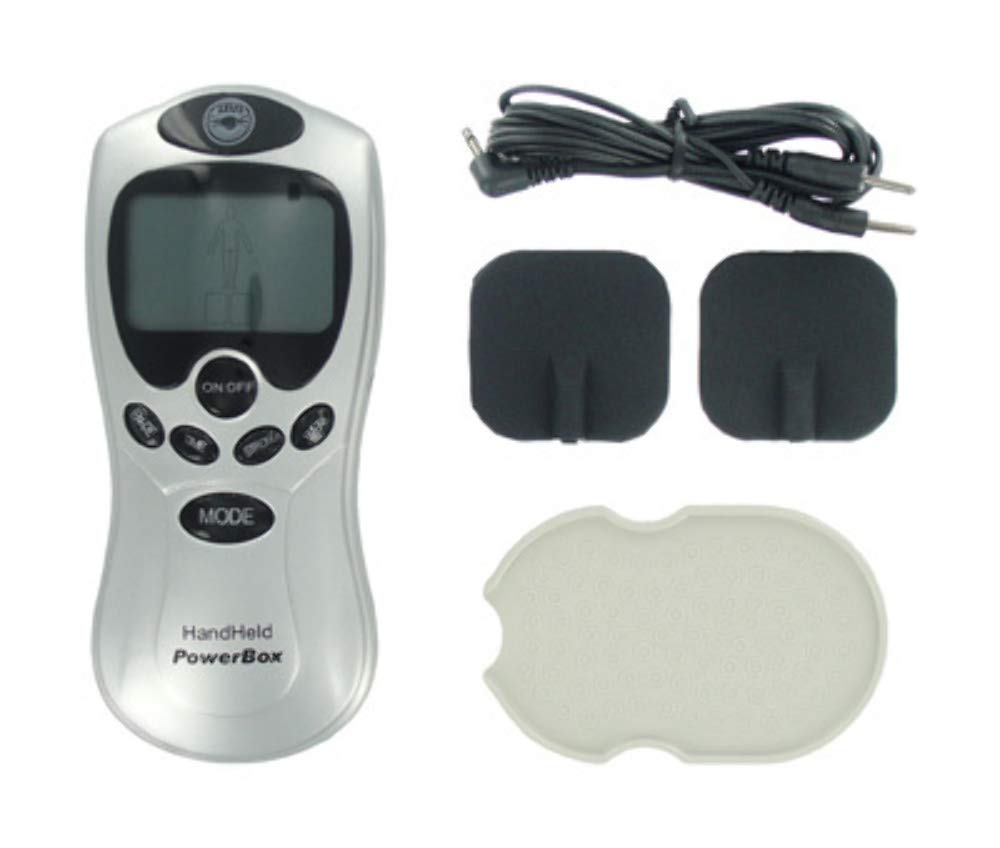
Figure 2: The E-STIM unit with electrode wires and silicone pads attached, ready for use.
5. Setup
- Charge the Unit: If the unit is rechargeable, connect the USB charging cable to the unit and a suitable USB power source. Allow it to charge fully before first use. If battery-operated, insert required batteries (not included).
- Connect Electrode Wires: Insert the pin connectors of the electrode wire into the electrode ports on the top of the E-STIM unit.
- Attach Electrode Pads: Connect the other end of the electrode wire to the silicone electrode pads. Ensure a secure connection.
- Prepare Skin: Clean and dry the skin area where the pads will be applied. Avoid applying pads over cuts, wounds, or irritated skin.
- Apply Pads: Carefully peel the protective film from the electrode pads and firmly press them onto the desired skin area. Ensure full contact.
6. Operating Instructions
- Power On: Press the "ON/OFF" button to turn on the device. The LCD display will illuminate.
- Select Mode: Press the "MODE" button repeatedly to cycle through the 8 available stimulation modes. Observe the display to see the active mode.
- Adjust Intensity: Press the "STRONG" button to increase the stimulation intensity. Start at the lowest setting and gradually increase to a comfortable level. Avoid setting the intensity too high, which can cause discomfort.
- Set Time: Press the "TIME" button to adjust the session duration. The default session time may vary, refer to the display.
- Activate Heat: Press the "HEAT" button to activate the heating function or a specific heat-related mode.
- Session End: The unit will automatically turn off once the set time has elapsed. You can also manually turn it off by pressing the "ON/OFF" button.
- Remove Pads: Gently peel the electrode pads from your skin. Replace the protective film on the pads for storage.
Understanding the 8 Modes:
The unit offers 8 distinct stimulation modes. While specific details for each mode are not provided, generally these modes vary in pulse patterns, frequencies, and waveforms to provide different sensations. Experiment with each mode to find what is most suitable for your preferences. Always start with low intensity when trying a new mode.
7. Maintenance and Care
- Cleaning the Unit: Wipe the main unit with a soft, dry cloth. Do not use abrasive cleaners or immerse the unit in water.
- Cleaning Pads: The silicone pads can be gently wiped with a damp cloth if needed. Ensure they are completely dry before re-applying the protective film.
- Storage: Store the unit and pads in a cool, dry place, away from direct sunlight and extreme temperatures. Keep the protective film on the pads to maintain their adhesive quality.
- Pad Lifespan: The adhesive quality of the pads will diminish over time. Replace pads when they no longer stick effectively to the skin.
8. Troubleshooting
- Unit does not turn on:
- Ensure the unit is fully charged (if rechargeable) or has fresh batteries (if battery-operated).
- Press and hold the "ON/OFF" button for a few seconds.
- No sensation or weak sensation:
- Check that the electrode wires are securely connected to both the unit and the pads.
- Ensure the pads are making full contact with clean, dry skin.
- Increase the intensity using the "STRONG" button.
- The pads may have lost their adhesive quality; try replacing them.
- Display is not working correctly:
- Turn the unit off and then on again.
- Ensure the unit is adequately charged.
- Discomfort during use:
- Reduce the intensity immediately.
- Ensure pads are not placed over sensitive or broken skin.
- Discontinue use if discomfort persists and consult a healthcare professional.
9. Specifications
- Model: AC204
- Dimensions: 5 x 2.83 x 0.89 inches
- Weight: 10.88 ounces
- Modes: 8 Stimulation Modes
- Power Source: Not specified (typically internal rechargeable battery or external AAA/AA batteries)
- Manufacturer: XR
10. Warranty and Support
For warranty information or technical support, please contact the manufacturer or your retailer. Keep your purchase receipt as proof of purchase.
Manufacturer: XR


