Introduction
This manual provides detailed instructions for the installation, operation, and maintenance of your DINGLILIGHTING 10W LED Motion Sensor Flood Light. Designed for outdoor use, this floodlight offers automatic illumination based on motion detection, enhancing security and convenience for areas such as garages, yards, patios, and pathways.

Image: The 10W LED Motion Sensor Flood Light installed on a building, providing bright illumination to an outdoor area at night.
Safety Information
- Always disconnect power before installing or servicing the fixture.
- Consult a qualified electrician if you have any electrical questions or concerns.
- Ensure the product is installed on a stable surface capable of supporting its weight.
- Do not immerse the floodlight in water for extended periods, despite its IP66 waterproof rating. The motion sensor is IP44 rated.
- Keep the product out of reach of children.
- Avoid installing in flammable, explosive, or corrosive environments.
- If the glass is broken, replace it immediately.
Package Contents
The package includes the following items:
- 1 x 10W LED Motion Sensor Flood Light (with attached power cord)
- 1 x Operation Instruction Manual

Image: The 10W LED Motion Sensor Flood Light, showing the main light unit, the adjustable motion sensor, and the attached power cord with a US 3-prong plug.
Specifications
| Feature | Detail |
|---|---|
| Brand | DINGLILIGHTING |
| Model Number | WS-FPA5-10A |
| Wattage | 10 Watts |
| Brightness | 800 Lumens |
| Color Temperature | 6000 Kelvin (Daylight White) |
| Material | Aluminum, Glass, Metal |
| Product Dimensions | 4.53"L x 3.3"W x 5.91"H |
| Item Weight | 1.4 Pounds |
| Water Resistance Level | IP66 (Floodlight), IP44 (Motion Sensor) |
| Power Source | AC Corded Electric |
| Special Feature | Motion Sensor (Not Dimmable) |

Image: Detailed dimensions of the flood light unit, showing measurements in both millimeters and inches (4.53"L x 3.3"W x 5.91"H).
Setup and Installation
The DINGLILIGHTING 10W LED Motion Sensor Flood Light is designed for easy installation. It features a thickened adjustable metal stand for secure mounting.
- Turn off Main Power: Before starting installation, ensure the main power supply to the installation area is turned off at the circuit breaker or fuse box.
- Mount the Fixture: Use appropriate screws (not included) to securely mount the floodlight's adjustable metal stand to a wall, ceiling, or other suitable surface. The stand allows for adjustment of the light direction.
- Adjust Light Direction: Loosen the screws on the adjustable stand to set the desired angle of the floodlight, then tighten them to secure the position.
- Connect Power: Plug the 3-prong power cord into a properly installed and grounded outdoor electrical outlet. If hardwiring, consult a qualified electrician.
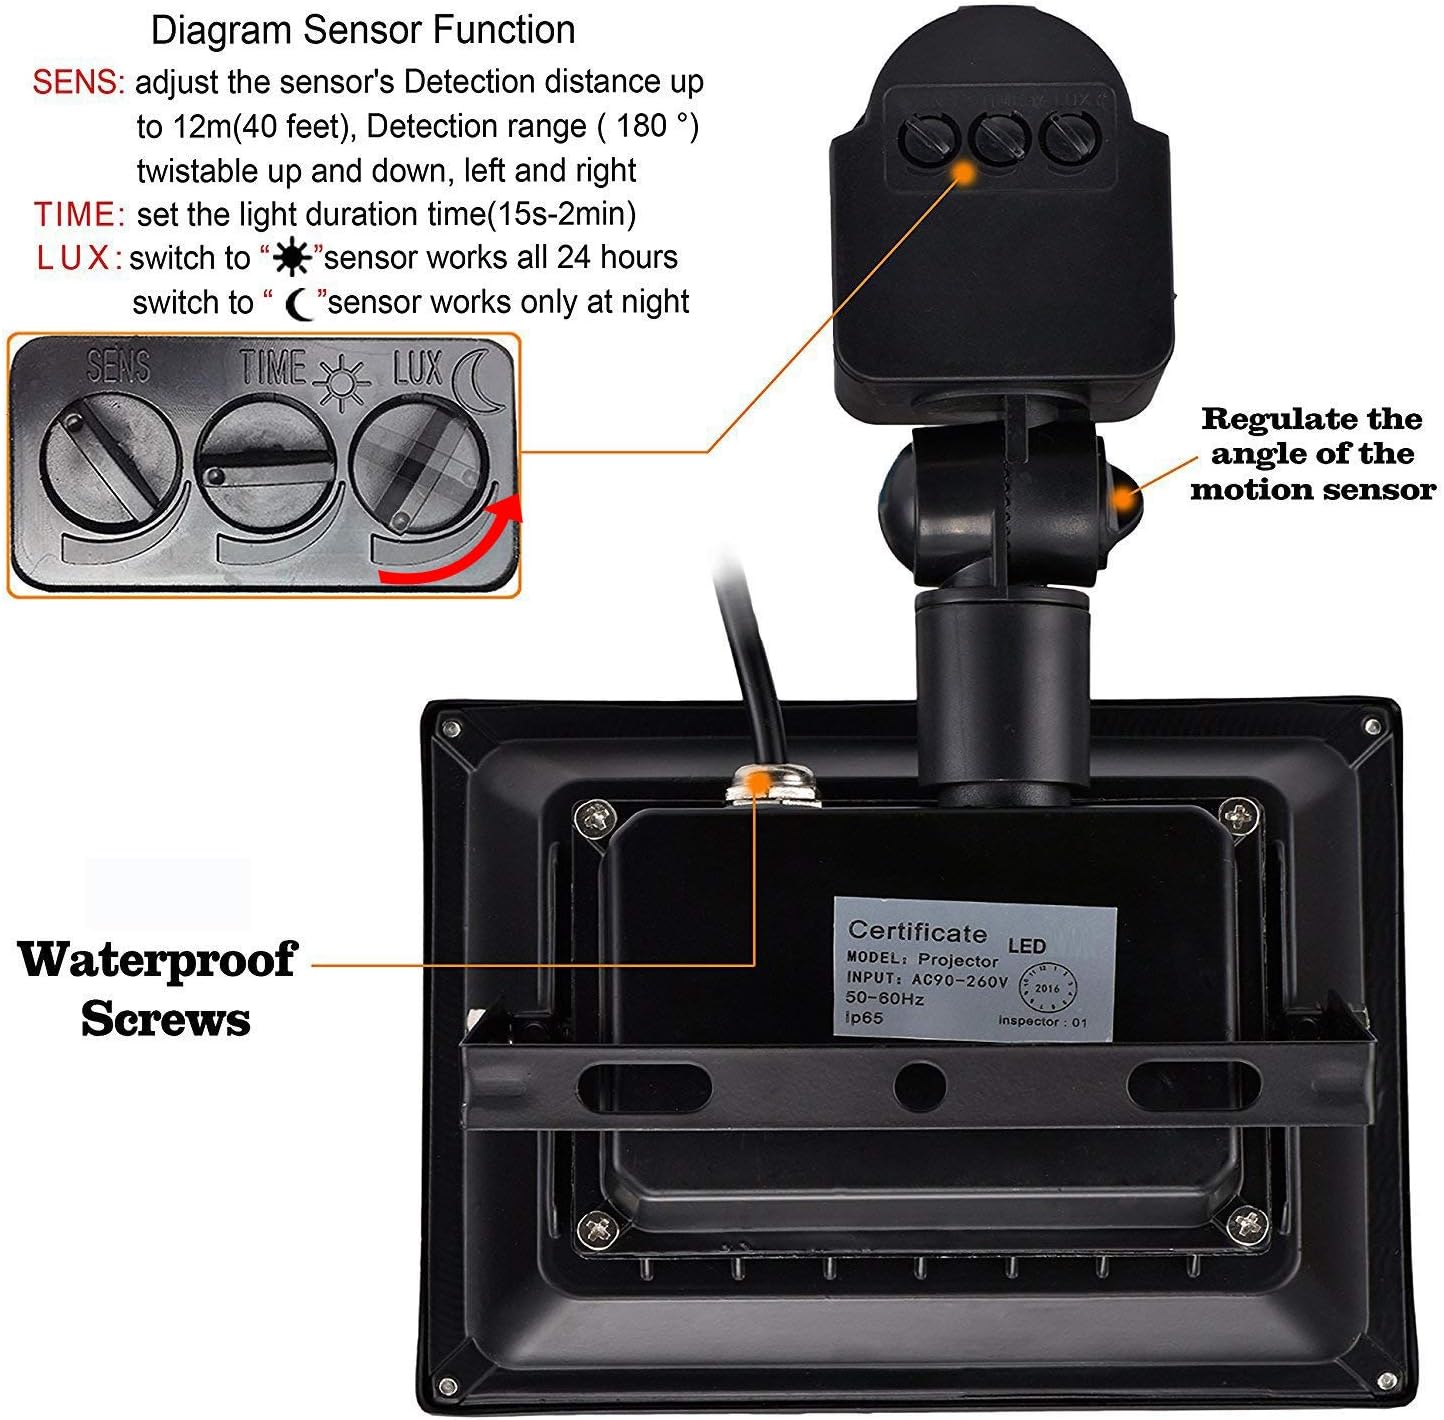
Image: Examples of where the flood light can be installed, including a garden, parking area, and backyard, demonstrating its versatility.

Image: A close-up view of the flood light's adjustable bracket and the motion sensor, highlighting their rotational capabilities for precise positioning.
Operating Instructions
The flood light features a smart motion sensor with adjustable settings for optimal performance.
Motion Sensor Functionality:
The light automatically turns on when sensing motion within its detection range and turns off after a set duration if no further motion is detected. It does not have a dimmer mode.
Adjusting Sensor Settings:
The motion sensor unit has three adjustable knobs: SENS, TIME, and LUX.
- SENS (Sensitivity): Adjusts the sensor's detection distance up to 12 meters (40 feet). The detection range is 180 degrees, twistable up and down, left and right.
- TIME (Duration): Sets the light duration time, from 15 seconds to 2 minutes, after motion is no longer detected.
- LUX (Light Sensor): Determines when the sensor operates:
- Switch to "SUN" symbol: The sensor works all 24 hours (day and night).
- Switch to "MOON" symbol: The sensor works only at night or in dark places.
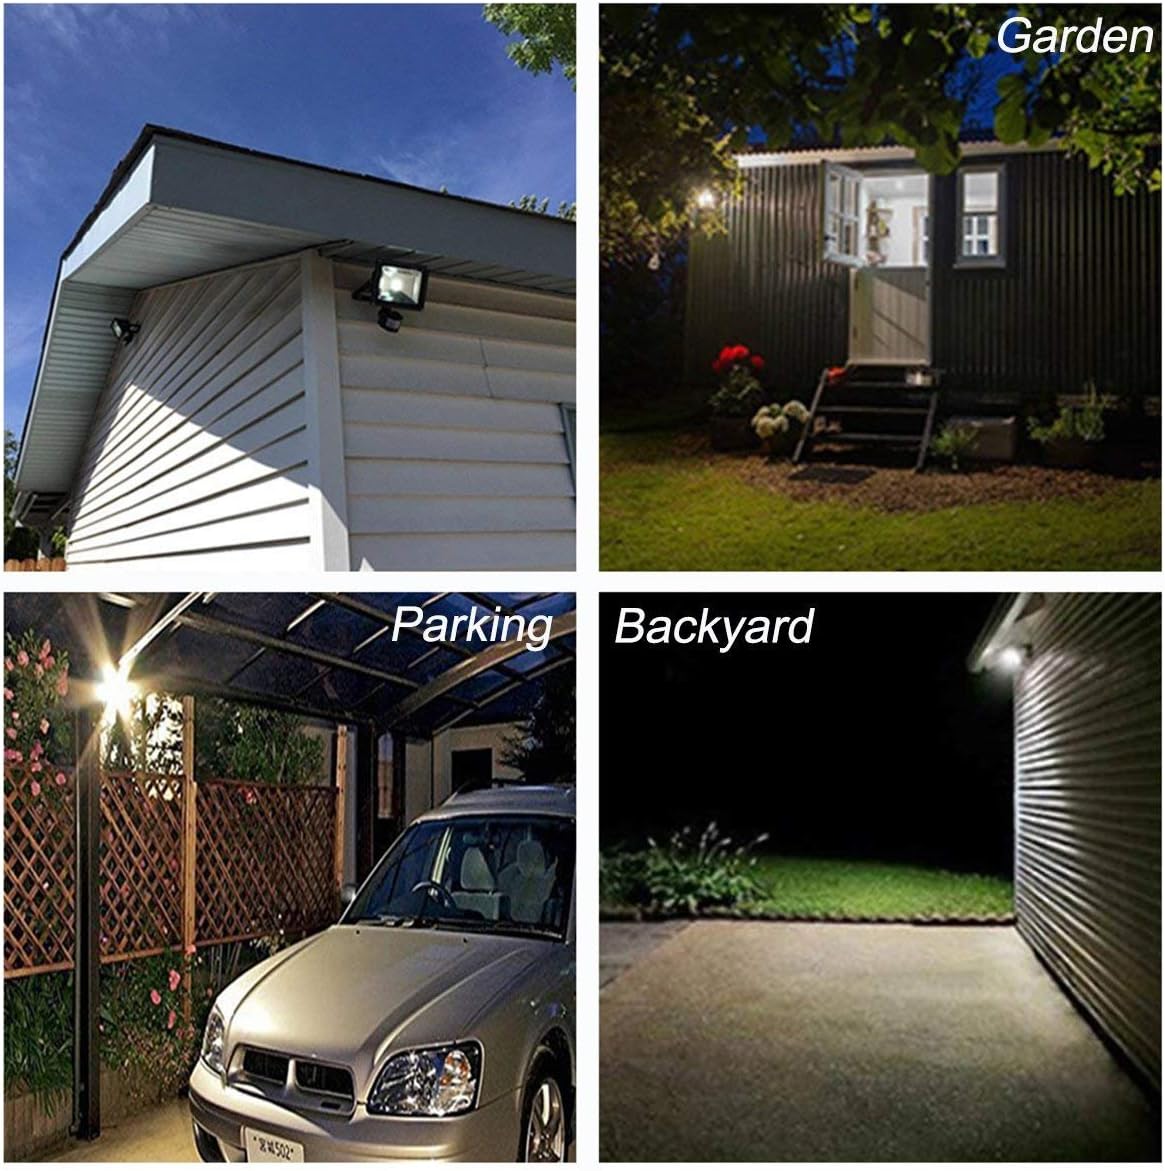
Image: A close-up diagram illustrating the three adjustment knobs (SENS, TIME, LUX) on the motion sensor, with explanations for each setting.
Official Product Video: Sensor Adjustment and Function
Video: This video demonstrates how to adjust the SENS, TIME, and LUX settings on the motion sensor. It also visually explains how the motion sensor detects movement and activates the light, showing the light turning on when motion is detected and turning off after a set period.
Maintenance
To ensure optimal performance and longevity of your flood light, follow these simple maintenance guidelines:
- Cleaning: Use a dry or slightly dampened clean cloth to wipe the surface of the fixture. Do not use abrasive cleaners or solvents.
- Inspection: Periodically check the power cord and connections for any signs of damage. Ensure the mounting is secure.
- Glass Condition: If the glass cover is cracked or broken, discontinue use and replace the fixture to maintain its IP66 rating.
Troubleshooting
| Problem | Possible Cause | Solution |
|---|---|---|
| Light does not turn on. | No power supply; LUX setting incorrect; Sensor not detecting motion. | Check power connection and circuit breaker. Adjust LUX to "SUN" for 24-hour operation or ensure sufficient darkness for "MOON" setting. Verify sensor is pointed correctly and within range. |
| Light stays on continuously. | Continuous motion detected; TIME setting too long; LUX setting incorrect. | Ensure no constant motion in the detection area. Adjust TIME setting to a shorter duration. If set to "SUN", the light will always be on with motion; switch to "MOON" for night-only operation. |
| Light turns on too frequently. | SENS setting too high; Sensor picking up unwanted motion (e.g., trees, small animals). | Reduce the SENS setting. Reposition the sensor to avoid detecting irrelevant movements. |
Warranty
This DINGLILIGHTING product comes with a 2-year manufacturer warranty from the date of purchase. This warranty covers defects in materials and workmanship under normal use and service. Please retain your proof of purchase for warranty claims.
Support
If you have any questions or require assistance with your DINGLILIGHTING 10W LED Motion Sensor Flood Light, please feel free to contact our customer service. We aim to reply to your email within 24 hours.
For support, please refer to the contact information provided in your product packaging or visit the official DINGLILIGHTING store on Amazon.


