Introduction
This user manual provides detailed instructions for the operation and maintenance of your WLN KD-C1 Mini Walkie Talkie. The KD-C1 is a professional two-way radio operating on the UHF 400-470Mhz frequency range, designed for reliable communication. Its rugged feel case and integrated antenna ensure strong anti-interference capabilities and reduced radiation.
What's in the Box
Upon opening the package, please verify that all the following items are included:
- 1 x WLN KD-C1 Walkie Talkie
- 1 x Earpiece
- 1 x Desktop Charger
- 1 x Belt Clip
- 1 x Lithium Ion Battery
- 1 x USB Charging Cable

Image: All components included in the WLN KD-C1 package. This includes the walkie talkie unit, a desktop charging cradle, a USB charging cable, a removable belt clip, a lithium-ion battery pack, and a user's manual.
Product Overview
Familiarize yourself with the various parts and controls of your WLN KD-C1 walkie talkie.
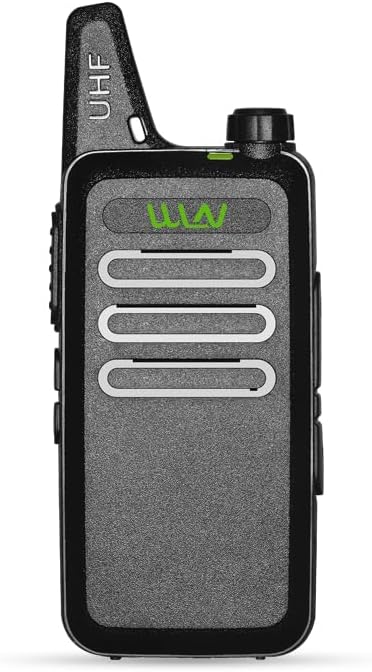
Image: Front view of the WLN KD-C1 walkie talkie, showing the speaker grille and the WLN logo. The green light indicates power or signal.
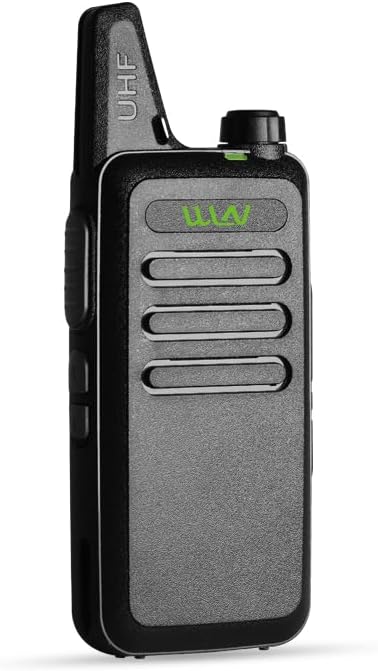
Image: Angled front view of the WLN KD-C1 walkie talkie, highlighting its slim profile and integrated antenna.
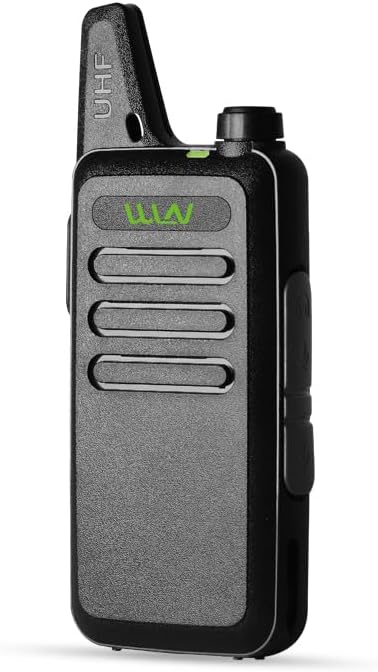
Image: Side view of the WLN KD-C1 walkie talkie, showing the large Push-To-Talk (PTT) button and volume/channel knob on top.

Image: Opposite side view of the WLN KD-C1 walkie talkie, showing the accessory port for earpiece and programming cable, and the micro-USB charging port.
Key Components:
- Antenna: Integrated for optimal signal reception and transmission.
- Power/Volume Knob: Rotate to turn the radio on/off and adjust volume.
- Channel Selector Knob: Rotate to select one of the 16 available channels.
- Push-To-Talk (PTT) Button: Press and hold to transmit your voice. Release to listen.
- Speaker/Microphone: For audio output and input.
- Accessory Port: For connecting the included earpiece or a programming cable.
- Micro-USB Charging Port: For charging the radio directly.
- Battery Compartment: Houses the rechargeable Lithium Ion battery.
Setup
1. Battery Installation
- Ensure the radio is turned off.
- Locate the battery compartment cover on the back of the radio.
- Slide the cover down or unclip it to open.
- Insert the Lithium Ion battery pack, ensuring the contacts align correctly with the radio's terminals.
- Replace the battery compartment cover, ensuring it clicks securely into place.
2. Initial Charging
Before first use, fully charge the battery. A full charge typically takes 3-4 hours.
- Connect the USB charging cable to the desktop charger.
- Plug the charger into a standard wall outlet.
- Place the walkie talkie into the charging cradle. Ensure the charging indicator light on the cradle illuminates (usually red for charging, green for fully charged).
- Alternatively, you can charge the radio directly using the micro-USB port on the side with a compatible USB cable and power adapter.
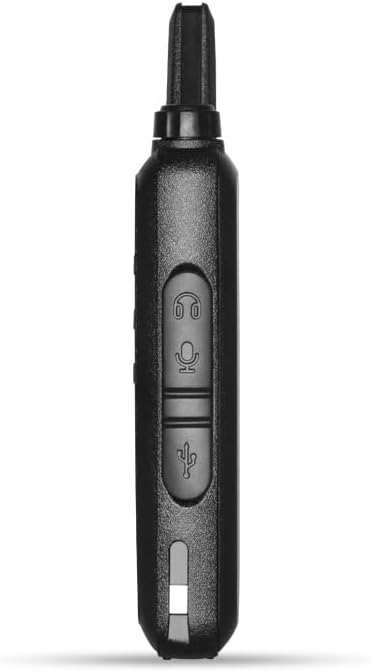
Image: The WLN KD-C1 walkie talkie placed in its desktop charging cradle, connected to a power source. The cradle ensures proper contact for battery charging.
3. Attaching the Belt Clip
The included belt clip allows for convenient carrying.
- Align the belt clip with the designated slots on the back of the radio.
- Slide the clip upwards until it locks into place.
- To remove, press the release tab (if present) and slide the clip downwards.
Operating Instructions
1. Power On/Off and Volume Adjustment
- To turn on the radio, rotate the Power/Volume knob clockwise until you hear a click and a power-on tone.
- To adjust the volume, continue rotating the Power/Volume knob. Clockwise increases volume, counter-clockwise decreases it.
- To turn off the radio, rotate the Power/Volume knob counter-clockwise until you hear a click and a power-off tone.
2. Channel Selection
The WLN KD-C1 has 16 pre-programmed channels. To communicate with another radio, both radios must be on the same channel.
- Rotate the Channel Selector knob (located next to the Power/Volume knob) to choose your desired channel.
- The radio will announce the channel number as you select it.
3. Transmitting and Receiving
- To Transmit: Press and hold the PTT (Push-To-Talk) button on the side of the radio. Speak clearly into the microphone, holding the radio approximately 2-5 cm from your mouth. Release the PTT button when you finish speaking.
- To Receive: Ensure the PTT button is not pressed. The radio will automatically receive transmissions on the selected channel.
4. Using the Earpiece
For private communication or hands-free operation, connect the included earpiece.
- Plug the earpiece connector firmly into the accessory port on the side of the radio.
- The earpiece typically includes a built-in microphone and PTT button for convenient operation.
5. Advanced Features
- Battery Saver: The radio automatically enters battery saver mode when no activity is detected, extending battery life.
- Low Power Alarm: The radio will emit an alert when the battery level is critically low, indicating it needs recharging.
- DCS and CTCSS: Digital Coded Squelch (DCS) and Continuous Tone-Coded Squelch System (CTCSS) are sub-audible tones that allow you to filter out unwanted conversations on a busy channel. These are typically programmed via software.
- Noise Reduction Function: Enhances audio clarity by reducing background noise.
Maintenance
- Cleaning: Use a soft, damp cloth to clean the radio's surface. Do not use harsh chemicals or abrasive cleaners.
- Battery Care: To prolong battery life, avoid overcharging or completely draining the battery. Store the radio and battery in a cool, dry place when not in use for extended periods.
- Storage: When storing the radio for a long time, remove the battery.
- Water Resistance: While the product description mentions "Waterproof", it's generally advisable to avoid submerging the device or exposing it to heavy rain to prevent damage.
Troubleshooting
| Problem | Possible Cause | Solution |
|---|---|---|
| Radio does not power on. | Battery is dead or not installed correctly. | Charge the battery. Ensure the battery is properly inserted and the compartment cover is secured. |
| Cannot communicate with other radios. | Radios are on different channels or out of range. | Ensure all radios are set to the same channel. Move closer to the other radio. Check for obstructions. |
| Poor audio quality or static. | Weak signal, interference, or low battery. | Move to an open area. Recharge the battery. Ensure antenna is clear. |
| Battery life is short. | Battery not fully charged or aging battery. | Ensure battery is fully charged before use. Consider replacing the battery if it's old. |
Specifications
| Feature | Detail |
|---|---|
| Brand | WLN |
| Model | KD-C1 |
| Frequency Range | UHF 400-470MHz |
| Number of Channels | 16 |
| Output Power | 2-3W |
| Battery Type | Lithium Ion |
| Voltage | 3.7 Volts |
| Charging | Micro-USB Charging |
| Dimensions (L x W x H) | 96 x 55 x 22 mm (approx.) |
| Item Weight | ~11.1 ounces (including battery) |
| Special Features | Battery Saver, Low Power Alarm, DCS/CTCSS, Noise Reduction Function |
| Included Components | Walkie Talkie, Earphone, Desktop Charger |
Warranty and Support
For warranty information or technical support, please refer to the documentation provided with your purchase or contact the manufacturer directly. Specific warranty terms may vary by region and retailer.