1. Introduction
Thank you for choosing the Massive Audio BP1000.1 V2 Blade Series Monoblock Car Amplifier. This manual provides essential information for the proper installation, operation, and maintenance of your amplifier. Please read this manual thoroughly before attempting installation or operation to ensure optimal performance and safety.

Image 1.1: Top view of the Massive Audio BP1000.1 V2 Blade Series Monoblock Car Amplifier, showcasing its sleek black chassis and branding.
1.1 Safety Precautions
- Always disconnect the vehicle's battery negative terminal before starting any installation.
- Ensure all wiring is properly routed and secured to prevent damage or short circuits.
- Use appropriate gauge wiring for power, ground, and speaker connections as specified.
- Mount the amplifier securely in a location that allows for adequate ventilation and is protected from moisture and excessive heat.
- Do not operate the amplifier if it is damaged or malfunctioning. Refer to the troubleshooting section or contact support.
2. Key Features
The Massive Audio BP1000.1 V2 Blade Series Monoblock Amplifier is designed for high-performance car audio systems. Key features include:
- 1000 Watts Max Power Output.
- 2 Ohm Stable operation.
- Class A/B Monoblock design for efficient power delivery.
- Variable Low Pass Filter (LPF) for precise subwoofer integration.
- Adjustable Bass Boost for enhanced low-frequency response.
- High-level inputs for integration with factory head units.
- Protection circuitry against thermal overload, short circuits, and over/under voltage.
3. Setup and Installation
3.1 Mounting the Amplifier
Choose a mounting location that is dry, well-ventilated, and secure. Avoid mounting the amplifier directly on carpet or in enclosed spaces that restrict airflow. Ensure sufficient space around the amplifier for cooling.
- Place the amplifier in the desired location and mark the mounting holes.
- Drill pilot holes if necessary, ensuring no wires or fuel lines are damaged.
- Secure the amplifier using the provided mounting screws.
3.2 Wiring Connections
Proper wiring is crucial for performance and safety. Refer to the diagram below for connection points.

Image 3.1: Rear connection panel of the amplifier, showing power, ground, remote, and speaker terminals.
3.2.1 Power, Ground, and Remote Connections
- Power (12V): Connect a heavy-gauge power cable (e.g., 4 AWG) directly from the positive terminal of the vehicle's battery to the amplifier's +12V terminal. Install an in-line fuse (not supplied) within 18 inches of the battery.
- Ground (GND): Connect a heavy-gauge ground cable (e.g., 4 AWG) from the amplifier's GND terminal to a clean, unpainted metal surface of the vehicle chassis. The ground point should be as short as possible.
- Remote (REM IN/OUT): Connect a remote turn-on wire from your head unit's remote output to the amplifier's REM IN terminal. This wire signals the amplifier to turn on and off with your head unit.
3.2.2 Speaker Connections
Connect your subwoofer(s) to the amplifier's speaker terminals. Ensure the total impedance of the connected speakers is 2 Ohms or higher for stable operation. Observe correct polarity (+ to + and - to -).
3.2.3 Input Connections
- RCA Inputs (Low-Level): If your head unit has RCA pre-outs, connect them to the amplifier's RCA INPUTs (L and R).
- High-Level Inputs: If your head unit does not have RCA pre-outs, use the high-level input connector. Connect the speaker wires from your head unit to the corresponding terminals on the high-level input harness.
4. Operating Instructions
The amplifier features several controls to fine-tune its performance. Refer to the control panel image below.
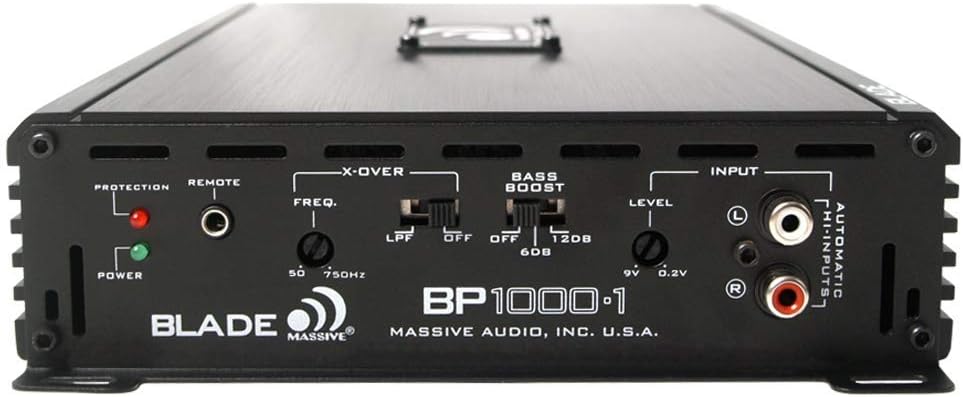
Image 4.1: Front control panel of the amplifier, detailing the crossover, bass boost, and level adjustments.
4.1 Level Control (Gain)
The LEVEL control (also known as gain) matches the amplifier's input sensitivity to the output of your head unit. Start with the level control at minimum. Gradually increase it until you hear distortion, then back off slightly. This is not a volume control.
4.2 Crossover (LPF)
The LPF (Low Pass Filter) control allows you to set the upper frequency limit for the amplifier's output. This is essential for subwoofers, ensuring they only reproduce low frequencies. Adjust the FREQ. knob between 50Hz and 750Hz to blend the subwoofer output with your main speakers.
4.3 Bass Boost
The BASS BOOST switch provides an adjustable boost to low frequencies. You can select OFF, 6dB, or 12dB boost. Use this feature sparingly and adjust carefully to avoid distortion or damage to your speakers.
4.4 Input Selection
The amplifier automatically detects whether RCA or high-level inputs are connected. Ensure only one type of input is used at a time.
5. Maintenance
The Massive Audio BP1000.1 V2 amplifier requires minimal maintenance. Follow these guidelines to ensure longevity:
- Keep the amplifier clean and free of dust and debris. Use a soft, dry cloth for cleaning.
- Ensure proper ventilation. Periodically check that the cooling fins are not obstructed.
- Regularly inspect all wiring connections for tightness and corrosion.
- Avoid exposing the amplifier to extreme temperatures or moisture.
6. Troubleshooting
If you experience issues with your amplifier, consult the following table for common problems and solutions.
| Problem | Possible Cause | Solution |
|---|---|---|
| No Power / Amplifier Not Turning On |
|
|
| No Sound Output |
|
|
| Distorted Sound |
|
|
| Amplifier Overheating / Protection Light On |
|
|
7. Specifications
Technical specifications for the Massive Audio BP1000.1 V2 Monoblock Amplifier:
| Feature | Specification |
|---|---|
| Brand | Massive Audio |
| Model Number | BP1000.1V2 |
| Number of Channels | 1 (Monoblock) |
| Output Power | 1000 Watts (Max) |
| Minimum Stable Impedance | 2 Ohms |
| Voltage (Minimum Supply) | 12 Volts |
| Voltage (Maximum Supply) | 9 Volts (Note: This specification appears inconsistent with typical car audio systems. Refer to product documentation for operational voltage range.) |
| Mounting Type | Surface Mount |
| Item Weight | 6.18 pounds |
| Package Dimensions | 15.2 x 8.15 x 2.95 inches |
| UPC | 623169631122 |
8. Warranty and Support
For warranty information, technical support, or service inquiries, please contact Massive Audio directly or refer to their official website. Keep your purchase receipt as proof of purchase for any warranty claims.
For further assistance, visit the Massive Audio Store on Amazon.


