1. Introduction
This manual provides essential information for the safe and efficient operation of your MEDION LIFE E64070 CD-Radio MP3 Cassette Stereo System. Please read it thoroughly before using the device and retain it for future reference.
2. Safety Instructions
- Do not expose the device to rain or moisture.
- Do not block ventilation openings.
- Ensure proper power supply as indicated on the device.
- Avoid placing the device near heat sources.
- Do not open the casing; refer all servicing to qualified personnel.
- Keep batteries out of reach of children.
3. Product Overview
Familiarize yourself with the components and controls of your stereo system.
3.1 Front and Top View

Image 1: Front and top view of the Medion LIFE E64070 stereo system. Shows the main unit with CD compartment, cassette deck, control buttons, LCD display, and telescopic antenna.

Image 2: Top view of the Medion LIFE E64070 with the CD compartment lid open, revealing the CD player mechanism.

Image 3: Angled view of the Medion LIFE E64070 with the CD compartment lid open, showing the CD player and some top panel controls.
3.2 Rear View
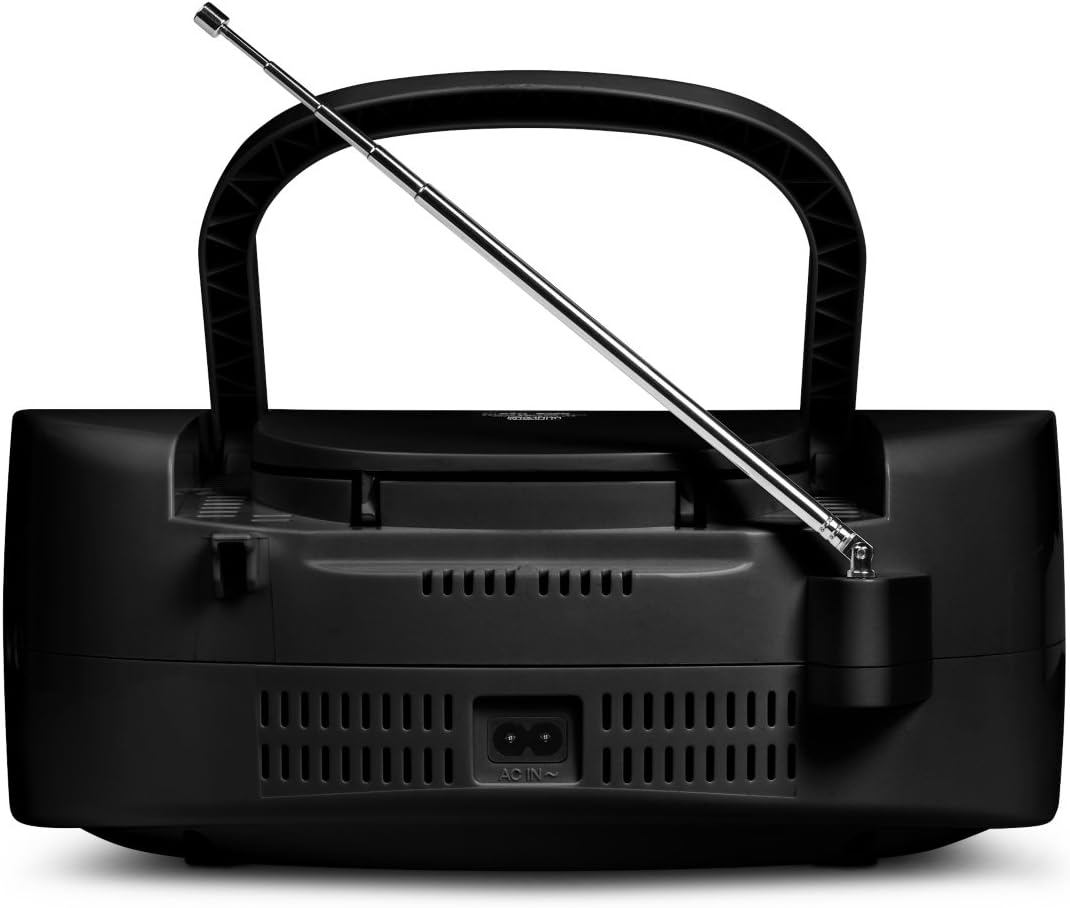
Image 4: Rear view of the Medion LIFE E64070, showing the AC power input and battery compartment.
3.3 Remote Control

Image 5: The remote control for the Medion LIFE E64070, displaying various function buttons for power, mode selection, playback control, tuning, and volume.
3.4 Controls and Functions
- POWER Button: Turns the unit on or off.
- MODE Button (CD/USB, TAPE/LINE IN, RADIO): Selects the audio source.
- PLAY/PAUSE Button: Starts or pauses playback.
- STOP/EJECT Button: Stops playback and ejects CD/cassette.
- SKIP/SEARCH Buttons (<<, >>): Skips tracks or searches within a track/frequency.
- VOLUME +/- Buttons: Adjusts the volume level.
- TUNING Buttons: Adjusts radio frequency.
- PRESET/PROGRAM Button: Stores or recalls radio presets, programs CD tracks.
- REPEAT/RANDOM Button: Controls playback modes for CD/USB.
- LCD Display: Shows current status, frequency, track number.
- Telescopic Antenna: For FM radio reception.
- Cassette Deck: For playing and recording (if applicable) cassette tapes.
- CD Compartment: For playing audio CDs.
- USB Port: For playing MP3 files from a USB drive.
- LINE IN Jack: For connecting external audio devices.
4. Setup
4.1 Power Connection
The unit can be powered by AC mains or batteries.
AC Power
- Ensure the voltage rating on the unit matches your local power supply.
- Connect the AC power cord to the AC IN socket on the rear of the unit.
- Plug the other end of the power cord into a wall outlet.
Battery Installation
- Open the battery compartment cover located on the rear of the unit.
- Insert the required number of batteries (e.g., 6 x 1.5V C-size batteries, not included) according to the polarity markings (+/-).
- Close the battery compartment cover securely.
- Note: Remove batteries if the unit will not be used for an extended period.
4.2 Antenna Setup
For optimal FM radio reception, fully extend the telescopic antenna. For AM reception, rotate the unit for best signal.
5. Operating Instructions
5.1 General Operation
- Power On/Off: Press the POWER button.
- Volume Adjustment: Use the VOLUME +/- buttons.
- Source Selection: Press the MODE button repeatedly to cycle through CD/USB, TAPE/LINE IN, and RADIO modes.
5.2 Radio Operation (AM/FM)
- Select RADIO mode using the MODE button.
- Extend the telescopic antenna for FM.
- Use the TUNING buttons to manually tune to your desired station.
- Auto Scan (AMS): Press the AMS button to automatically scan and store available stations (if supported by model).
- Preset Stations:
- To store: Tune to a station, press PRESET/PROGRAM, use SKIP/SEARCH to select a preset number, then press PRESET/PROGRAM again to confirm.
- To recall: Press PRESET/PROGRAM, then use SKIP/SEARCH to select the desired preset number.
5.3 CD Player Operation
- Select CD/USB mode.
- Open the CD compartment lid.
- Place a CD (audio CD, CD-R, CD-RW) with the label side facing up.
- Close the CD compartment lid. The display will show "READING" then the total number of tracks.
- Press PLAY/PAUSE to start playback.
- Press SKIP/SEARCH buttons to skip tracks. Hold to search within a track.
- Press STOP/EJECT to stop playback.
- Repeat Play: Press REPEAT/RANDOM once for single track repeat, twice for all tracks repeat.
- Program Play:
- In STOP mode, press PRESET/PROGRAM. "P01" will flash.
- Use SKIP/SEARCH to select the first track, then press PRESET/PROGRAM.
- Repeat for up to 20 tracks.
- Press PLAY/PAUSE to start programmed playback.
5.4 Cassette Player Operation
- Select TAPE/LINE IN mode.
- Press the STOP/EJECT button on the cassette deck to open the compartment.
- Insert a cassette tape.
- Press the PLAY button to start playback.
- Use F.FWD (Fast Forward) and REW (Rewind) buttons to navigate the tape.
- Press STOP/EJECT to stop playback and open the compartment.
5.5 USB Playback (MP3)
- Select CD/USB mode.
- Insert a USB flash drive into the USB port. The unit will automatically detect and start playing MP3 files.
- Use SKIP/SEARCH buttons to navigate between MP3 tracks.
- Folder Navigation: Use the FOLDER +/- buttons on the remote control to navigate between folders (if applicable).
- Playback controls (PLAY/PAUSE, STOP, REPEAT, RANDOM) function similarly to CD playback.
5.6 LINE IN Operation
- Select TAPE/LINE IN mode.
- Connect an external audio device (e.g., smartphone, MP3 player) to the LINE IN jack using a 3.5mm audio cable (not included).
- Start playback on your external device. The audio will be played through the stereo system's speakers.
- Adjust volume using the unit's VOLUME +/- buttons or the external device's volume control.
6. Maintenance
- Cleaning: Wipe the unit with a soft, dry cloth. Do not use abrasive cleaners or solvents.
- CD Lens Care: Use a specialized CD lens cleaner if playback issues occur.
- Cassette Head Cleaning: Periodically clean the cassette heads with a cotton swab lightly dampened with isopropyl alcohol to ensure optimal sound quality.
- Storage: Store the unit in a cool, dry place away from direct sunlight and extreme temperatures.
7. Troubleshooting
| Problem | Possible Cause | Solution |
|---|---|---|
| No power | Power cord not connected; Batteries depleted or incorrectly inserted. | Check AC cord connection; Replace batteries or ensure correct polarity. |
| No sound | Volume too low; Incorrect source selected; Headphones connected. | Increase volume; Select correct mode (CD/USB, RADIO, TAPE/LINE IN); Disconnect headphones. |
| CD/USB not playing | CD inserted incorrectly or scratched; USB drive not formatted correctly or empty; Dirty CD lens. | Insert CD correctly (label up); Use a clean, unscratched CD; Ensure USB is FAT32 and contains MP3s; Clean CD lens. |
| Poor radio reception | Antenna not extended; Interference; Weak signal. | Fully extend FM antenna; Rotate unit for AM; Move away from electronic devices. |
| Cassette playback issues | Tape tangled or damaged; Dirty cassette heads. | Check tape condition; Clean cassette heads. |
8. Specifications
- Model: MEDION LIFE E64070 (50055574A1)
- Power Output (RMS): 6 Watts
- Tuner Type: Analog and Digital
- Frequency Bands: AM, FM (87.5 - 108 MHz)
- Optical Disc Support: CD, CD-R, CD-RW
- Cassette Player: Semi-auto-stop mechanism
- USB Playback: MP3 compatible
- Display: LCD with blue backlight
- Power Source: AC 230V ~ 50Hz or 6 x 1.5V C-size batteries
- Dimensions (L x W x H): 29.5 x 21.2 x 11.5 cm
- Weight: 1.56 kg
9. Warranty and Support
For warranty information and technical support, please refer to the documentation provided with your purchase or visit the official MEDION website. Keep your proof of purchase for warranty claims.
Manufacturer: MEDION
First Available Date: February 21, 2020


