1. Introduction
This manual provides detailed instructions for the installation, operation, and maintenance of your Temank EPEVER 40A MPPT Solar Charge Controller, model Tracer4210AN. This device is designed to efficiently manage power flow from solar panels to batteries in 12V/24V systems, supporting various battery types including lead-acid and lithium.
Please read this manual thoroughly before installation and use to ensure optimal performance and safety.
2. Product Features
- Advanced MPPT Technology: High tracking efficiency up to 99.5% and peak conversion efficiency of 98%, maximizing energy harvest from solar panels.
- Comprehensive Protection: Built-in safeguards against reverse polarity, overcharging, over-discharging, overload, short-circuiting, and reverse current.
- Optimized Charging: Features a 4-stage battery charging process (Bulk, Boost, Float, and Equalization) with temperature compensation for extended battery life and improved system performance.
- Versatile Compatibility: Supports 12V/24V DC system voltage auto-identification and is compatible with various deep cycle battery options: Sealed, Gel, Flooded, and Lithium.
- Monitoring and Control: Supports PC software, mobile application (APP), and MT-50 remote meter for system monitoring and parameter adjustment.
- User-Friendly Display: Equipped with a backlit LCD screen for displaying system information and working conditions.
- Efficient Heat Dissipation: Die-cast aluminum design ensures effective thermal management.

Figure 2.1: Key features of the EPEVER MPPT 40A Solar Charge Controller.
3. What's in the Box
Upon unpacking, please verify that all components listed below are present and undamaged:
- EPEVER MPPT Solar Charge Controller (Tracer4210AN)
- MT50 Remote Meter Display
- Remote Temperature Sensor (RTS)
- Communication Cable (USB to RJ45)
- Mounting Screws and Wall Plugs

Figure 3.1: Package contents including the controller, remote meter, temperature sensor, and communication cable.
4. Setup and Installation
Proper installation is crucial for the safe and efficient operation of your solar charge controller. Always ensure all power sources are disconnected before beginning installation.
4.1 Wiring Sequence
- Connect the battery to the charge controller.
- Connect the solar PV array to the charge controller.
- Connect the load to the charge controller.
To disconnect the system, reverse this order: disconnect the load first, then the solar PV array, and finally the battery.
4.2 System Wiring Diagrams

Figure 4.1: Wiring diagrams for systems with and without battery connection.
4.2.1 With Battery Mode
In this configuration, the solar charge controller regulates the charging of a battery bank from the solar panels and provides power to a DC load. Ensure the battery is connected before the PV array.
4.2.2 No Battery Mode (Batteryless Run)
The Tracer4210AN series supports direct connection to an inverter without a battery. When operating in this mode, the controller's battery terminals should be connected to the inverter. This mode is suitable for high-frequency inverters. Ensure the PV input power is greater than the load output power, considering conversion efficiencies.
5. Operating Instructions
5.1 Battery Type Settings
The controller is compatible with various battery types. It is essential to select the correct battery type for optimal charging and battery longevity. Use the MT50 remote meter or the mobile app to configure this setting.

Figure 5.1: Applicable battery types with corresponding display codes for configuration.
| Sequence | Display Code | Battery Type |
|---|---|---|
| 1 | SEI | Sealed Lead Acid Battery |
| 2 | GEL | GEL Sealed Lead-Acid Battery |
| 3 | FLd | Flooded Lead-Acid Battery |
| 4 | F04 | 4-Series LiFePO4 Battery |
| 5 | F08 | 8-Series LiFePO4 Battery |
| 6 | N03 | 3-Series Lithium-ion Battery |
| 7 | N06 | 6-Series Lithium-ion Battery |
| 8 | N07 | 7-Series Lithium-ion Battery |
| 9 | USE | User-Defined |
5.2 Load Work Modes
The controller offers multiple load control methods to suit various application needs:
- Timer Mode (1-14 Hrs): The load remains on for a specified duration after sunset.
- Manual Mode: The load can be manually turned on or off via the controller or remote meter.
- Test Mode: Used for testing the load output.
- Always-On Mode: The load output is continuously active.
- Auto-On/Off Mode (Dawn-to-Dusk Mode): The load automatically turns on at dusk and off at dawn.

Figure 5.2: Overview of available load work modes.
5.3 Monitoring and Control via App
The controller features built-in Bluetooth for mobile monitoring and control. Download the "Solar Guardian" app from your device's app store or scan the QR code provided in the product documentation. The app allows for real-time monitoring of system parameters and custom charging parameter adjustments.

Figure 5.3: Monitoring and control interface via the Solar Guardian mobile application. Download Solar Guardian App
6. System Configuration Calculation
Properly sizing your solar system components is essential for efficient operation. The following formulas and example illustrate how to calculate load power consumption, battery capacity, and solar panel power.
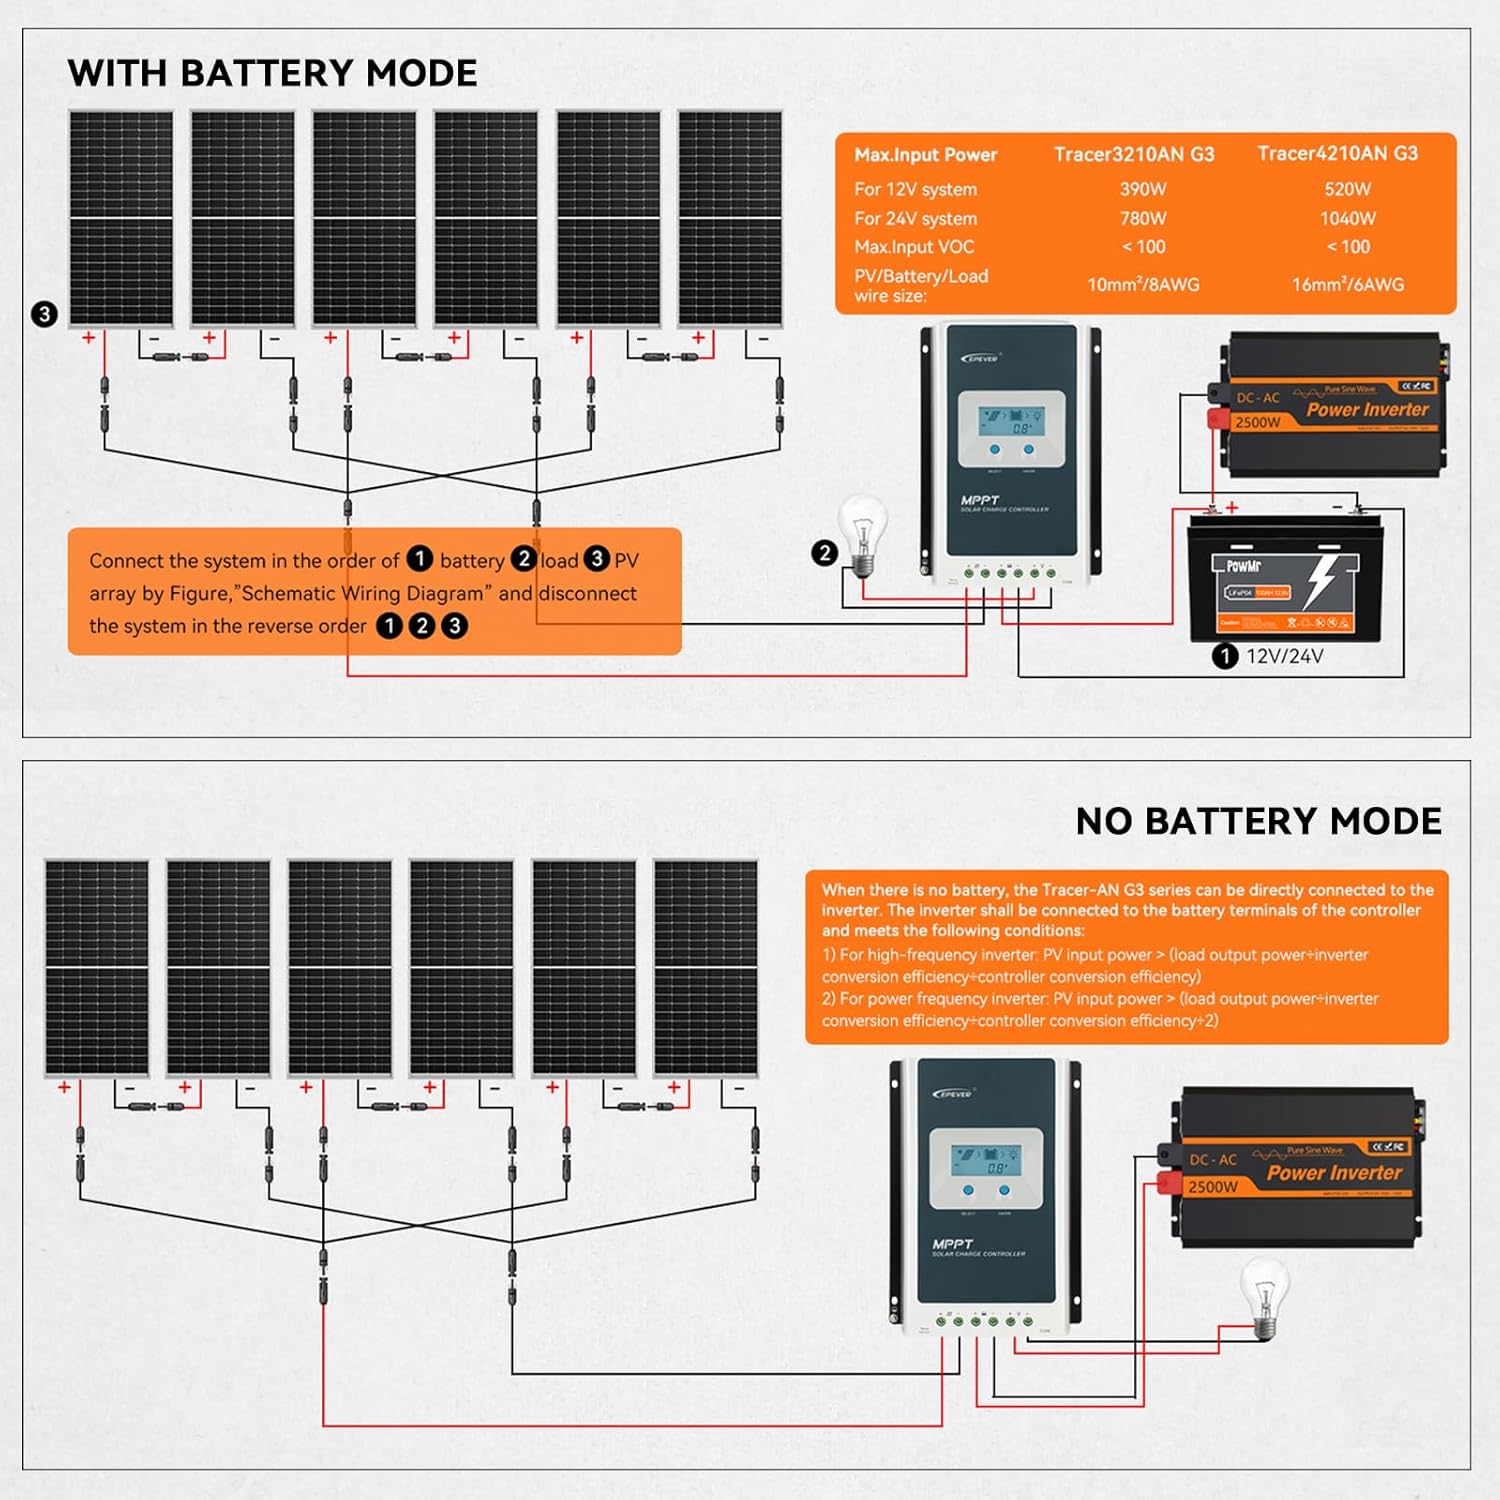
Figure 6.1: System configuration calculation formulas and an example scenario.
For detailed calculations and examples, refer to Figure 6.1. This section helps determine the appropriate battery capacity and solar panel wattage based on your daily energy consumption and desired autonomy.
7. Maintenance
Regular maintenance ensures the longevity and optimal performance of your solar charge controller and overall system.
- Visual Inspection: Periodically check all wiring for loose connections, corrosion, or damage. Ensure the controller's ventilation openings are clear of dust and debris.
- Cleaning: Clean the controller's exterior with a dry cloth. Do not use solvents or corrosive cleaners.
- Connection Integrity: Verify that all terminal connections are tight. Loose connections can cause overheating and damage.
- Battery Health: Monitor battery voltage and health regularly, especially for lead-acid batteries, to ensure they are within optimal operating parameters.
- Firmware Updates: Check the manufacturer's website or app for any available firmware updates to ensure your controller has the latest features and bug fixes.
8. Troubleshooting
If you encounter issues with your solar charge controller, refer to the following general troubleshooting steps. For more detailed guidance, consult the official Troubleshooting Guide PDF available for download.
- No Display/Power: Check battery connections and voltage. Ensure the battery is adequately charged.
- No Charging: Verify solar panel connections and ensure sufficient sunlight. Check PV array voltage. Confirm the correct battery type is selected.
- Load Not Working: Check load connections and ensure the load is not exceeding the controller's rated current. Verify the load work mode setting.
- Error Codes: Refer to the controller's display or the MT50 remote meter for any error codes. Consult the full user manual or troubleshooting guide for specific code interpretations.
- Overheating: Ensure the controller is installed in a well-ventilated area and not exposed to direct sunlight. Check for obstructions around the heat sink.
For a comprehensive troubleshooting resource, please download the official Troubleshooting Guide (PDF).
9. Specifications
Key technical specifications for the Temank EPEVER 40A MPPT Solar Charge Controller (Tracer4210AN):
- Model: Tracer4210AN
- Rated Charge Current: 40A
- System Voltage: 12V/24V Auto Work
- Max. PV Input Voltage: 100V
- Max. PV Input Power (12V System): 520W
- Max. PV Input Power (24V System): 1040W
- Battery Type: Sealed, Gel, Flooded, LiFePO4, Lithium-ion, User-Defined
- Grounding: Negative Ground
- Operating Temperature: -25°C to +55°C (Note: Product specification states 25 Degrees Celsius, but typical operating range is wider. Refer to full manual for exact range.)
- Display Type: LCD
- Item Weight: 1.9 Kilograms (4.18 pounds)
- Package Dimensions: 16.89 x 7.99 x 3.5 inches
- Manufacturer: EPEVER
- UPC: 615150301602
10. Warranty and Support
For warranty information and technical support, please refer to the documentation included with your product or visit the official Temank/EPEVER website. You may also contact customer service through your point of purchase.
Online Resources:
- Official Temank Store: Temank Store on Amazon
- User Manual (PDF): Download User Manual (PDF)


