1. Introduction
Thank you for choosing the Kaff KMW 5PJ Built-in Microwave Oven. This appliance is designed to offer versatile cooking options including microwave, grill, and combination modes, integrated seamlessly into your kitchen. To ensure safe and efficient operation, please read this manual thoroughly before using the appliance and retain it for future reference.
2. Important Safety Instructions
Always follow basic safety precautions when using electrical appliances to reduce the risk of fire, electric shock, injury to persons, or exposure to excessive microwave energy.
- Read all instructions before using the appliance.
- Do not attempt to operate this oven with the door open as this can result in harmful exposure to microwave energy.
- Do not place any object between the oven front face and the door or allow soil or cleaner residue to accumulate on sealing surfaces.
- Do not operate the oven if it is damaged. It is particularly important that the oven door closes properly and that there is no damage to the: (1) door (bent), (2) hinges and latches (broken or loosened), (3) door seals and sealing surfaces.
- The oven should not be adjusted or repaired by anyone except properly qualified service personnel.
- Ensure the appliance is properly grounded.
- Do not heat liquids or other foods in sealed containers as they are liable to explode.
- Do not use corrosive chemicals or vapors in this appliance.
- Close supervision is necessary when the appliance is used by or near children. The Child Lock feature should be activated to prevent unintended operation.
- Only use utensils suitable for microwave ovens.
- Clean the oven regularly and remove any food deposits.
3. Product Overview
The Kaff KMW 5PJ is a 20-litre built-in microwave oven featuring a sleek black tempered glass finish and intuitive controls.

Figure 3.1: Front view of the Kaff KMW 5PJ Built-in Microwave Oven, showcasing its black tempered glass finish and digital display.
3.1 Components
- Oven Cavity: The interior space where food is cooked.
- Glass Turntable: Ensures even cooking by rotating food.
- Grill Rack: Used for grilling functions.
- Control Panel: Features a digital clock with time display, soft push buttons, and a rotary control dial for setting functions and time.
- Push Door Opening Button: For easy access to the oven cavity.
- Door with Tempered Glass: Provides visibility and safety.

Figure 3.2: Detailed view of the control panel, highlighting the digital clock, soft push controls, rotary dial, and door opening button.

Figure 3.3: Overview of key features including Digital Clock with Time Display, Full Black Tempered Glass Finish, Auto Defrost (Time & Weight), and 20 Litre Capacity.
4. Installation
The Kaff KMW 5PJ is a built-in appliance designed for integration into kitchen cabinetry. Professional installation is highly recommended to ensure proper fit, ventilation, and electrical connection.
4.1 Placement Requirements
- Ensure the installation cabinet meets the specified dimensions for built-in appliances.
- Provide adequate ventilation around the appliance as per installation guidelines to prevent overheating.
- The appliance must be connected to a properly grounded electrical outlet.

Figure 4.1: The microwave oven integrated into a kitchen cabinet, demonstrating its built-in design.
4.2 Electrical Connection
The microwave oven requires a 220 Volt electrical supply. Ensure the circuit is capable of handling the appliance's power consumption (1250W input, 800W microwave output, 1000W grill output). Do not use extension cords or adapters.
5. Initial Setup
5.1 Setting the Digital Clock
- After plugging in the oven, the display will show "0:00" or flash.
- Press the "Clock" button (refer to control panel diagram in Section 3.1).
- Use the rotary control dial to set the hour. Press "Clock" again to confirm.
- Use the rotary control dial to set the minutes. Press "Clock" again to confirm. The clock is now set.
5.2 First Use
Before cooking food, operate the microwave empty for 5 minutes on high power to remove any manufacturing odors. Ensure the turntable is correctly placed inside the oven.
6. Operating Instructions
The KMW 5PJ offers multiple cooking modes for various culinary needs.

Figure 6.1: The display indicating the Multi Programming Mode options: Microwave, Grill, and Combination.
6.1 Microwave Cooking
- Place food in a microwave-safe container on the glass turntable.
- Close the oven door.
- Press the "Microwave" button (usually indicated by a wave icon).
- Use the rotary control dial to set the desired cooking time.
- Press the "Start" button to begin cooking.
6.2 Grill Cooking
The grill function is ideal for browning and crisping food. Use the provided grill rack.
- Place food on the grill rack, then place the rack on the turntable.
- Close the oven door.
- Press the "Grill" button (usually indicated by a zigzag line icon).
- Use the rotary control dial to set the desired grilling time.
- Press the "Start" button to begin grilling.

Figure 6.2: The oven is capable of reaching temperatures up to 250°C for effective grilling and combination cooking.
6.3 Combination Cooking
Combination mode uses both microwave and grill functions for faster cooking and browning.
- Place food in a suitable container on the grill rack or turntable.
- Close the oven door.
- Press the "Combination" button (usually indicated by a combination of wave and zigzag icons).
- Select the desired combination level (e.g., C-1, C-2, C-3) using the rotary dial.
- Set the cooking time using the rotary control dial.
- Press the "Start" button to begin.
6.4 Defrosting
The oven features auto defrost by time and weight.
- Place the frozen food in a microwave-safe container.
- Press the "Defrost" button (usually indicated by a snowflake icon).
- Select defrost by time or weight using the appropriate button or dial.
- Adjust the time or weight using the rotary control dial.
- Press the "Start" button.
6.5 Timer Function
The timer can be used independently or during cooking.
- Press the "Timer" button.
- Use the rotary control dial to set the desired time.
- Press "Start" to activate the timer. An audible signal will sound when the time expires.

Figure 6.3: Illustration of the timer function on the control panel.
6.6 Child Lock
The child lock feature prevents unintended operation by children.
- To Activate: Press and hold the "Stop/Cancel" button for approximately 3 seconds until a lock indicator appears on the display.
- To Deactivate: Press and hold the "Stop/Cancel" button again for approximately 3 seconds until the lock indicator disappears.
7. Maintenance and Cleaning
Regular cleaning helps maintain the performance and longevity of your microwave oven.
7.1 Exterior Cleaning
- Wipe the exterior surfaces, including the door and control panel, with a soft, damp cloth.
- Do not use abrasive cleaners, harsh detergents, or metal brushes, as these can damage the finish.
7.2 Interior Cleaning
- Clean the oven cavity after each use to prevent food buildup.
- For stubborn food splatters, place a bowl of water with lemon slices inside and microwave on high for 5-10 minutes. The steam will loosen the residue, making it easier to wipe clean.
- Remove the glass turntable and wash it with warm, soapy water. The grill rack can also be cleaned similarly.

Figure 7.1: The removable turntable plate and grill stand for easy cleaning.
7.3 Door Seal Care
Regularly inspect the door seals and sealing surfaces for any damage or food residue. Clean them gently with a damp cloth to ensure a proper seal during operation.
8. Troubleshooting
If you encounter issues with your microwave oven, refer to the following table for common problems and solutions.
| Problem | Possible Cause | Solution |
|---|---|---|
| Oven does not start | Power cord not plugged in; Door not closed properly; Fuse blown or circuit breaker tripped. | Ensure power cord is securely plugged in; Close the door firmly; Check household fuse or reset circuit breaker. |
| Food not heating | Incorrect cooking time/power level set; Door not closed properly; Utensils not microwave-safe. | Adjust cooking time and power; Ensure door is fully closed; Use only microwave-safe dishes. |
| Turntable not rotating | Turntable not properly seated; Obstruction under turntable; Motor malfunction. | Ensure turntable is correctly placed on its support; Remove any obstructions; Contact service if problem persists. |
| Sparks or arcing inside oven | Metal in oven; Food residue buildup; Damaged waveguide cover. | Remove any metal objects; Clean oven interior thoroughly; Contact service if waveguide cover is damaged. |
If the problem persists after attempting these solutions, please contact Kaff customer service.
9. Product Specifications
| Feature | Detail |
|---|---|
| Brand | KAFF |
| Model | KMW 5PJ Black |
| Capacity | 20 Litres |
| Installation Type | Built-In |
| Microwave Input Power | 1250 Watts |
| Microwave Output Power | 800 Watts |
| Grill Power | 1000 Watts |
| Voltage | 220 Volts |
| Oven Cooking Mode | Convection |
| Special Features | Child Lock, Digital Clock, Programmable, Time Display, Touch Control |
| Material | Stainless Steel (Interior), Tempered Glass (Exterior) |
| Color | Black (Finish) |
| Item Dimensions (LxWxH) | 56.4 x 58 x 38 Centimeters |
| Item Weight | 16 kg 400 g |
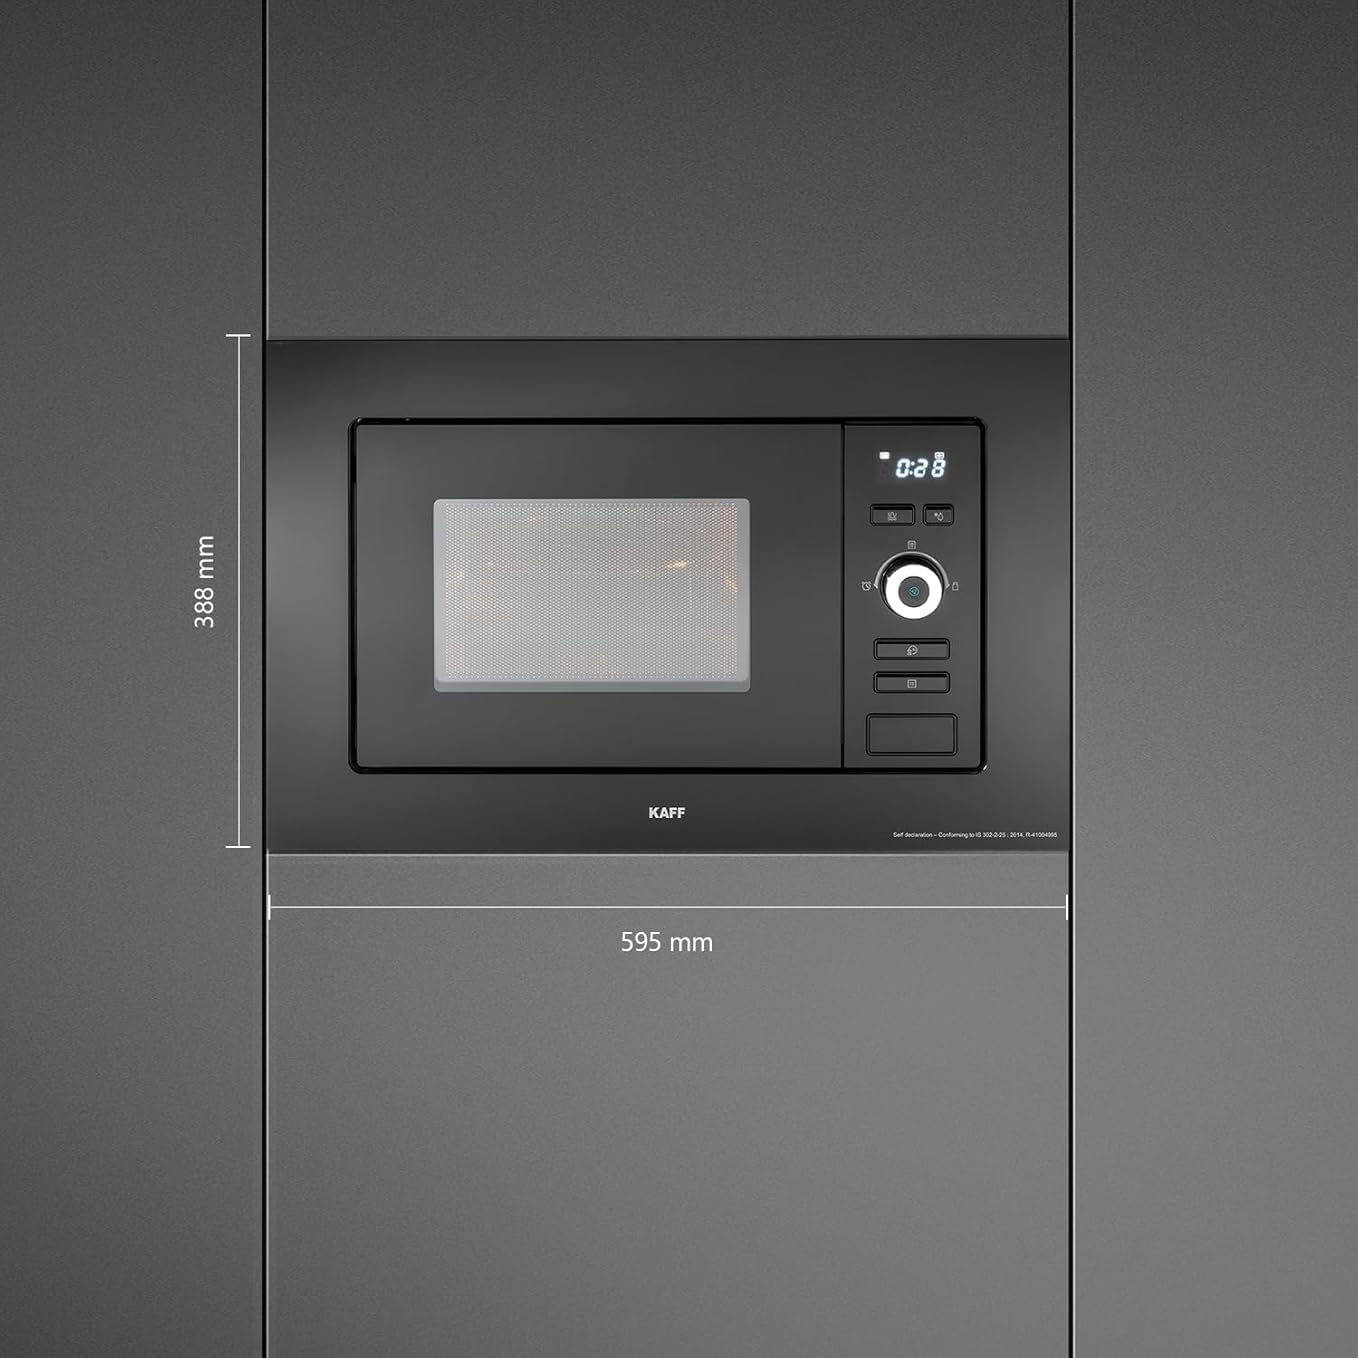
Figure 9.1: Key dimensions for installation: 595 mm width and 388 mm height.
10. Warranty and Customer Support
10.1 Warranty Information
The Kaff KMW 5PJ Built-in Microwave Oven comes with a 1-year warranty on the product and an extended 5-year warranty on the magnetron. This warranty covers manufacturing defects under normal use conditions. Please retain your purchase receipt for warranty claims.
10.2 Customer Support
For technical assistance, service requests, or any queries regarding your appliance, please contact Kaff customer service:
- Manufacturer: Kaff Appliances (I) Pvt.Ltd
- Address: S.S. Plaza, 4th Floor, Sector -47, Gurgaon -122018 Haryana
- Contact Number: 18001802221