Kaise EM480A Insulation Tester User Manual
Model: EM480A
1. Introduction
The Kaise EM480A is a robust and reliable insulation tester designed for professional use in electrical fault location, machine commissioning, and preventive maintenance of various electrical installations. This device provides accurate insulation resistance measurements at multiple test voltages, ensuring the safety and efficiency of electrical systems.
Key features include:
- Multiple test voltages: 250V, 500V, and 1000V.
- Measurement range up to 2000 MΩ.
- Clear LCD display with 1999 counts.
2. Safety Information
Always adhere to the following safety precautions to prevent personal injury and damage to the instrument:
- Read the entire manual before using the instrument.
- Do not use the tester if it appears damaged or is operating abnormally.
- Ensure the circuit under test is de-energized and locked out before connecting the test leads.
- Wear appropriate personal protective equipment (PPE), including insulated gloves and safety glasses.
- Avoid touching the test leads or the circuit under test during measurement, especially when high test voltages are applied.
- Discharge the circuit completely after testing before disconnecting the leads.
- Do not operate the tester in wet environments or in the presence of explosive gases or dust.
- Replace batteries promptly when the low battery indicator appears.
3. Package Contents
Verify that all items are present and undamaged upon opening the package:
- Kaise EM480A Insulation Tester
- Test Lead Set
- 6 x AA Batteries (pre-installed or included separately)
- User Manual
4. Setup
4.1 Battery Installation
The Kaise EM480A requires 6 AA batteries for operation. If the batteries are not pre-installed, follow these steps:
- Locate the battery compartment on the back of the tester.
- Use a screwdriver to open the battery compartment cover.
- Insert 6 AA batteries, ensuring correct polarity (+ and -) as indicated inside the compartment.
- Replace the battery compartment cover and secure it with the screw.
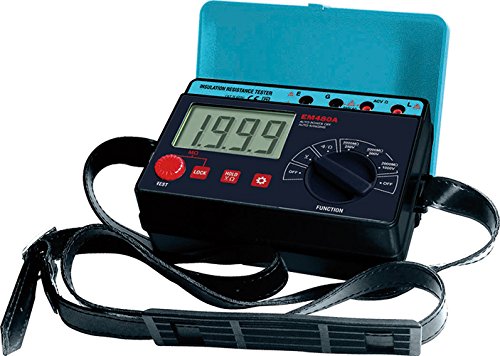
Figure 1: Front view of the Kaise EM480A Insulation Tester, showing the LCD display, function selector, and test buttons. This image illustrates the general appearance and layout of the device.
4.2 Connecting Test Leads
Connect the red and black test leads to the corresponding input terminals on the tester. Ensure a secure connection to prevent inaccurate readings or hazards.
5. Operating Instructions
5.1 Powering On/Off
To power on the tester, rotate the function selector dial to any desired measurement function. To power off, rotate the dial to the 'OFF' position.
5.2 Performing an Insulation Resistance Test
Follow these steps to perform an insulation resistance measurement:
- Ensure Safety: Verify that the circuit under test is completely de-energized and isolated from all power sources. Apply lockout/tagout procedures.
- Connect Leads: Connect the test leads to the circuit or component you wish to test. Typically, one lead connects to the conductor and the other to ground or another conductor.
- Select Test Voltage: Rotate the function selector dial to the desired insulation test voltage (250V, 500V, or 1000V). Choose a voltage appropriate for the insulation rating of the circuit.
- Initiate Test: Press and hold the 'TEST' button. The tester will apply the selected voltage and display the insulation resistance value on the LCD.
- Read Measurement: Observe the reading on the LCD. The unit will typically be in MΩ (Megaohms).
- Discharge Circuit: Release the 'TEST' button. The tester will automatically discharge any residual charge in the circuit. Wait for the discharge to complete before disconnecting the leads.
- Disconnect Leads: Once the circuit is safely discharged, disconnect the test leads.
Note: Always refer to relevant electrical codes and standards for acceptable insulation resistance values for specific applications.
6. Maintenance
6.1 Cleaning
Wipe the instrument's casing with a damp cloth and a mild detergent. Do not use abrasive cleaners or solvents. Ensure the tester is completely dry before storage or next use.
6.2 Battery Replacement
When the low battery indicator appears on the display, replace all 6 AA batteries promptly to ensure accurate measurements. Refer to Section 4.1 for battery installation instructions. Dispose of old batteries responsibly according to local regulations.
6.3 Storage
Store the tester in a cool, dry place, away from direct sunlight and extreme temperatures. If storing for extended periods, remove the batteries to prevent leakage.
7. Troubleshooting
| Problem | Possible Cause | Solution |
|---|---|---|
| Tester does not power on. | Dead or incorrectly installed batteries. | Check battery polarity; replace batteries. |
| Inaccurate readings. | Poor test lead connection; low batteries; external interference. | Ensure secure lead connections; replace batteries; test in a different environment. |
| Display shows 'OL' (Overload). | Resistance value exceeds the tester's maximum range. | This indicates very high insulation resistance, which is often a good result. |
| Display shows '0.00' or very low resistance. | Short circuit or very low insulation resistance. | Indicates a fault in the circuit. Investigate the circuit for shorts or damaged insulation. |
8. Specifications
- Model: EM480A
- Brand: KAISE
- Test Voltages: 250V, 500V, 1000V
- Maximum Measurement Range: 2000 MΩ
- Display: LCD, 1999 counts
- Power Source: 6 x AA Batteries (included)
- Maximum Operating Voltage: 1000 Volts
- Dimensions (L x W x H): 11 x 16.8 x 6.2 cm (4.33 x 6.61 x 2.44 inches)
- Weight: Approximately 485 grams (1.07 lbs)
- Included Components: Insulation Tester, Test Lead Set, Batteries, User Manual
- Country of Origin: China
9. Warranty and Support
This product is covered by a standard manufacturer's warranty against defects in materials and workmanship. The specific duration and terms of the warranty may vary by region. Please retain your proof of purchase for warranty claims.
For technical support, troubleshooting assistance, or warranty inquiries, please contact your local KAISE distributor or the point of purchase. Provide the model number (EM480A) and a detailed description of the issue when seeking support.