
Fischer 15740-27309
Fischer Infinity 50L Built-in Electric Oven with Air Fryer Function
Model: 15740-27309 | Brand: Fischer
1. Introduction
This instruction manual provides essential information for the safe and efficient operation of your Fischer Infinity 50L Built-in Electric Oven with Air Fryer function. Please read this manual thoroughly before installation and use, and keep it for future reference. Proper installation, use, and maintenance will ensure optimal performance and longevity of your appliance.
Important Safety Information
- Ensure the oven is installed by a qualified technician in accordance with local regulations.
- Do not operate the oven if it is damaged. Contact customer support.
- Keep children away from the appliance during operation, as surfaces can become hot.
- Always use oven mitts when handling hot dishes or oven components.
- Disconnect the power supply before cleaning or performing any maintenance.
2. Product Overview
The Fischer Infinity 50L Built-in Electric Oven is designed for modern kitchens, offering a 50-liter capacity and multiple cooking functions, including an integrated Air Fryer. Its stainless steel finish provides a sleek aesthetic.

Figure 2.1: Front view of the Fischer Infinity 50L Built-in Electric Oven. This image displays the oven's control panel with three rotary knobs for function, timer, and temperature, along with the large glass door and stainless steel handle.
Key Features
- Capacity: 50 Liters, suitable for various cooking needs.
- Functions: Defrost, Turbo, Turbo Plus, Turbo Grill, Grill, and Air Fryer.
- Temperature Control: Adjustable from 50°C to 300°C.
- Interior: Easy-clean black enameled body for simplified maintenance.
- Illumination: Internal lamp with protective cover for clear visibility.
- Pilot Light: Indicates when the oven is operating.
Components Included
- 1 x Enameled Residue Tray
- 1 x Instruction Manual (this document)
- 2 x Oven Racks
- 1 x Electric Oven Unit
3. Setup and Installation
The Fischer Infinity oven is designed for built-in installation. Proper ventilation and electrical connection are crucial for safe operation. Refer to the installation diagram for precise measurements and requirements.

Figure 3.1: Installation diagram showing dimensions for built-in oven placement. This diagram illustrates two common installation types: tower installation and under-counter installation, with detailed measurements in millimeters for the niche.
Installation Requirements
- Niche Dimensions: Follow the dimensions provided in Figure 3.1 for both tower and under-counter installations. Ensure adequate space for air circulation.
- Electrical Connection: The oven requires a 220V electrical supply. Ensure the circuit is properly grounded and can handle the oven's power rating (2422 Watts).
- Ventilation: Maintain proper clearance around the oven as indicated in the diagram to prevent overheating.
- Securing the Oven: Secure the oven within the niche using the provided screws, as shown in the detailed inset of Figure 3.1.
4. Operating Instructions
Familiarize yourself with the control panel before operating the oven. The oven features three main rotary knobs for function selection, timer settings, and temperature control.
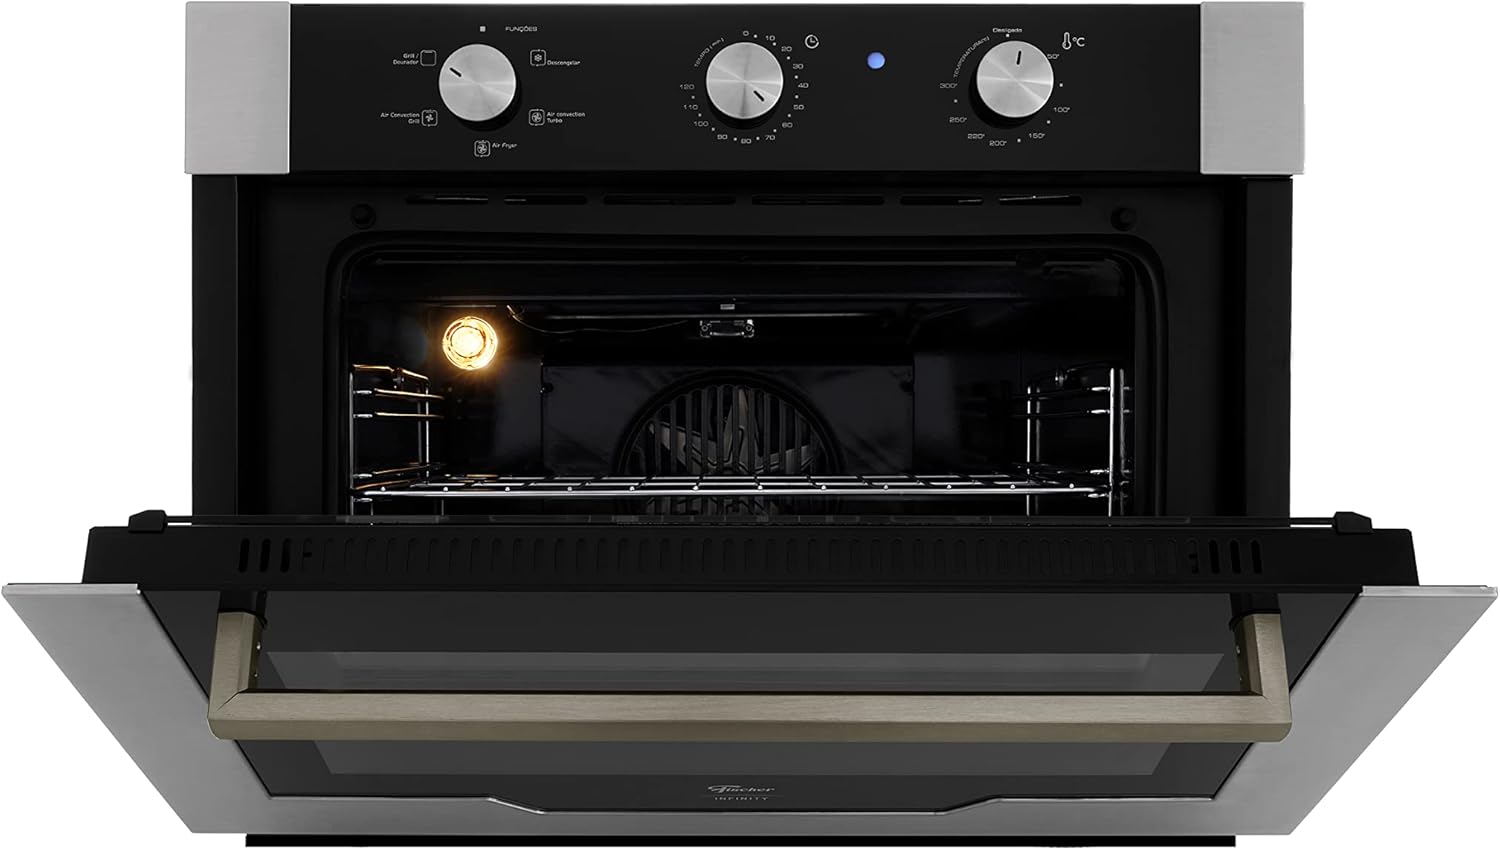
Figure 4.1: Interior view of the oven with the door open, showing the two oven racks, internal light, and the convection fan at the back. The heating elements are also visible at the top.
Control Panel Overview
- Left Knob (Functions): Select desired cooking mode (Defrost, Turbo, Turbo Plus, Turbo Grill, Grill, Air Fryer).
- Middle Knob (Timer): Set cooking duration. The oven will automatically turn off when the timer expires.
- Right Knob (Temperature): Adjust temperature from 50°C to 300°C.
- Pilot Light: Illuminates when the oven is active.
Cooking Functions
- Defrost: Uses the internal fan to circulate air at room temperature, gently thawing frozen foods.
- Turbo (Convection): Circulates hot air evenly throughout the oven, ideal for baking and roasting multiple dishes simultaneously without flavor transfer.
- Turbo Plus: Enhanced convection mode for faster and more intense cooking.
- Turbo Grill: Combines the grill element with convection for crispy exteriors and thoroughly cooked interiors.
- Grill: Uses the top heating element for browning, toasting, and grilling.
- Air Fryer: Utilizes high-speed hot air circulation for frying with minimal oil, achieving crispy results.

Figure 4.2: Close-up view of the oven interior, highlighting the top heating element (red), the internal light, and the convection fan at the rear. Two adjustable racks are also visible.
5. Maintenance and Cleaning
Regular cleaning and maintenance will prolong the life of your oven and ensure hygienic operation. Always ensure the oven is cool and disconnected from the power supply before cleaning.
Cleaning the Interior
The oven features an "Easy Clean" black enameled interior. This smooth coating prevents grease absorption, making cleaning easier.
- Wipe the interior with a soft cloth and mild detergent after each use.
- For stubborn stains, use a non-abrasive oven cleaner specifically designed for enameled surfaces. Follow the cleaner's instructions carefully.
- Remove oven racks and the residue tray for separate cleaning in warm, soapy water.
- Do not use abrasive pads, harsh chemicals, or steam cleaners, as these can damage the enamel.
Cleaning the Exterior
- Clean the stainless steel exterior with a soft cloth dampened with water and a mild, non-abrasive cleaner.
- Wipe in the direction of the grain to avoid streaks.
- Avoid using abrasive cleaners or scouring pads on the stainless steel.
Replacing the Oven Lamp
Ensure the oven is cool and unplugged. Unscrew the protective cover, replace the bulb with a suitable high-temperature oven lamp, and reattach the cover.
6. Troubleshooting
This section addresses common issues you might encounter. If the problem persists after following these steps, contact Fischer customer support.
| Problem | Possible Cause | Solution |
|---|---|---|
| Oven does not turn on. | No power supply; oven door not closed properly; timer not set. | Check power connection and circuit breaker. Ensure the oven door is fully closed. Set the timer if required for the selected function. |
| Food not cooking evenly. | Incorrect temperature or function; improper rack placement; oven overloaded. | Verify temperature and function settings. Use appropriate rack positions. Avoid overcrowding the oven. Utilize convection functions for better heat distribution. |
| Oven light not working. | Bulb is faulty or loose. | Ensure the oven is cool and unplugged. Check if the bulb is securely screwed in. Replace the bulb if necessary (refer to Maintenance section). |
| Excessive smoke during cooking. | Food residue or grease buildup. | Clean the oven interior thoroughly (refer to Maintenance section). Use the residue tray to catch drips. |
7. Specifications
Detailed technical specifications for the Fischer Infinity 50L Built-in Electric Oven.
| Brand Name | Fischer |
| Model Information | 15740-27309 |
| Certification | BRA19/00760 |
| Product Dimensions (LxWxH) | 57.3 x 59.4 x 44.5 cm |
| Capacity | 50 Liters |
| Installation Type | Built-in |
| Special Features | Compatible with gas, electric, and induction cooktops; Manual control; Programmable |
| Oven Mode Options | Convection |
| Heating Element Type | Resistance |
| Color | INOX (Stainless Steel) |
| Voltage | 220V |
| Power (Watts) | 2422W |
| Fuel Type | Electric |
| Defrost Feature | Automatic Defrost |
| Door Hinges | Frontal |
| Material Type | Steel |
| Item Weight | 28.87 Kilograms |
| Available for purchase since | July 1, 2017 |
8. Warranty and Support
Fischer products are manufactured to high-quality standards. For warranty information, please refer to the warranty card included with your purchase or visit the official Fischer website. For technical assistance, spare parts, or service inquiries, please contact Fischer customer support.
Fischer Official Website: Visit Fischer Store on Amazon (This link directs to the brand's store on Amazon, which may contain further support information).
Related documents15740-27309


Ask a question about this manual
Ask about setup, troubleshooting, compatibility, parts, safety, or missing instructions. Manuals+ will review the question and use this page’s manual context to help answer it.