
1. Important Safety Information
Always read and understand all safety warnings and instructions before operating this air hammer. Failure to follow these instructions may result in electric shock, fire, and/or serious injury. Keep this manual for future reference.
- Wear Eye Protection: Always wear ANSI-approved safety goggles or safety glasses with side shields when operating this tool.
- Wear Hearing Protection: Prolonged exposure to noise from power tools can cause hearing damage.
- Wear Hand Protection: Use appropriate gloves to protect hands from vibration and debris.
- Maintain a Clean Work Area: Cluttered areas invite accidents. Keep your work area well-lit.
- Secure Workpiece: Always clamp or otherwise secure the workpiece to prevent movement during operation.
- Use Correct Air Pressure: Do not exceed the maximum recommended air pressure of 90 PSI.
- Disconnect Air Supply: Always disconnect the air supply before changing accessories, performing maintenance, or when the tool is not in use.
- Inspect Tool Before Use: Check for damaged parts, air leaks, or any condition that may affect the tool's operation.
- Keep Children Away: Do not allow children or untrained persons to operate this tool.
2. Product Overview
2.1 What's in the Box
The DYNAMIC POWER Short Barrel Air Hammer Kit includes the air hammer and a set of four chisels, along with a spring retainer.

Image: Components included in the kit.
- Short Barrel Air Hammer
- Spring Retainer
- Cutting Chisel
- Hammer Head Chisel
- Flat Chisel
- Pointed Chisel
2.2 Key Features
The DYNAMIC POWER Short Barrel Air Hammer is designed for durability and efficient performance in various applications.

Image: Detailed view of the air hammer's features.
- Alloyed Steel Barrel: Provides enhanced durability and extended tool life.
- Heat-Treated Piston: Ensures maximum impact strength and reliability.
- Adjustable Air Regulator & Speed Control: Allows for precise control over impact power and speed.
- Ergonomic Grip: Designed for comfortable handling during prolonged use.
- Durable Trigger: Built for consistent and reliable operation.
3. Specifications
Refer to the table below for the technical specifications of the DYNAMIC POWER Short Barrel Air Hammer Kit.

Image: Visual representation of key specifications.
| Feature | Specification |
|---|---|
| Model Number | D319115 |
| Power Source | Air-Powered |
| Maximum Blows Per Minute (BPM) | 4500 BPM |
| Stroke Length | 1-5/8 inches |
| Shank Size | .401 inch (standard) |
| Operating Air Pressure | 90 PSI (recommended) |
| Average Air Consumption | 4 CFM @ 90 PSI |
| Air Inlet Size | 1/4 inch NPT |
| Recommended Hose Size | 3/8 inch |
| Material | Alloy Steel |
4. Setup
4.1 Connecting to Air Supply
- Ensure your air compressor is off and the air tank is drained.
- Apply thread sealant tape to the 1/4 inch NPT air inlet fitting on the air hammer.
- Connect a 3/8 inch air hose (minimum) from your air compressor to the air inlet fitting. Ensure all connections are secure and leak-free.
- Set your air compressor regulator to 90 PSI. Do not exceed this pressure.
4.2 Chisel Installation
To install a chisel, follow these steps:
Video: Demonstration of chisel installation and basic operation.
- Disconnect the air hammer from the air supply.
- Pull back the spring retainer on the front of the air hammer.
- Insert the desired .401 inch shank chisel into the tool's opening until it seats firmly.
- Release the spring retainer, ensuring it securely holds the chisel in place.
- Reconnect the air supply.
5. Operating Instructions
5.1 General Operation
Once the chisel is installed and the air supply is connected, the air hammer is ready for use.
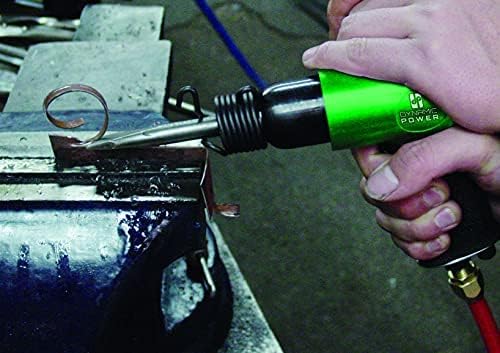
Image: Air hammer in use for chipping metal.
- Hold the air hammer firmly with both hands, maintaining a secure grip.
- Position the chisel tip against the workpiece at the desired angle.
- Press the trigger to activate the air hammer. The tool will begin to deliver rapid impacts.
- Apply steady, controlled pressure to guide the chisel. Avoid excessive force, letting the tool do the work.
- Release the trigger to stop operation.
5.2 Adjusting Speed and Power
The air hammer features an adjustable air regulator and speed control to match the tool's performance to the task at hand.
- Locate the speed control dial or lever, typically near the air inlet or trigger.
- Rotate the control to increase or decrease the impact speed and power. Test on a scrap piece of material to find the optimal setting for your application.
5.3 Applications
The DYNAMIC POWER Short Barrel Air Hammer is versatile and suitable for various tasks.

Image: Examples of air hammer applications.
- Muffler and pipe removal
- Bodyshop work
- Shock work
- Scraping rust
- Light front-end work
- Chipping, cutting, and shaping various materials
6. Maintenance
Regular maintenance ensures optimal performance and extends the life of your air hammer.
6.1 Lubrication
It is crucial to lubricate the air hammer before each use and after every hour of continuous operation.
- Disconnect the air hammer from the air supply.
- Add 5-10 drops of pneumatic tool oil into the air inlet.
- Reconnect the air supply and run the tool for a few seconds to distribute the oil.
6.2 Cleaning
- After each use, wipe down the tool with a clean, dry cloth to remove dirt and debris.
- Periodically inspect chisels for wear or damage. Replace worn chisels to maintain efficiency and safety.
6.3 Storage
- Store the air hammer in a clean, dry environment away from excessive moisture and extreme temperatures.
- Disconnect from air supply and remove any chisels before storing.
7. Troubleshooting
If you encounter issues with your DYNAMIC POWER Short Barrel Air Hammer, refer to the following common problems and solutions:
| Problem | Possible Cause | Solution |
|---|---|---|
| Tool does not operate or has low power. | Low air pressure or insufficient air supply. | Check compressor pressure (ensure 90 PSI). Verify air hose diameter (minimum 3/8 inch) and length are adequate. |
| Air leaks in connections. | Tighten all air connections. Apply thread sealant tape if necessary. | |
| Lack of lubrication. | Add pneumatic tool oil to the air inlet. | |
| Excessive air leakage from tool. | Worn O-rings or seals. | Contact customer support for replacement parts or service. |
| Chisel is difficult to install or remove. | Spring retainer is stuck or damaged. | Ensure the spring retainer is fully pulled back. Clean any debris. If damaged, replace. |
| Incorrect chisel shank size. | Ensure chisels have a .401 inch shank. |
8. Warranty and Support
DYNAMIC POWER is committed to delivering premium-quality pneumatic tools. For any questions, technical assistance, or warranty claims, please contact DYNAMIC POWER customer support. Keep your purchase receipt as proof of purchase.
For further information, you may visit the official DYNAMIC POWER website or contact their customer service department.