1. Introduction
The Darkglass Microtubes B7K V2 is a versatile bass preamp pedal designed to provide a wide range of tonal options for electric bass players. It combines a powerful overdrive circuit with a comprehensive 4-band equalizer and a balanced XLR output, making it suitable for both live performance and studio recording. This manual provides detailed instructions for setting up, operating, and maintaining your B7K V2 pedal.
2. Features
- Combines a preamp, EQ, and overdrive in one unit for powerful tone shaping.
- Features a blend control to mix clean and overdriven signals for perfect balance.
- Includes a 4-band active EQ with bass, low mids, high mids, and treble controls.
- Grunt switch adds three levels of low-end boost for a thicker sound.
- Attack switch adjusts treble content, offering boost, flat, and cut settings.
- Low mids switch changes the center frequency from 1 kHz to 500 Hz.
- Hi mids switch changes the center frequency from 3 kHz to 1.5 kHz.
- Parallel output for running the input signal through unaffected.
- Direct output provides a balanced version for PA systems or studio consoles.
- Operates with a regulated 9V DC adapter (not included).
3. Controls and Connections
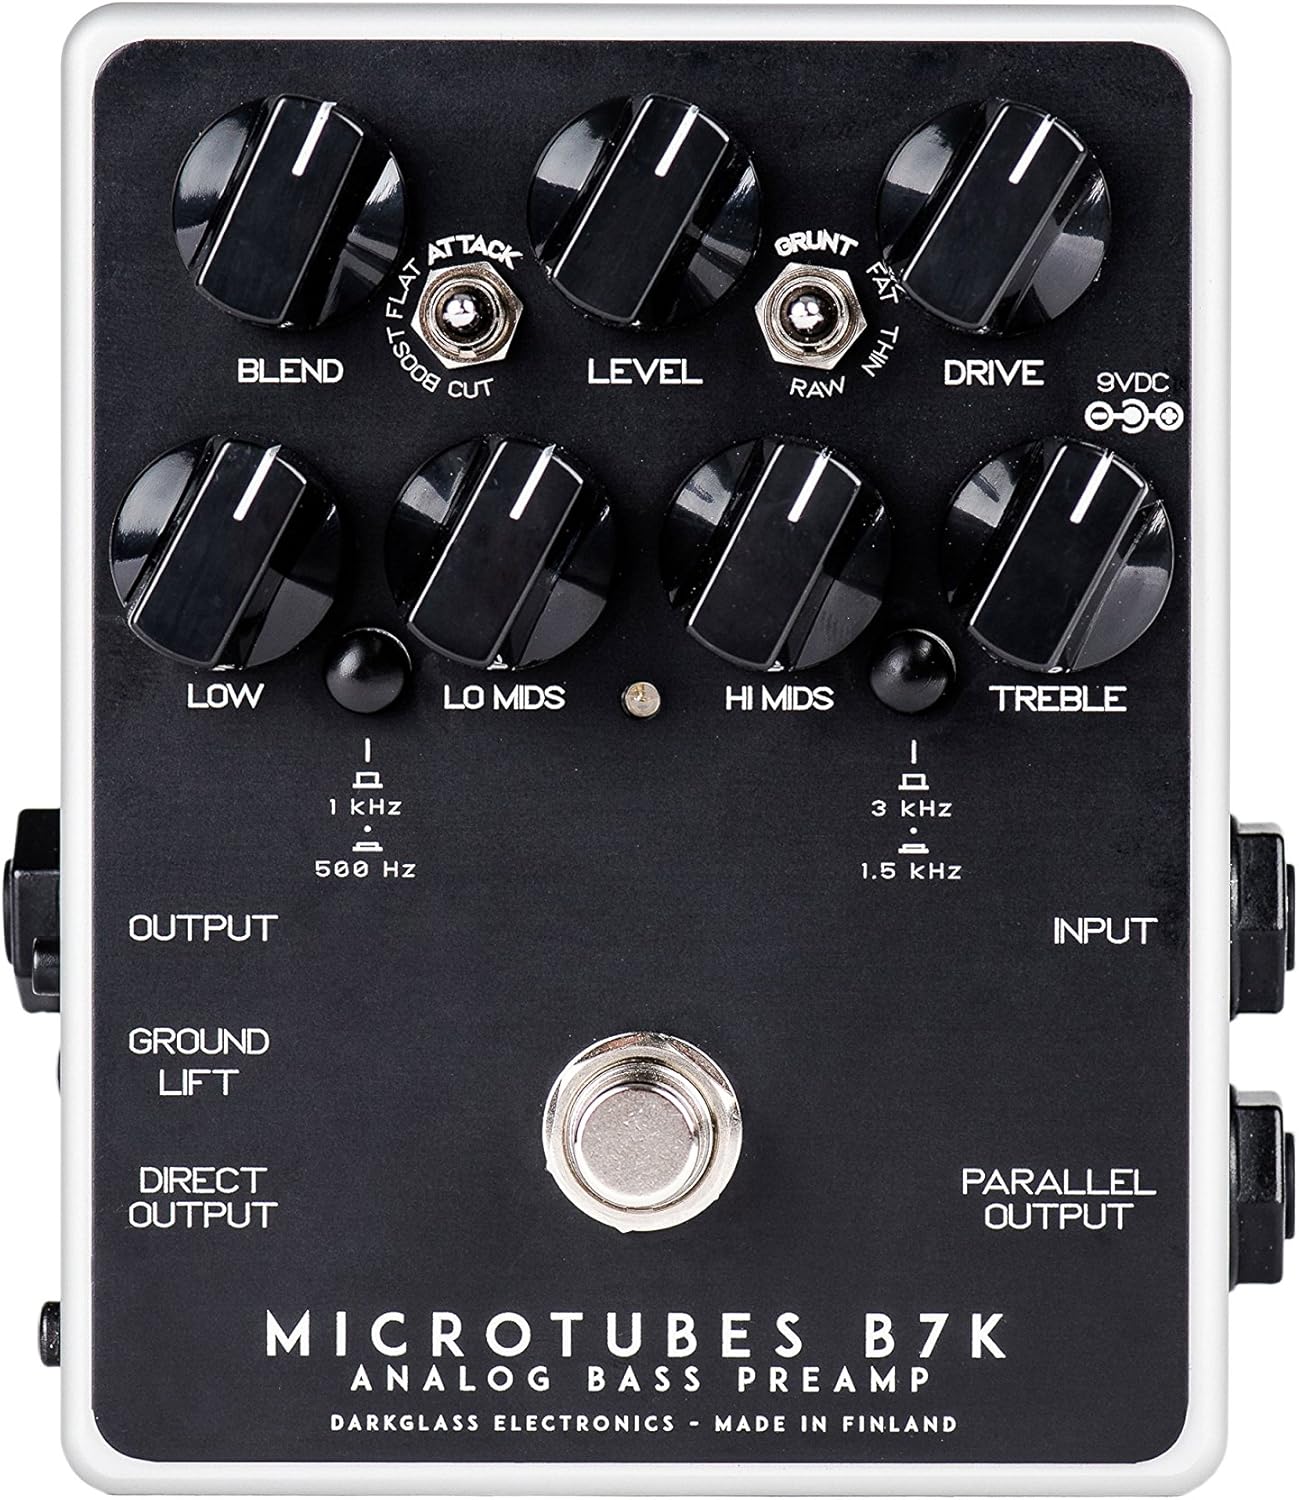
Figure 1: Top view of the B7K V2 pedal.
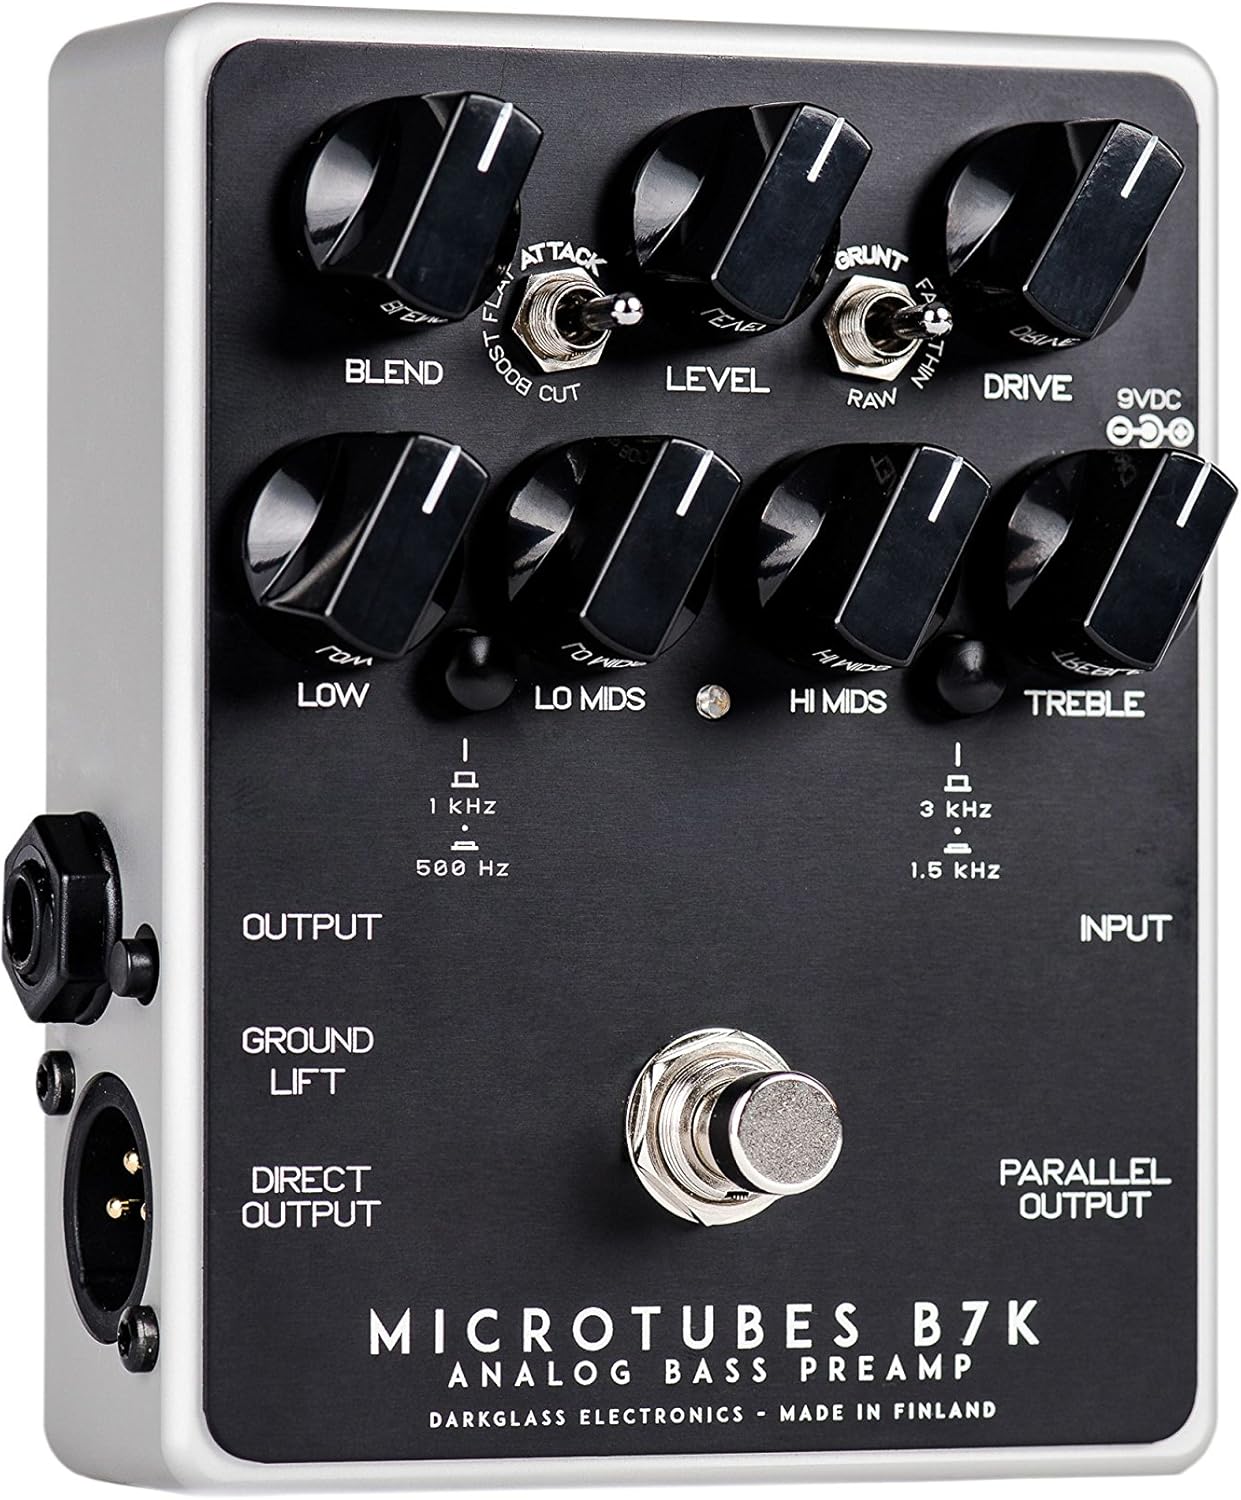
Figure 2: Left side connections.

Figure 3: Right side connections.
3.1 Control Knobs
- Blend: Mixes the clean input signal with the overdriven signal. The clean signal remains at unity gain while the volume of the overdriven signal is controlled by the Drive knob, allowing for fine-tuning of the blend ratio.
- Level: Sets the overall output volume of the pedal.
- Drive: Controls the amount of gain in the overdriven signal.
- Low: Adjusts the level of the low frequencies.
- Lo Mids: Adjusts the level of the low-mid frequencies. The center frequency can be switched between 500 Hz and 1 kHz.
- Hi Mids: Adjusts the level of the high-mid frequencies. The center frequency can be switched between 1.5 kHz and 3 kHz.
- Treble: Adjusts the level of the high frequencies.
3.2 Switches
- Attack Switch: Modifies the treble content of the overdriven signal. Options are Boost, Flat, and Cut.
- Grunt Switch: Modifies the low-end content of the overdriven signal. Options are Thin, Raw, and Fat.
- Lo Mids Switch: Selects the center frequency for the Lo Mids knob (500 Hz or 1 kHz).
- Hi Mids Switch: Selects the center frequency for the Hi Mids knob (1.5 kHz or 3 kHz).
- Ground Lift Switch: Disconnects the ground from the XLR output to help eliminate hum or ground loops when connected to external equipment.
3.3 Connections
- Input (1/4" Jack): Connect your bass guitar or other instrument here.
- Output (1/4" Jack): Connect to your bass amplifier or other effects pedals.
- Direct Output (XLR): Provides a balanced output for connecting directly to a PA system, mixing console, or audio interface.
- Parallel Output (1/4" Jack): Outputs the unaffected input signal, useful for parallel processing or sending a clean signal to another device.
- 9VDC Input: Connect a regulated 9V DC power supply (center negative, minimum 30mA).
4. Setup
- Ensure the pedal is powered off before making any connections.
- Connect your bass guitar to the Input jack on the right side of the pedal.
- Connect the Output jack on the left side to your bass amplifier's input.
- If using the balanced output, connect the Direct Output (XLR) to a PA system, mixing console, or audio interface.
- If you need an unaffected signal, connect the Parallel Output to another device.
- Connect a regulated 9V DC (center negative) power supply to the 9VDC Input. The pedal requires a minimum of 30mA. Note: A power supply is not included with the pedal.
- Once all connections are secure, you can power on the pedal.
5. Operating Instructions
5.1 Basic Operation
To activate the pedal, press the footswitch. The LED indicator will illuminate. To bypass the effect, press the footswitch again.
5.2 Tone Shaping
- Start with all EQ knobs (Low, Lo Mids, Hi Mids, Treble) at the 12 o'clock position for a flat response.
- Adjust the Drive knob to achieve your desired level of overdrive. Higher settings will produce more distortion.
- Use the Blend knob to mix the clean signal with the overdriven signal. This allows you to retain clarity and low-end presence while adding grit.
- Experiment with the Attack and Grunt switches to fine-tune the treble and bass characteristics of the overdriven tone.
- Utilize the 4-band EQ to sculpt your overall tone. The Lo Mids and Hi Mids switches allow you to select different frequency centers for precise control.
- Adjust the Level knob to match the output volume with your bypassed signal or to boost your signal for solos.
6. Maintenance
- Keep the pedal clean by wiping it with a soft, dry cloth. Avoid using abrasive cleaners or solvents.
- Protect the pedal from extreme temperatures, moisture, and direct sunlight.
- Ensure all cables are in good condition and properly connected to prevent signal loss or damage.
- Always use a regulated 9V DC center-negative power supply to avoid damage to the unit.
7. Troubleshooting
| Problem | Possible Cause | Solution |
|---|---|---|
| No sound | Incorrect power supply; cables not connected properly; pedal bypassed. | Verify 9V DC center-negative power supply is connected. Check all input/output cables. Ensure pedal is engaged (LED illuminated). |
| Excessive hum or noise | Ground loop; faulty cables; interference from other equipment. | Engage the Ground Lift switch on the XLR output. Try different cables. Ensure power supply is isolated and free from noise. Move pedal away from power transformers or other noisy electronics. |
| Weak or distorted signal (unintended) | Incorrect gain staging; faulty instrument cable. | Adjust Level and Drive knobs. Test with a different instrument cable. |
8. Specifications
- Item Weight: 1.1 pounds (0.5 Kilograms)
- Product Dimensions: 6 x 7 x 10 inches
- Item Model Number: B7K2
- Color: Black
- Connector Type: 1/4" (aux), XLR
- Hardware Interface: USB (for potential future firmware updates, not for audio)
- Signal Format: Analog
- Power Source: Corded Electric
- Voltage: 9 Volts DC (center negative)
- Current Draw: Minimum 30mA
9. Warranty and Support
Darkglass Electronics products are designed for reliability and performance. For specific warranty information and support, please refer to the documentation included with your purchase or visit the official Darkglass Electronics website. Keep your proof of purchase for warranty claims.
For technical assistance or service inquiries, please contact Darkglass Electronics customer support through their official channels.