1. Overview
The Canon EOS C200 EF Cinema Camera is a professional-grade camera designed for high-quality video production. It features a Super 35mm CMOS sensor and Canon's Dual DIGIC DV 6 Image processors, capable of capturing up to 4K DCI resolution. The camera supports Canon Cinema RAW Light internally via a C Fast card slot and 4K UHD/HD MP4 video recording to two SD card slots. Its EF lens mount ensures compatibility with a wide range of Canon EF lenses.
Key features include:
- Super 35mm CMOS sensor with Dual Pixel CMOS AF technology.
- Dual DIGIC DV 6 processors for 4K DCI and UHD recording.
- Recording options: Canon RAW Light, MP4, and MP4 sub-recording.
- Integrated EVF and a removable 4-inch LCD monitor.
- Two XLR audio inputs for professional audio capture.
- Connectivity: SDI, HDMI, and Ethernet connectors.
2. What's in the Box
Upon unpacking, ensure all components are present:
- Canon EOS C200 Camera Body
- Electronic Viewfinder (EVF)
- 4-inch LCD Monitor
- Top Handle
- Camera Grip
- Battery Pack
- Battery Charger
- Power Adapter
- Shoulder Strap

Figure 2.1: Front-side view of the Canon EOS C200 EF Cinema Camera with attached components.
3. Setup
3.1 Attaching Components
- Attach the Top Handle: Secure the top handle to the camera body using the provided screws. This handle provides additional mounting points and facilitates carrying.
- Attach the LCD Monitor: Connect the 4-inch LCD monitor to the camera body via its dedicated cable and mounting arm. Ensure the connection is firm.
- Attach the Electronic Viewfinder (EVF): Mount the EVF to its designated port on the camera body.
- Attach the Camera Grip: Secure the camera grip to the side of the camera body. This grip often includes controls for recording and menu navigation.

Figure 3.1: Canon EOS C200 with top handle and LCD monitor attached, showing various ports and controls.
3.2 Powering the Camera
- Insert Battery: Open the battery compartment and insert the provided battery pack, ensuring it clicks into place.
- Charge Battery: If the battery is low, use the battery charger and power adapter to charge it fully before first use.
3.3 Inserting Media Cards
- C Fast Card: Locate the C Fast card slot. Insert a compatible C Fast card for Cinema RAW Light recording.
- SD Cards: Locate the two SD card slots. Insert compatible SD cards (UHS Class 3 or higher recommended) for 4K UHD/HD MP4 video recording.
3.4 Attaching a Lens
- Remove the body cap from the camera and the rear cap from the lens.
- Align the red index mark on the lens with the red index mark on the camera's EF mount.
- Rotate the lens clockwise until it locks into place.
4. Operating the Camera
4.1 Power On/Off
Locate the power switch on the camera body. Toggle it to the 'ON' position to power on the camera. To power off, toggle it back to 'OFF'.
4.2 Basic Recording
- Select Recording Format: Navigate through the camera's menu using the joystick and buttons to select your desired recording format (e.g., Cinema RAW Light, 4K UHD MP4, HD MP4).
- Insert Media: Ensure appropriate media cards (C Fast for RAW, SD for MP4) are inserted.
- Focus: Utilize the Dual Pixel CMOS AF for automatic focusing or manually adjust focus using the lens ring.
- Start/Stop Recording: Press the dedicated RECORD button on the camera body or the camera grip to start and stop recording.
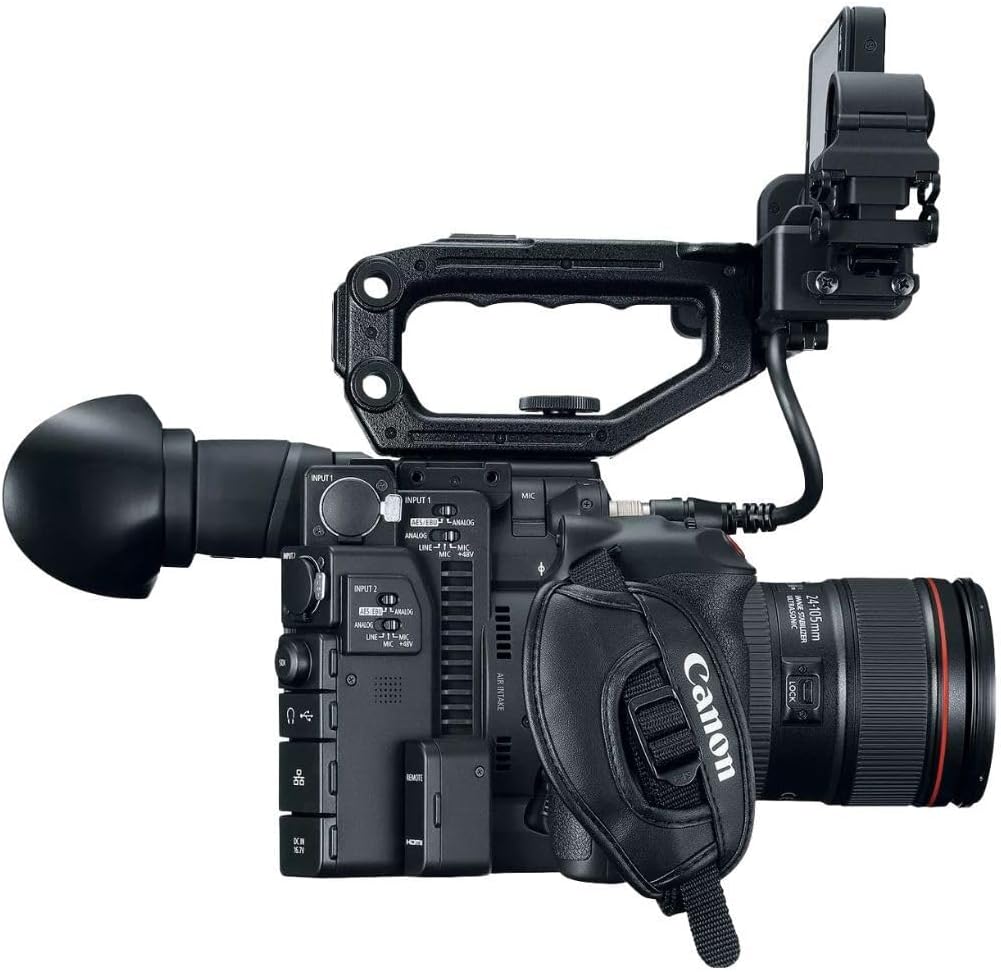
Figure 4.1: Side view of the Canon EOS C200, highlighting control buttons and input/output ports.
4.3 Audio Input
The camera features two XLR audio inputs. Connect professional microphones or audio sources to these inputs. Adjust audio levels and settings via the camera's menu or dedicated audio controls.
4.4 Video Output and Control
The EOS C200 provides SDI and HDMI outputs for external monitoring. An Ethernet connector allows for remote control and network integration.

Figure 4.2: Rear view of the Canon EOS C200, showing the battery compartment, EVF, and LCD monitor.
5. Maintenance
5.1 Cleaning
- Use a soft, lint-free cloth to clean the camera body.
- For the lens and sensor, use specialized cleaning kits and follow manufacturer guidelines to avoid damage.
- Keep the LCD monitor and EVF free from dust and smudges.
5.2 Storage
Store the camera in a dry, cool place, away from direct sunlight and extreme temperatures. Use a protective case when transporting the camera.
5.3 Battery Care
To prolong battery life, avoid fully discharging the battery frequently. Store batteries in a cool, dry place when not in use. Do not expose batteries to excessive heat.
6. Troubleshooting
This section addresses common issues you might encounter with your Canon EOS C200.
6.1 Recording Button/Joystick on Grip Not Responding
- Check Connection: Ensure the camera grip is securely attached and its cable is properly connected to the camera body.
- Re-attach Grip: Disconnect and then firmly re-attach the grip. Sometimes, a simple re-connection can resolve communication issues.
- Camera Restart: Power off the camera, wait a few seconds, and then power it back on.
6.2 4K Footage File Sizes Are Too Large
- Media Capacity: 4K DCI Cinema RAW Light files are very large. Ensure you are using high-capacity C Fast cards.
- Storage Solutions: Plan for adequate external storage (e.g., large hard drives, RAID systems) for offloading and archiving 4K footage.
- Recording Format: If storage is a critical concern, consider recording in 4K UHD MP4 to SD cards, which offers smaller file sizes compared to Cinema RAW Light, while still providing high quality.
6.3 Camera Does Not Power On
- Check Battery: Ensure the battery is fully charged and correctly inserted.
- Power Adapter: If using AC power, verify the power adapter is securely connected to both the camera and a working power outlet.
6.4 No Image on LCD/EVF
- Check Connections: Ensure the LCD monitor and EVF cables are securely connected to the camera.
- Brightness Settings: Verify that the brightness settings for the LCD/EVF are not set too low.
- Display Mode: Check if the camera is in a mode that disables the display (e.g., external output only).
7. Specifications
| Feature | Specification |
|---|---|
| Brand | Canon |
| Model Number | #2215C002 |
| Photo Sensor Technology | CMOS |
| Video Capture Resolution | 4K |
| Maximum Aperture | 1.2 f |
| Flash Memory Type | SD, C Fast |
| Video Capture Format | MPEG-4, Cinema RAW Light |
| Supported Audio Format | XLR, Dolby Digital/AC-3 |
| Screen Size | 4 Inches |
| Connectivity Technology | HDMI, SDI, Ethernet |
| Photo Sensor Size | Super 35mm |
| Image Stabilization | Digital (No optical) |
| Item Weight | 6 Pounds (approx.) |
| Focus Type | Auto Focus (Dual Pixel CMOS AF) |
| Display Resolution Maximum | 4K DCI |
| Compatible Devices | Canon EF-mount lenses |
| Shooting Modes | Movie, Manual |
| Image Aspect Ratio | 1.89:1, 16:9 |
| White Balance Settings | Auto |
| Exposure Control Type | Manual |
8. Warranty and Support
8.1 Manufacturer's Warranty
The Canon EOS C200 EF Cinema Camera is covered by a manufacturer's warranty. Please refer to the warranty card included with your product for specific terms, conditions, and duration.
8.2 Customer Support
For technical assistance, service, or further inquiries, please visit the official Canon support website or contact Canon customer service. Keep your product's serial number and proof of purchase readily available when seeking support.