
1. Introduction
This manual provides essential information for the safe and efficient operation of your Rigol DS1104Z-S Plus 100 MHz Digital Oscilloscope. Please read this manual thoroughly before using the instrument to ensure proper functionality and to prevent damage. The Rigol DS1104Z-S Plus is a 4-channel digital storage oscilloscope designed for precise signal analysis with a 100 MHz bandwidth and a 1 GSa/s real-time sample rate.
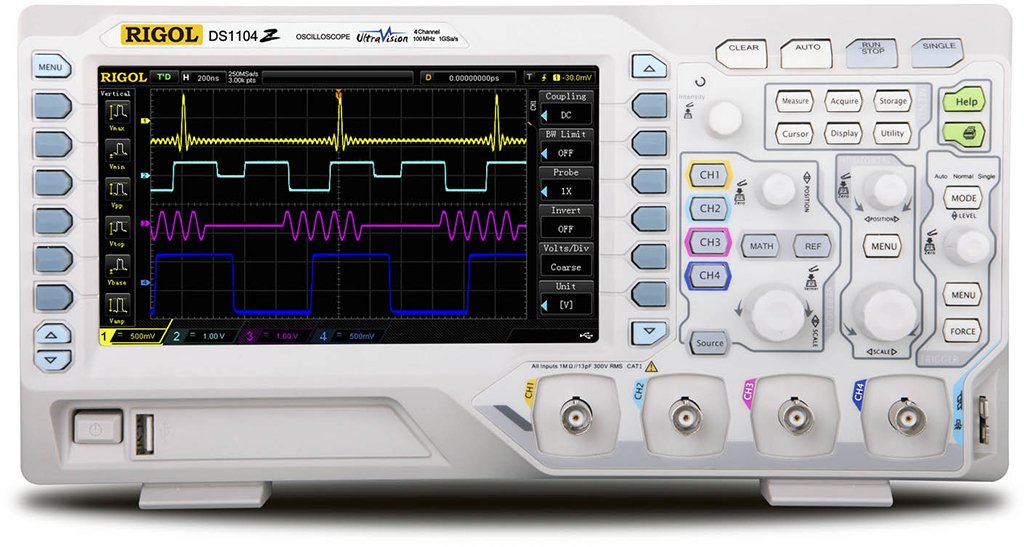
Figure 1: Rigol DS1104Z-S Plus Digital Oscilloscope. This image shows the front panel of the oscilloscope with its display, control knobs, and input channels.
2. Safety Information
Always observe the following safety precautions to prevent injury and damage to the instrument:
- Power Source: Connect the instrument only to a power source with the specified voltage and frequency.
- Grounding: Ensure the instrument is properly grounded to prevent electric shock.
- Ventilation: Do not block ventilation openings. Ensure adequate airflow around the instrument.
- Environment: Operate the oscilloscope in a dry, well-ventilated area, away from direct sunlight, high temperatures, and excessive dust.
- Probes: Use only probes designed for the specified voltage and frequency ratings.
- Servicing: Refer all servicing to qualified service personnel. Do not attempt to repair the instrument yourself.
- Cleaning: Disconnect power before cleaning. Use a soft, damp cloth. Do not use abrasive cleaners or solvents.
3. Package Contents
Verify that your package contains the following items:
- Rigol DS1104Z-S Plus Digital Oscilloscope
- Power Cord
- Passive Probes (4 units)
- USB Cable
- Quick Guide
- Resource CD (User Manual, Programming Manual, Software)
4. Product Overview
The Rigol DS1104Z-S Plus features a user-friendly interface and robust design for various measurement applications.
4.1 Front Panel
The front panel includes the display, control knobs, function buttons, and input connectors for channels 1-4.
- Display Screen: Shows waveforms, measurement results, and menu options.
- Vertical Controls: Adjust voltage per division and position for each channel.
- Horizontal Controls: Adjust time per division and horizontal position.
- Trigger Controls: Set trigger level, mode, and type.
- Function Buttons: Access various menus such as Acquire, Measure, Storage, Utility, etc.
- Channel Inputs (CH1-CH4): BNC connectors for probe connection.
4.2 Rear Panel
The rear panel provides power input, USB host/device ports, and LAN port for connectivity.
- AC Power Input: For connecting the power cord.
- USB Host Port: For connecting USB storage devices.
- USB Device Port: For connecting to a PC.
- LAN Port: For network connectivity and remote control.
5. Setup
5.1 Power Connection
- Ensure the power switch on the rear panel is in the OFF position.
- Connect the provided power cord to the AC power input on the rear panel of the oscilloscope.
- Plug the other end of the power cord into a grounded AC power outlet.
5.2 Probe Connection
- Connect the BNC connector of a passive probe to one of the input channels (CH1, CH2, CH3, or CH4) on the front panel.
- Connect the probe's ground clip to the circuit's ground reference.
- Set the attenuation ratio on the probe to match the setting on the oscilloscope (e.g., 1X or 10X).
5.3 Initial Power On
- Press the power switch on the rear panel to the ON position.
- The oscilloscope will perform a self-test and display the Rigol logo.
- After startup, the default waveform display will appear.
6. Operating Instructions
This section covers basic operations for acquiring and analyzing waveforms.
6.1 Basic Waveform Display
- Vertical Scale (VOLTS/DIV): Use the vertical scale knob for the active channel to adjust the voltage sensitivity.
- Vertical Position: Use the vertical position knob to move the waveform up or down on the screen.
- Horizontal Scale (SEC/DIV): Use the horizontal scale knob to adjust the time base.
- Horizontal Position: Use the horizontal position knob to shift the waveform left or right.
6.2 Triggering
Triggering stabilizes repetitive waveforms and captures single-shot events.
- Trigger Level: Adjust the trigger level knob to set the voltage point at which the trigger occurs.
- Trigger Menu: Press the Trigger Menu button to configure trigger type (Edge, Pulse, Video, etc.), source, and slope.
- Trigger Mode: Select between Auto, Normal, and Single modes.
6.3 Measurement Functions
The oscilloscope offers various automatic measurement functions.
- Press the Measure button to display the measurement menu.
- Select desired measurements such as Vpp, Vmax, Vmin, Freq, Period, Rise Time, etc.
- The results will be displayed on the screen.
6.4 Saving Data
Waveforms and settings can be saved to internal memory or a USB storage device.
- Press the Storage button.
- Select the storage type (Waveform, Setup, Image) and destination (Internal, USB).
- Follow the on-screen prompts to save the data.
7. Maintenance
7.1 Cleaning
To maintain the instrument's appearance and performance:
- Disconnect the power cord before cleaning.
- Use a soft cloth dampened with mild detergent and water to clean the exterior.
- Do not use abrasive cleaners, solvents, or harsh chemicals.
- Ensure no liquid enters the instrument.
7.2 Calibration
The oscilloscope is factory calibrated. For optimal performance, periodic calibration by qualified service personnel is recommended, typically every 1-2 years, depending on usage.
7.3 Storage
When not in use for extended periods, store the oscilloscope in a dry, dust-free environment within the specified operating temperature range.
8. Troubleshooting
This section lists common problems and their solutions. If the problem persists, contact Rigol customer support.
| Problem | Possible Cause | Solution |
|---|---|---|
| No display after power on | Power cord not connected; Power switch off; Faulty power outlet | Check power cord connection; Ensure power switch is ON; Test power outlet with another device |
| No waveform displayed | Probe not connected; Incorrect channel settings; Trigger level incorrect; Input signal too small/large | Connect probe to active channel; Adjust vertical scale and position; Adjust trigger level; Check input signal source |
| Unstable waveform | Incorrect trigger settings; Noisy signal | Adjust trigger level and mode; Check signal source for noise; Use averaging acquisition mode |
| Cannot save data to USB | USB drive not formatted correctly; USB drive full; USB drive faulty | Format USB drive to FAT32; Delete unnecessary files; Try a different USB drive |
9. Specifications
Key technical specifications for the Rigol DS1104Z-S Plus Digital Oscilloscope:
- Bandwidth: 100 MHz
- Channels: 4 Analog Channels
- Real-time Sample Rate: Up to 1 GSa/s
- Memory Depth: 12 Mpts (Standard), 24 Mpts (Optional)
- Waveform Capture Rate: Up to 30,000 wfms/s
- Display: 7-inch TFT LCD (800x480 resolution)
- Vertical Sensitivity: 1 mV/div to 10 V/div
- Time Base Range: 2 ns/div to 50 s/div
- Trigger Types: Edge, Pulse, Video, Slope, Alternate, Runt, Window, Delay, Setup/Hold, Nth Edge
- Interface: USB Host, USB Device, LAN, Pass/Fail, Trigger Out
- Power Source: Corded Electric
- Item Weight: 1 Kilograms
- Compliance: CE
10. Warranty and Support
Rigol Technologies provides a standard warranty for its products. For detailed warranty terms and conditions, please refer to the warranty card included with your product or visit the official Rigol website. For technical support, service, or inquiries, please contact your local Rigol distributor or Rigol customer service. Contact information can typically be found on the Rigol website or in the documentation provided with your oscilloscope.
Official Website: www.rigol.com


