
Introduction
This manual provides instructions for the proper installation, operation, and maintenance of your AudioOrigin Mirror Chrome plated headshell, cartridge, and needle. This product is designed to enhance the audio performance of compatible Realistic turntable models. Please read these instructions carefully before use to ensure optimal sound reproduction and product longevity.
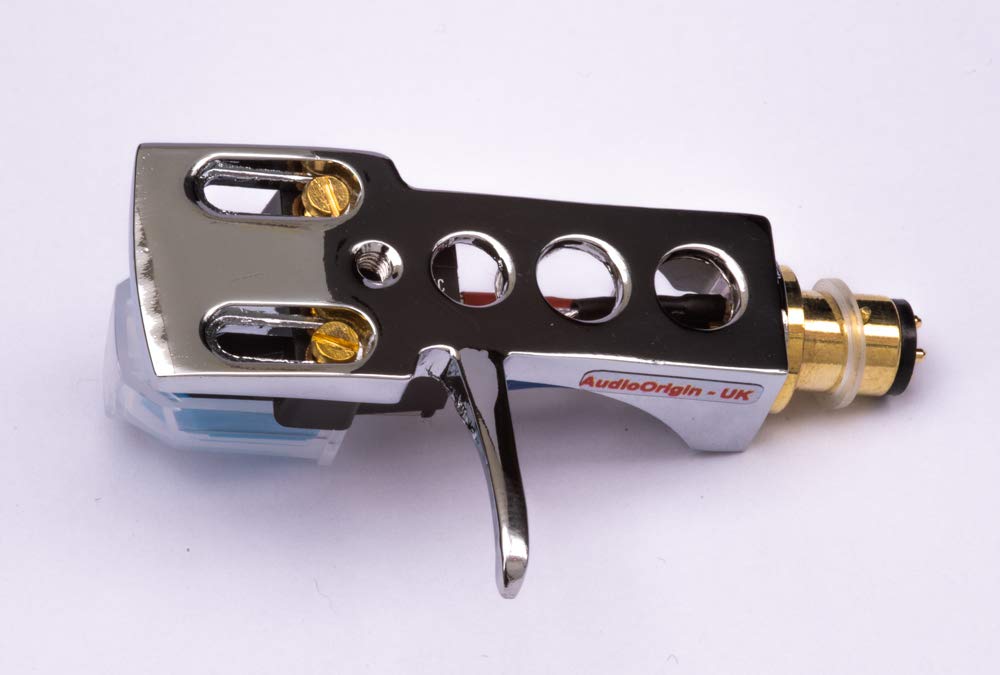
Image: The AudioOrigin Mirror Chrome plated headshell with an attached cartridge and needle, ready for installation.
Safety Information
- Handle the cartridge and stylus with care. The stylus tip is delicate and can be damaged by improper handling.
- Always turn off your turntable and audio system before installing or removing the headshell or cartridge.
- Keep small components, such as screws and wires, out of reach of children.
- Avoid touching the stylus tip with your fingers. Use a stylus brush for cleaning.
Package Contents
Verify that all items are present in your package:
- 1 x Mirror Chrome Plated Headshell
- 1 x Audio Technica Cartridge (pre-installed with needle)
- 4 x Furukawa 5N Pure Soft Annealed Silver Litz Cartridge Wires (pre-connected)
- Mounting hardware (screws, nuts, washers)
Setup
1. Attaching the Cartridge to the Headshell
Your AudioOrigin headshell comes with a high-quality Audio Technica cartridge and Furukawa 5N Pure Soft Annealed Silver Litz cartridge wires pre-installed. If you need to re-attach or replace the cartridge, follow these steps:
- Carefully connect the four color-coded wires from the headshell to the corresponding pins on the cartridge. Ensure a firm but gentle connection to avoid bending the pins.
- Red (R+): Right channel positive
- Green (R-): Right channel ground
- White (L+): Left channel positive
- Blue (L-): Left channel ground
- Align the cartridge with the headshell and secure it using the provided screws and nuts. Do not overtighten.

Image: Close-up view of the transparent Furukawa 5N Pure Soft Annealed Silver Litz cartridge wires with color-coded connectors (white, green, blue, red).

Image: The AudioOrigin Mirror Chrome plated headshell with the Audio Technica cartridge securely mounted, showing the wire connections.
2. Mounting the Headshell to the Tonearm
- Ensure your turntable is powered off.
- Gently insert the headshell connector into the tonearm socket.
- Twist the locking collar on the tonearm clockwise until the headshell is firmly secured. Do not force it.

Image: A close-up view of the headshell's gold-plated connector inserted into a tonearm socket, with the locking collar visible.
3. Adjusting Tonearm Weight (Tracking Force)
Proper tracking force is crucial for optimal sound quality and to prevent damage to your records and stylus. Refer to your turntable's instruction manual for specific guidance on adjusting the tonearm's counterweight and anti-skate settings. A common tracking force for this type of cartridge is approximately 1.5 grams, but always verify with your turntable's specifications.
- Balance the tonearm so it floats freely.
- Set the tracking force dial to zero.
- Rotate the counterweight to achieve the recommended tracking force.
- Adjust the anti-skate setting according to your turntable's manual, typically matching the tracking force value.
Operating
Once installed and adjusted, operate your turntable as usual. Gently lower the tonearm onto the record's lead-in groove. The Audio Technica cartridge is designed to provide a pure, rich, and warm sound with exceptional low and high-frequency delivery.
Maintenance
Stylus Care
- Regularly clean the stylus tip using a soft stylus brush, brushing gently from back to front.
- Avoid using harsh chemicals or solvents on the stylus or cartridge.
- Inspect the stylus periodically for wear or damage. A worn stylus can damage your records and degrade sound quality. Replace the stylus if it appears bent, chipped, or excessively worn.
Headshell Cleaning
- Wipe the chrome plated headshell with a soft, dry, lint-free cloth to remove dust and fingerprints.
- Do not use abrasive cleaners, which can scratch the chrome finish.
Troubleshooting
| Problem | Possible Cause | Solution |
|---|---|---|
| No sound or weak sound from one channel | Loose cartridge wire connection; incorrect channel wiring; damaged stylus. | Check all four cartridge wire connections for tightness and correct color coding. Inspect stylus for damage. |
| Distorted or muffled sound | Incorrect tracking force; dirty stylus; worn stylus; incorrect anti-skate setting. | Adjust tracking force and anti-skate. Clean stylus. Replace stylus if worn. |
| Skipping or jumping | Insufficient tracking force; damaged stylus; dirty record; turntable not level. | Increase tracking force slightly. Clean stylus and record. Ensure turntable is on a level surface. |
| Headshell loose on tonearm | Locking collar not tightened. | Tighten the tonearm's locking collar clockwise until secure. |
Specifications
- Product Type: Headshell with Cartridge and Needle
- Brand: AudioOrigin
- Headshell Material: Aluminum (Mirror Chrome Plated)
- Cartridge Type: Audio Technica (High Quality)
- Cartridge Wires: Furukawa 5N Pure Soft Annealed Silver Litz
- Sound Characteristics: Pure, rich, warm sound with exceptional low and high-frequency delivery
- Special Feature: Lightweight design
- Compatibility: Realistic LAB-400, RD-8100, LAB-300, LAB-420, LAB-390, LAB-270, LAB-260, LAB-250, LAB-8500 turntables
- Origin: Made to order in England
Warranty Information
For specific warranty details regarding your AudioOrigin product, please refer to the documentation provided at the time of purchase or visit the official AudioOrigin website. Warranty terms typically cover manufacturing defects under normal use.
Support
If you encounter any issues or have questions not covered in this manual, please contact AudioOrigin customer support through their official website or the retailer from whom you purchased the product. Provide your product model number and a detailed description of the issue for efficient assistance.