Introduction
This manual provides detailed instructions for the installation, operation, and maintenance of your Acoustic Audio PSW500-12 Home Theater Powered 12" LFE Subwoofer. Please read this manual thoroughly before using the product to ensure proper setup and optimal performance. Retain this manual for future reference.
Safety Instructions
Observe the following safety precautions to prevent electric shock, fire, or damage to the unit:
- Power Source: Connect the subwoofer only to a standard US 110V grounded wall outlet.
- Ventilation: Ensure adequate ventilation around the subwoofer. Do not block any ventilation openings.
- Water and Moisture: Do not expose the unit to rain, moisture, or excessive humidity. Do not place objects filled with liquids, such as vases, on the unit.
- Heat Sources: Keep the subwoofer away from heat sources such as radiators, heat registers, stoves, or other heat-producing appliances.
- Cleaning: Unplug the unit from the wall outlet before cleaning. Use a dry cloth for cleaning.
- Servicing: Do not attempt to service this product yourself. Refer all servicing to qualified service personnel.
- Placement: Place the subwoofer on a stable, level surface to prevent it from falling.
Package Contents
Verify that all items are present in the package:
- Acoustic Audio PSW500-12 Powered Subwoofer
- 9-foot Dual RCA/LFE Cable
- RCA "Y" Adapter
- Instruction Manual (this document)

Image: The subwoofer, a 9-foot dual RCA/LFE cable, an RCA "Y" adapter, and the user manual are included in the package.
Product Overview
Front View

Image: Front view of the subwoofer with its black acoustically transparent grille and the Acoustic Audio logo at the bottom.
Rear Panel Controls and Connections

Image: Rear panel of the subwoofer displaying the power switch, power input, LFE/Line inputs, High Level inputs/outputs, Phase control, Gain control, and Crossover frequency control.
The PSW500-12 subwoofer features a high-current, 500-watt amplifier driving a 12-inch front-firing woofer. Key controls and connections on the rear panel include:
- LFE/Line Inputs: RCA inputs for connecting to a home theater receiver's subwoofer output.
- High Level Inputs/Outputs: Speaker wire terminals for connecting to a stereo receiver or amplifier.
- Gain Control: Adjusts the subwoofer's output volume.
- Crossover Control: Adjusts the upper frequency limit (40-140 Hz) for seamless integration with main speakers.
- Phase Control: A 0-180 degree switch to match the subwoofer's phase with other speakers.
- Auto ON/OFF: Signal sensing feature to automatically turn the subwoofer on/off.
- Power Switch: Main power control for the unit.
Bottom View and Dimensions

Image: Bottom view of the subwoofer, highlighting the bass reflex port and vibration-absorbing feet.
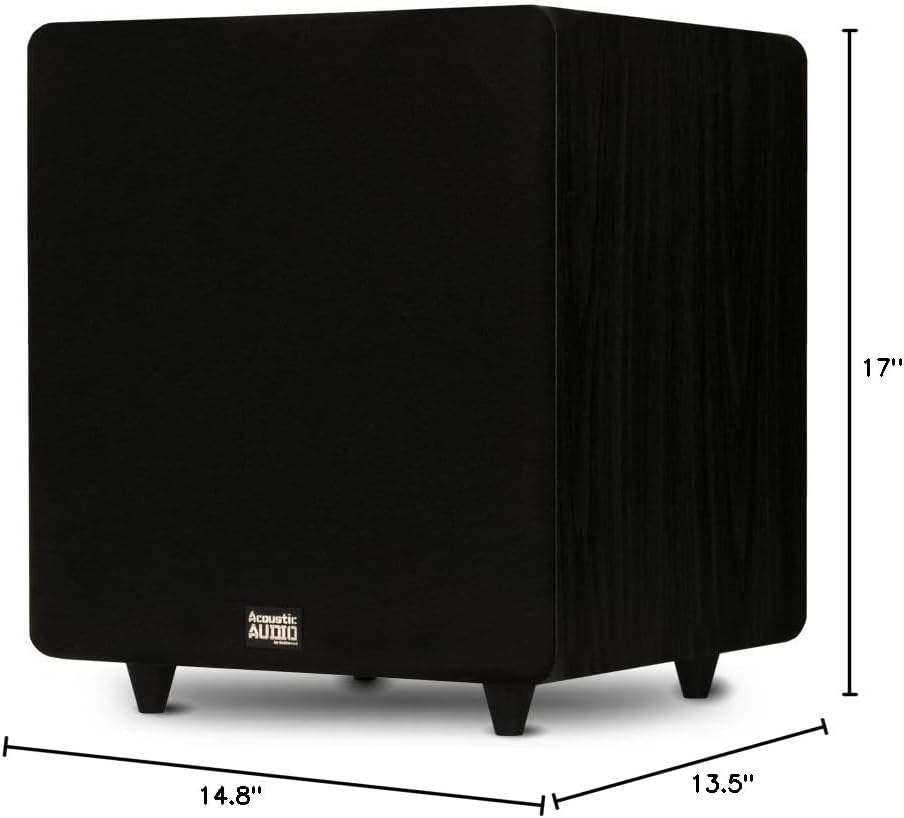
Image: Diagram showing the dimensions of the subwoofer: 17 inches (Height), 14.8 inches (Width), and 13.5 inches (Depth).
Setup
Placement
The placement of your subwoofer can significantly affect its performance. Experiment with different locations to find the best sound for your room. Generally, placing the subwoofer in a corner can enhance bass output, while placing it along a wall can provide a more balanced response. Ensure the subwoofer is placed on a stable surface and has adequate space for ventilation.
Connection Options
There are two primary ways to connect your PSW500-12 subwoofer to your audio system:
- LFE/RCA Input (Recommended for Home Theater Receivers):
If your home theater receiver has a dedicated "Subwoofer Out" or "LFE Out" RCA jack, use the supplied RCA cable to connect this output on your receiver to the "LFE IN" or "LINE IN" (L or R) jack on the subwoofer's rear panel. If using a single RCA cable, you can use the supplied "Y" adapter to split the signal for both L and R inputs on the subwoofer for potentially stronger signal, though connecting to just one (L or R) is often sufficient for LFE.
- High Level Input (For Stereo Receivers/Amplifiers without Subwoofer Out):
If your receiver or amplifier does not have a dedicated subwoofer output, you can connect the subwoofer using the "High Level Input" terminals. Connect the speaker outputs from your receiver/amplifier to the "Hi Level Input" terminals on the subwoofer. Then, connect the "Hi Level Output" terminals on the subwoofer to your main speakers. Ensure correct polarity (+ to + and - to -) for all connections.
Power Connection
Once audio connections are made, plug the subwoofer's power cord into a standard US 110V grounded wall outlet. Ensure the power switch on the rear panel is in the "OFF" position before plugging it in.
Operating Instructions
Initial Power On
After all connections are secure, flip the power switch on the rear panel to the "ON" position. The subwoofer features an Auto ON/OFF function, which will activate the subwoofer when an audio signal is detected and put it into standby mode after a period of inactivity.
Adjusting Controls
- Gain Control: Start with the Gain control set to its minimum position. Play some audio and slowly increase the Gain until the subwoofer's output blends smoothly with your main speakers. Avoid setting the gain too high, as this can lead to distorted bass.
- Crossover Control (40-140 Hz): This control determines the highest frequency the subwoofer will reproduce.
- If your receiver has a built-in bass management system (e.g., LFE output), set the subwoofer's crossover control to its maximum (140 Hz) or bypass position, and manage the crossover frequency through your receiver's settings.
- If your receiver does not have bass management, adjust the crossover control to match the low-frequency capabilities of your main speakers. For smaller bookshelf speakers, a higher crossover frequency (e.g., 80-100 Hz) might be appropriate. For larger floor-standing speakers, a lower frequency (e.g., 40-60 Hz) may be suitable. The goal is a seamless transition between the subwoofer and main speakers.
- Phase Control (0-180 degrees): This switch helps to ensure that the subwoofer's sound waves are in sync with your main speakers.
- Play music with a strong, consistent bass line.
- Toggle the phase switch between 0 and 180 degrees.
- Choose the setting that produces the loudest and most impactful bass at your listening position.
Maintenance
Proper maintenance ensures the longevity and performance of your subwoofer.
- Cleaning: Disconnect the power cord before cleaning. Use a soft, dry cloth to wipe the cabinet. Do not use liquid cleaners or aerosol sprays, as they may damage the finish or internal components.
- Grille: The acoustically transparent grille is removable. If it becomes dusty, gently brush it or use a low-power vacuum cleaner with a soft brush attachment.
- Ventilation: Periodically check that the ventilation openings are not obstructed by dust or debris.
Troubleshooting
If you experience issues with your subwoofer, refer to the following common problems and solutions:
| Problem | Possible Cause | Solution |
|---|---|---|
| No sound from subwoofer |
|
|
| Distorted or boomy bass |
|
|
| Weak or thin bass |
|
|
| Subwoofer turns off unexpectedly |
|
|
Specifications
| Feature | Detail |
|---|---|
| Model Number | PSW500-12 |
| Brand | Acoustic Audio by Goldwood |
| Speaker Type | Powered Subwoofer |
| Woofer Diameter | 12 Inches |
| Peak Power Output | 500 Watts |
| Frequency Response | 24 Hz - 250 Hz |
| Impedance | 8 Ohms |
| Connectivity Technology | RCA, Wired (High Level) |
| Crossover Control | Adjustable 40 - 140 Hz |
| Phase Control | 0 - 180 Degrees |
| Special Features | Signal Sensing Auto ON/OFF, Bass Boost |
| Enclosure Material | MDF Wood |
| Color | Black |
| Power Source | Corded Electric (110V US Standard) |
| Dimensions (H x W x D) | 17" x 14.75" x 13.5" |
| Item Weight | 29 Pounds |
Warranty Information
This Acoustic Audio PSW500-12 Subwoofer comes with a Limited Warranty. For specific details regarding the warranty period, coverage, and terms, please refer to the warranty card included with your product or contact Acoustic Audio by Goldwood customer support.
Support
If you require further assistance or have questions not covered in this manual, please contact Acoustic Audio by Goldwood customer support. You can typically find contact information on the manufacturer's website or on the product packaging.
For more information about Acoustic Audio by Goldwood products, visit their official store: Acoustic Audio by Goldwood Store