Introduction
Thank you for choosing the Everstone Full Motion TV Wall Mount. This manual provides essential information for the safe and correct installation, operation, and maintenance of your TV wall mount. Please read these instructions thoroughly before installation and keep them for future reference. This mount is designed to securely hold most 32-65 inch flat-screen TVs weighing up to 121 lbs (55 kg).
Safety Information
- Weight Capacity: Do not exceed the maximum weight capacity of 121 lbs (55 kg). Exceeding this limit may result in serious injury or property damage.
- TV Size: This mount is suitable for most 32-65 inch TVs. Verify your TV's weight and VESA pattern before installation.
- Wall Type: This mount is designed for installation on solid concrete walls or wood studs (8, 12, or 16 inches apart). Do not mount on drywall alone.
- Professional Installation: If you are unsure about the installation process or the suitability of your wall, consult a qualified professional.
- Tools: Ensure you have all necessary tools and follow safety precautions when using power tools.
- Children: Keep children away from the installation area during setup.
Package Contents
Verify that all components are present and undamaged before proceeding with installation. If any parts are missing or defective, contact customer service.
- TV Wall Mount Assembly
- Standard Mounting Hardware Kit (various screws, washers, spacers)
- User Manual
- 6ft High-Speed HDMI Cable
- 3-Axis Magnetic Bubble Level
- Cable Ties (3 pieces)
Specifications
| Feature | Specification |
|---|---|
| Model Number | ARL506D-ES |
| TV Size Compatibility | 32 - 65 inches |
| Weight Capacity | Up to 121 lbs (55 kg) |
| VESA Compatibility (mm) | 75x75, 100x100, 150x150, 200x100, 200x200, 200x300, 300x200, 300x300, 300x400, 400x200, 400x300, 400x400 |
| Tilt Angle | +3° to -15° |
| Swivel Angle | ±90° (180° total) |
| Extension from Wall | 2.6 inches (retracted) to 14 inches (extended) |
| Wall Compatibility | Solid Concrete Wall, Wood Studs (8", 12", 16" spacing) |
| Material | Alloy Steel |
Setup and Installation
1. Pre-Installation Checks
- Verify TV Compatibility: Check your TV's weight and VESA mounting pattern (the distance between the four mounting holes on the back of your TV). Ensure it falls within the specifications listed above.
- Identify Wall Type: Determine if your wall is solid concrete or has wood studs. Use a stud finder to locate the center of the studs if mounting to wood.
- Gather Tools: You will need a drill, screwdriver, pencil, and measuring tape. The included bubble level will assist with alignment.
2. Mounting the Wall Plate
Use the provided mounting template to mark the drill holes on your wall. Ensure the template is level using the included bubble level. Drill pilot holes according to the instructions for your specific wall type (wood stud or concrete). Secure the wall plate to the wall using the appropriate lag bolts and washers.

This image illustrates the initial steps of installation, where a user marks and drills holes into the wall using a template to ensure proper alignment for the wall mount.
3. Attaching TV Brackets to TV
Attach the vertical TV brackets to the back of your television using the screws, washers, and spacers that fit your TV's VESA pattern. Ensure the brackets are securely fastened and centered.

This image displays the range of VESA patterns supported by the mount, from 50x50mm to 400x400mm, and guides on how to measure the horizontal and vertical distances between mounting holes on a TV.
4. Hanging the TV and Securing
Carefully lift the TV with the attached brackets and hook them onto the wall plate. Ensure the TV is securely seated. Use the security locks on the bottom of the TV brackets to prevent accidental dislodging.
This image provides a close-up of key design elements, including the level adjustment mechanism, the robust heavy-duty steel construction, the tilt adjustment knob, and the security lock feature.
5. Height Adjustment for TV Centering
The TV brackets feature two position hooks allowing for a 4-inch height adjustment to center your TV perfectly after installation.

This image demonstrates the height adjustment feature, allowing the TV to be raised or lowered by 4 inches using different hook positions on the mounting brackets for optimal centering.
Operating Instructions
This full motion mount allows for flexible TV positioning to achieve optimal viewing angles.
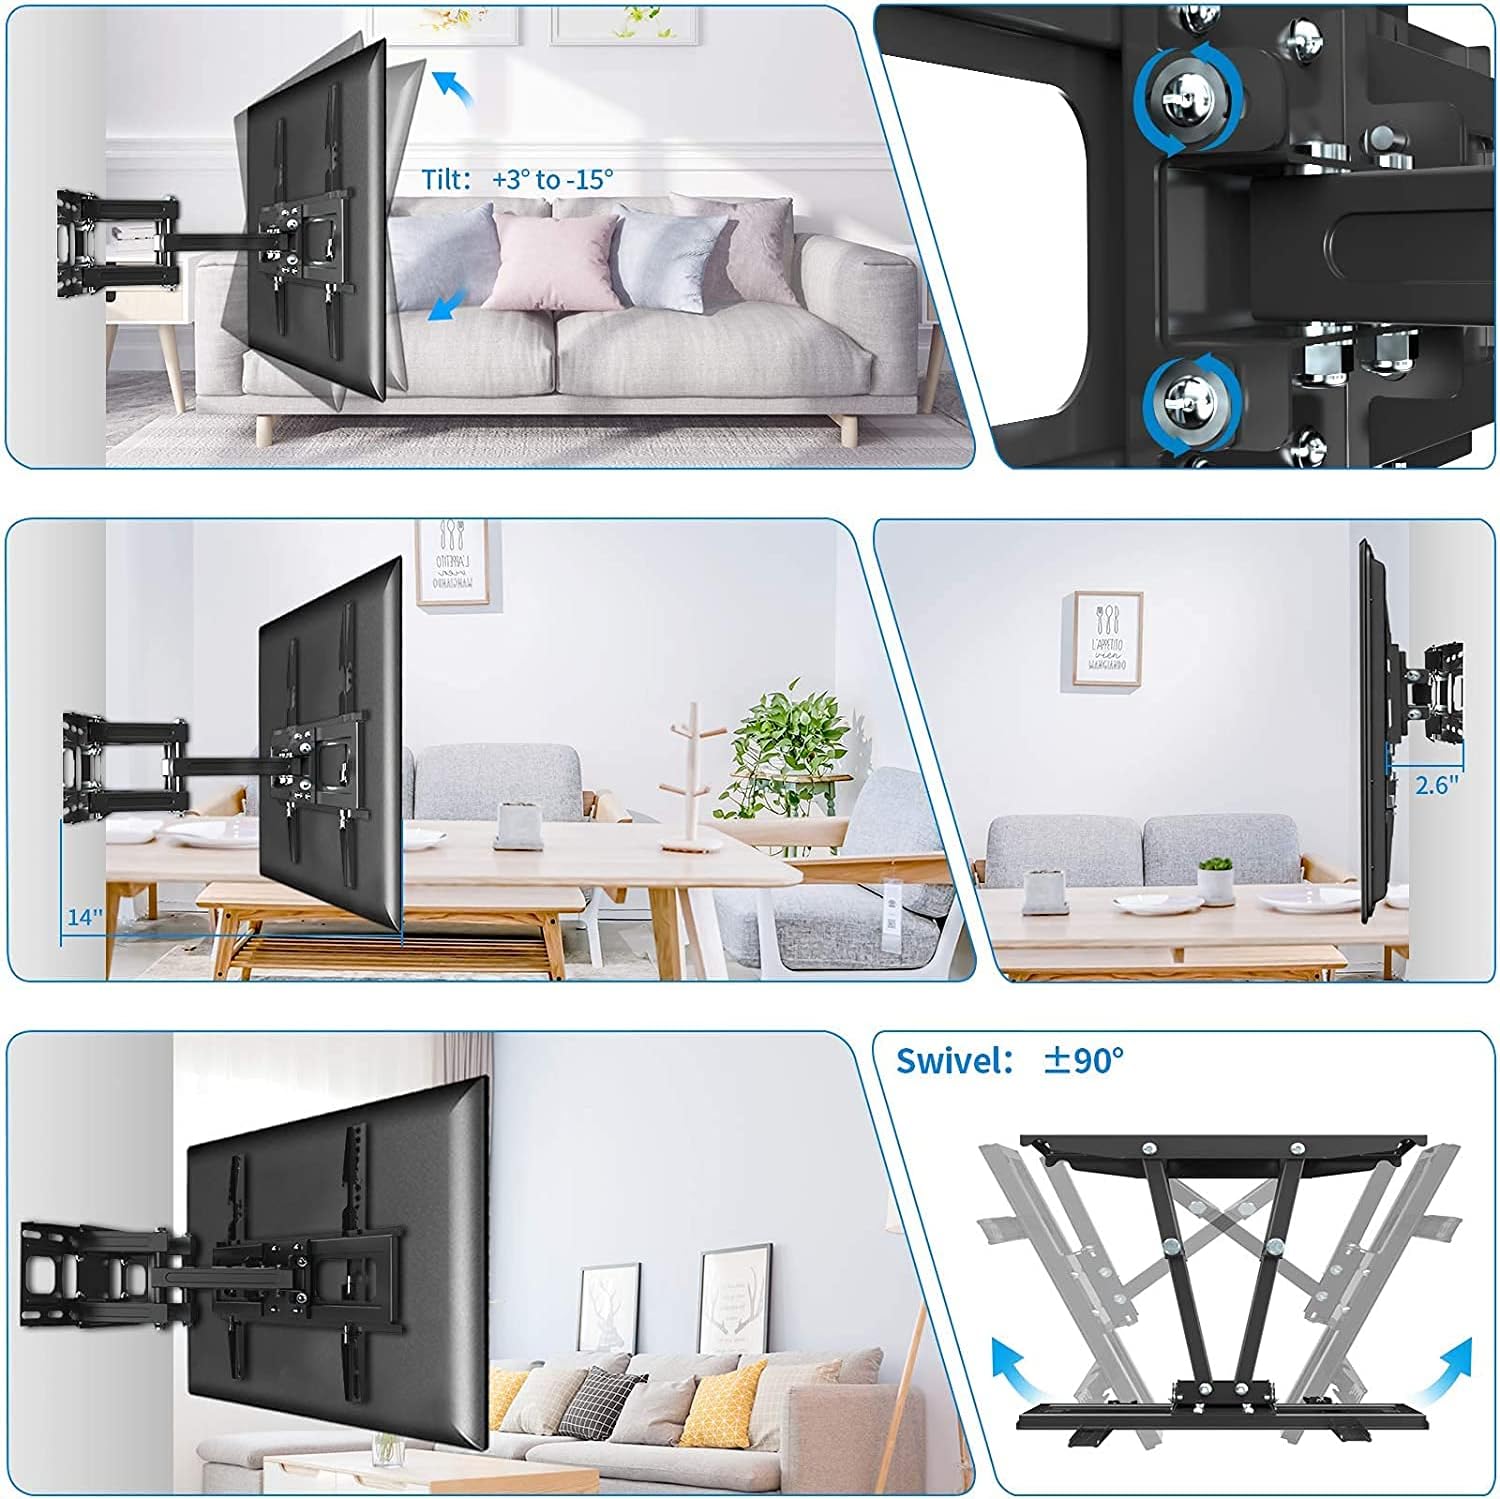
- Tilt Adjustment: The mount allows for a tilt range of +3° (upward) to -15° (downward). Loosen the tilt knobs on the side of the TV brackets, adjust to your desired angle, and then tighten the knobs to secure.
- Swivel Adjustment: The articulating arm allows the TV to swivel up to ±90° (180° total) left or right. Gently push or pull the TV to the desired swivel angle.
- Extension and Retraction: The mount can extend up to 14 inches from the wall and retract back to a minimum distance of 2.6 inches. Gently push or pull the TV to adjust the distance from the wall.
- Level Adjustment: A post-installation level adjustment of ±3° is available to ensure the TV is perfectly horizontal.

This image collage illustrates the mount's full motion capabilities, including tilting the TV up and down, extending it up to 14 inches from the wall, retracting it to 2.6 inches, and swiveling it left and right by up to 90 degrees.
Maintenance
- Regular Inspection: Periodically check all screws and connections to ensure they remain tight and secure.
- Cleaning: Clean the mount with a soft, dry cloth. Avoid using abrasive cleaners or solvents that could damage the finish.
- Lubrication: The articulating joints are designed for smooth movement and generally do not require lubrication. If movement becomes stiff, contact customer support.
Troubleshooting
- TV is not level: Use the post-installation level adjustment feature (±3°) to fine-tune the TV's horizontal position. Ensure the wall plate was installed level initially.
- Mount feels loose: Re-check all mounting screws on both the wall plate and the TV brackets. Ensure they are tightened securely. Verify that the wall type and stud spacing are appropriate for the mount.
- Difficulty adjusting movement: Ensure no cables are snagged or obstructing movement. Check that all adjustment knobs (e.g., tilt) are sufficiently loosened before attempting to reposition.
- TV does not fit: Double-check your TV's VESA pattern and weight against the specifications in this manual. If they do not match, the mount is not compatible with your TV.
Warranty and Support
Everstone provides a 10-year warranty for this TV wall mount. If you have any questions, suggestions, or require assistance with your product, please contact Everstone customer service. We are committed to resolving any issues within 24 hours.
For support, please refer to the contact information provided with your purchase or visit the official Everstone website.