1. Introduction
This manual provides detailed instructions for the installation, operation, and maintenance of your Zalman Z9 Neo Plus PC Case. Please read this guide thoroughly before beginning assembly to ensure proper setup and to maximize the performance and longevity of your system components.
The Zalman Z9 Neo Plus is a midi tower PC case designed to accommodate a wide range of computer components, offering efficient cooling and convenient cable management solutions.
2. Package Contents
Verify that all components are present before proceeding with installation. The package should contain:
- Zalman Z9 Neo Plus PC Case (1 unit)
- Accessory Box (containing screws, standoffs, cable ties, and user guide)
3. Key Features
The Zalman Z9 Neo Plus PC Case includes several features designed for ease of use and optimal system performance:
- Efficient Cooling: Pre-installed fans (typically 5) for effective airflow.
- Dust Filters: Removable dust filters located at the front and bottom for easy cleaning and system protection.
- Cable Management: Dedicated routing channels and tie-down points behind the motherboard tray to keep cables organized and improve airflow.
- PSU Shroud: A dedicated compartment for the power supply unit to conceal cables and enhance aesthetics.
- Drive Bays: Support for multiple 3.5-inch HDDs and 2.5-inch SSDs, including an optical drive bay.
- Side Panel: Acrylic side panel to showcase internal components.
- Front I/O Ports: Conveniently located USB 2.0 and audio ports on the top panel.
4. Setup and Installation
4.1 Pre-Installation Checklist
- Ensure you have all necessary components (motherboard, CPU, RAM, GPU, PSU, storage drives).
- Gather appropriate tools (screwdriver set, cable ties).
- Work on a clean, static-free surface.
4.2 Opening the Case
Remove the side panels by unscrewing the thumb screws located at the rear of the case. Carefully slide the panels backward and lift them off. The front panel may also have a hinged door for access to optical drive bays.
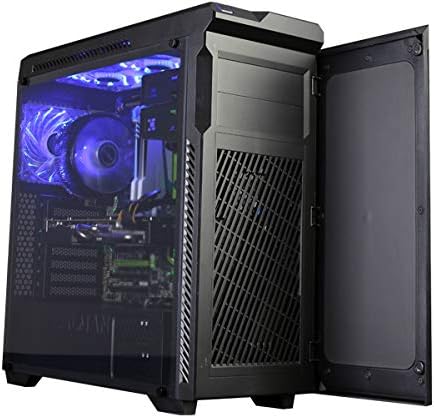
Image: The Zalman Z9 Neo Plus PC case shown with its front door open, revealing the intake vents and optical drive bays. This view demonstrates access to the front panel components.
4.3 Motherboard Installation
- Install the I/O shield into the rear opening of the case.
- Ensure motherboard standoffs are correctly aligned with your motherboard's screw holes. Install additional standoffs if necessary.
- Carefully place the motherboard onto the standoffs, aligning it with the I/O shield.
- Secure the motherboard with the provided screws. Do not overtighten.

Image: An internal view of the Zalman Z9 Neo Plus PC case, showcasing a fully assembled system with a motherboard, CPU cooler, graphics card, and organized cabling. Blue LED fans are visible, indicating active cooling.
4.4 Power Supply Unit (PSU) Installation
- Position the PSU in its designated compartment at the bottom rear of the case, typically with the fan facing downwards (if there's a filtered vent) or upwards.
- Secure the PSU to the case with screws from the rear.
4.5 Storage Drive Installation
- 3.5-inch HDDs: Slide the drive into the tool-less drive trays (if applicable) or secure with screws in the drive cage.
- 2.5-inch SSDs: Mount SSDs to dedicated 2.5-inch brackets or adapters, then secure them in the case.
- Optical Drives: Remove the front panel bay cover, slide the optical drive into the 5.25-inch bay, and secure it with screws or tool-less clips.
4.6 Expansion Card Installation (e.g., Graphics Card)
- Remove the necessary expansion slot covers from the rear of the case.
- Insert the expansion card firmly into the corresponding PCIe slot on the motherboard.
- Secure the card with a screw or retention clip.
4.7 Front Panel Connections
Connect the front panel cables (USB, audio, power switch, reset switch, HDD LED, Power LED) to the appropriate headers on your motherboard. Refer to your motherboard manual for exact header locations.

Image: A top-down perspective of the Zalman Z9 Neo Plus PC case, highlighting the top-mounted I/O panel with USB ports and audio jacks, along with the ventilation grilles for top-mounted fans or radiators.
4.8 Cable Management
Utilize the cable routing holes and tie-down points behind the motherboard tray to organize and secure cables. This improves airflow and gives your build a cleaner appearance.

Image: The Zalman Z9 Neo Plus PC case displayed from an angled front view, showcasing its sleek black exterior and the illuminated interior components with blue LED lighting, visible through the side panel.
5. Operation
Once all components are installed and secured, close the side panels. Connect your peripherals (monitor, keyboard, mouse) and power cable. Press the power button on the front panel to start your system. The pre-installed fans will begin operating to provide cooling.
6. Maintenance
6.1 Cleaning Dust Filters
Regularly check and clean the removable dust filters located at the front and bottom of the case. Gently slide them out, clean with water and mild soap, or use compressed air, and ensure they are completely dry before reinserting.
6.2 General Cleaning
Use a soft, damp cloth to wipe down the exterior surfaces of the case. For the acrylic side panel, use a microfiber cloth and a non-abrasive cleaner specifically designed for plastics to avoid scratches.
7. Troubleshooting
7.1 System Does Not Power On
- Check if the power cable is securely connected to both the PSU and the wall outlet.
- Ensure the PSU's power switch is in the 'ON' position.
- Verify that the front panel power switch cable is correctly connected to the motherboard header.
7.2 Fans Not Spinning
- Confirm that all fan cables are properly connected to the motherboard fan headers or a fan controller.
- Check BIOS/UEFI settings for fan speed control.
7.3 Front Panel USB/Audio Ports Not Working
- Ensure the USB and audio cables from the front panel are correctly connected to their respective headers on the motherboard.
- Check motherboard drivers for proper functionality.
8. Specifications
| Feature | Detail |
|---|---|
| Model Name | Z9 NEO PLUS |
| Case Type | Midi Tower |
| Color | Black |
| Material | Polycarbonate (PC) |
| Product Dimensions (LxWxH) | 3.94 x 3.94 x 3.94 inches (Approximate, as per provided data) |
| Item Weight | 2.2 pounds (Approximate, as per provided data) |
| USB 2.0 Ports | 2 |
| Compatible Devices | CPU (General PC components) |
9. Warranty and Support
For warranty information and technical support, please refer to the official Zalman website or contact your local retailer. Keep your proof of purchase for warranty claims.
Zalman is committed to providing quality products and support. If you encounter any issues not covered in this manual, please reach out to their customer service.


