Important Safety Instructions
Please read all instructions carefully before using this heater. Failure to follow these instructions may result in fire, electric shock, injury, or property damage. Keep this manual for future reference.
- Electrical Safety: Ensure the voltage indicated on the heater's rating label matches your mains supply voltage. Do not operate the heater with a damaged cord or plug. Do not run the power cord under carpeting or cover it with throw rugs, runners, or similar coverings. Arrange the cord away from traffic areas where it will not be tripped over.
- Placement: Always place the heater on a firm, level surface. Maintain a minimum distance of 3 feet (0.9 meters) from walls, furniture, curtains, and other combustible materials. Do not use in bathrooms, laundry areas, or similar indoor locations where water may be present.
- Operation: Do not use the heater to dry clothes. Do not insert or allow foreign objects to enter any ventilation or exhaust opening as this may cause an electric shock or fire, or damage the heater.
- Supervision: Close supervision is necessary when any appliance is used by or near children or individuals with reduced physical, sensory, or mental capabilities.
- Overheat Protection: This heater is equipped with an automatic overheat protection system. If the heater overheats, it will automatically shut off. Unplug the heater, allow it to cool for 30 minutes, then plug it back in. If it still does not operate, contact customer support.
- Tip-Over Protection: The heater includes a safety switch that automatically turns off the unit if it is accidentally tipped over.

Image: The heater features advanced safety mechanisms, including tip-over protection, which automatically shuts off the unit if it is knocked over, preventing potential hazards.
Setup
Follow these steps to prepare your oil-filled radiator heater for first use.
- Unpacking: Carefully remove the heater from its packaging. Retain the packaging for off-season storage.
- Inspection: Inspect the heater for any signs of damage. Do not operate if the heater, power cord, or plug is damaged.
- Placement: Place the heater on a stable, level surface. Ensure there is adequate clearance (at least 3 feet or 0.9 meters) from walls, furniture, and other objects to allow for proper air circulation and prevent fire hazards.
- Power Connection: Plug the power cord into a grounded 240V AC electrical outlet. Do not use extension cords or power strips.

Image: The heater's compact dimensions (51cm width, 24.5cm depth, 62cm height) allow for discreet placement in various room settings, such as beside furniture.

Image: The heater is equipped with castor wheels for easy movement and integrated cable storage for neat organization when not in use.
Operating Instructions
Your Pro Breeze oil-filled radiator heater features adjustable heat settings, a thermostat, and a 24-hour timer for customized comfort.
Controls Overview

Image: The control panel features an adjustable thermostat dial, a power setting selector (0, I, II, III), and a 24-hour mechanical timer.
Power Settings
Use the power setting dial to select the desired heat output:
- 0 (Off): Turns the heater off.
- I (Low): Provides a low heat output for gentle warmth or maintaining temperature.
- II (Medium): Provides a medium heat output for moderate warming.
- III (High): Provides the maximum heat output for rapid heating of a room.
Adjustable Thermostat
The adjustable thermostat allows you to set your desired room temperature. Turn the thermostat dial clockwise to increase the temperature setting and counter-clockwise to decrease it. The heater will cycle on and off to maintain the set temperature.
24-Hour Timer
The integrated 24-hour timer allows you to program the heater to turn on and off automatically at specific times.
- Setting the Current Time: Rotate the outer ring of the timer clockwise until the arrow points to the current time of day. The numbers on the timer represent hours (e.g., 12 for noon, 24 for midnight).
- Programming On/Off Periods: The timer has small segments around its circumference. Each segment represents 15 minutes. Push the segments inwards for the periods you want the heater to be ON. Leave segments outwards for the periods you want the heater to be OFF.
- Activating the Timer: Ensure the power setting dial is set to a desired heat level (I, II, or III) and the thermostat is set to a temperature above the current room temperature. The heater will now operate according to the programmed timer settings.
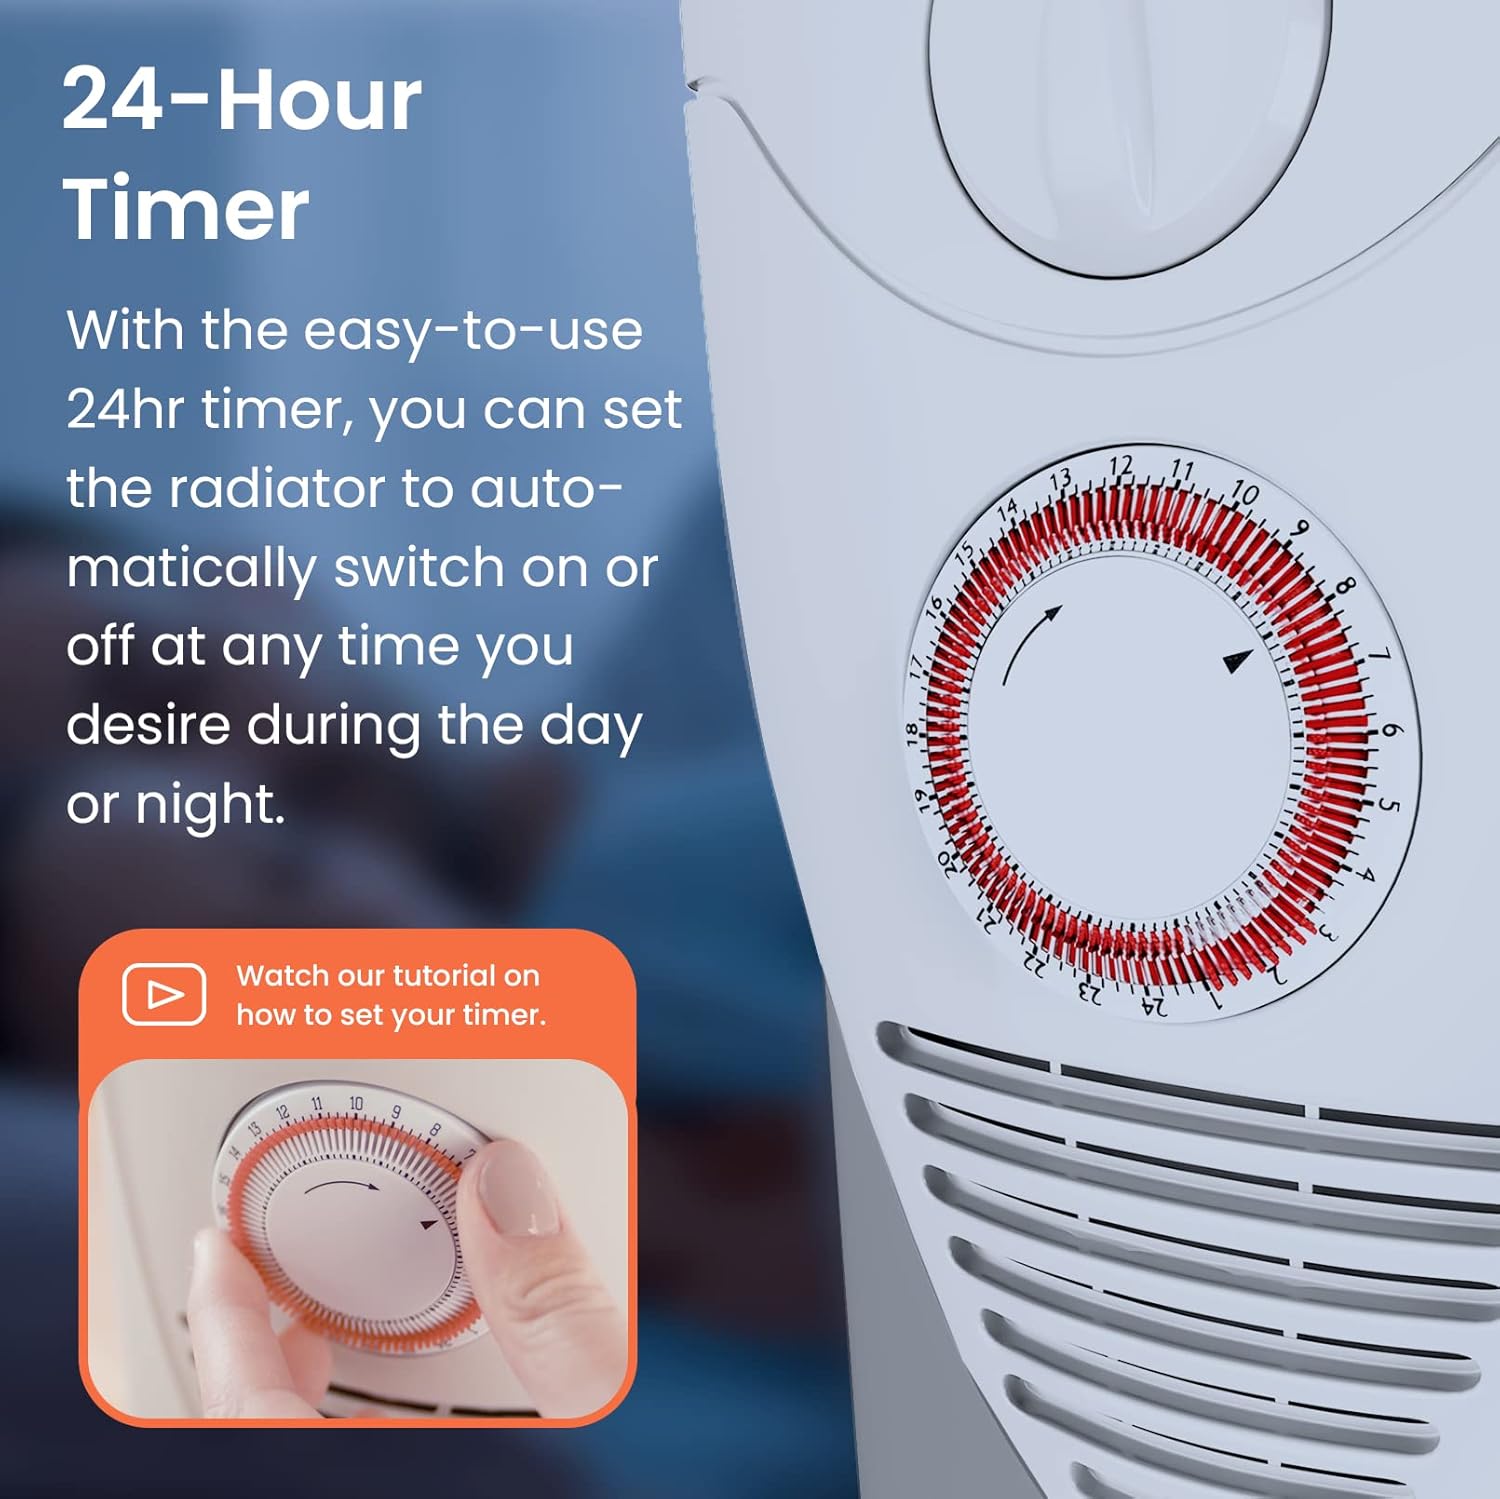
Image: The 24-hour timer allows users to program specific operating times by pushing in the corresponding 15-minute segments.
Maintenance
Regular maintenance ensures optimal performance and longevity of your heater.
Cleaning
- Always unplug the heater and allow it to cool completely before cleaning.
- Wipe the exterior surfaces with a soft, damp cloth. Do not use abrasive cleaners or solvents.
- Do not immerse the heater in water or allow water to drip into the interior.
- Clean the air vents regularly with a vacuum cleaner attachment to remove dust and lint.
Storage
- If storing the heater for an extended period, ensure it is clean and dry.
- Wrap the power cord neatly around the integrated cable storage.
- Store the heater in its original packaging in a cool, dry place.
Troubleshooting
If you experience issues with your heater, refer to the following common problems and solutions.
| Problem | Possible Cause | Solution |
|---|---|---|
| Heater does not turn on. | No power supply. Thermostat set too low. Overheat protection activated. Tip-over switch activated. | Check if the heater is plugged in and the outlet is working. Increase the thermostat setting. Unplug, let cool for 30 minutes, then plug back in. Ensure the heater is on a flat, stable surface. |
| Heater is on but not heating. | Thermostat set too low. Power setting too low. | Increase the thermostat setting. Select a higher power setting (II or III). |
| Heater makes unusual noises. | Normal expansion/contraction of metal. Loose internal component. | Minor clicking or creaking sounds are normal during heating and cooling. If noises are loud or persistent, discontinue use and contact customer support. |
| Heater smells burnt. | Dust accumulation. Overheating. | Unplug and clean the heater thoroughly. If the smell persists or is accompanied by smoke, unplug immediately and contact customer support. |
If the problem persists after attempting these solutions, please contact Pro Breeze customer support.
Specifications
Detailed technical specifications for the Pro Breeze 2500W Oil Filled Radiator Heater.
| Feature | Specification |
|---|---|
| Brand | Pro Breeze |
| Model Number | PB-H |
| Power | 2500W |
| Voltage | 240 Volts |
| Amperage | 10.42 Amps |
| Number of Fins | 11 |
| Heating Method | Radiant, Oil-Filled |
| Form Factor | Cabinet |
| Mounting Type | Freestanding |
| Color | White |
| Product Dimensions (L x W x H) | 18.11 x 11.02 x 23.82 inches (46 x 28 x 60.5 cm) |
| Item Weight | 25.7 pounds (11.66 kg) |
| Max Temperature Setting | 90 Degrees Celsius |
| Safety Features | Overheat Protection, Tip-Over Switch |
| Special Features | Adjustable Thermostat, 3 Heat Settings, 24-Hour Timer, Castor Wheels, Cable Storage |
Warranty and Support
Pro Breeze products are manufactured to the highest quality standards. This product comes with a standard manufacturer's warranty against defects in materials and workmanship.
Warranty Information
- Please refer to the warranty card included with your purchase for specific terms and conditions, including the warranty period.
- The warranty typically covers manufacturing defects and does not cover damage caused by misuse, neglect, accident, alteration, or unauthorized repair.
- Keep your proof of purchase (receipt) for warranty claims.
Customer Support
If you have any questions about your Pro Breeze 2500W Oil Filled Radiator Heater, require technical assistance, or need to make a warranty claim, please contact our customer support team:
- Website: Visit the official Pro Breeze website for support resources and contact information.
- Email: Refer to your warranty documentation or the Pro Breeze website for the customer support email address.
- Phone: Contact numbers may be available on the Pro Breeze website or in your product packaging.
When contacting support, please have your product model number (PB-H) and proof of purchase ready.


