1. Introduction
This manual provides essential information for the safe and efficient use of your TecTake Workbench with Tool Panel, Model 402749. Designed for both DIY enthusiasts and professionals, this workbench offers a stable and organized workspace for various tasks. Please read these instructions carefully before assembly and use, and retain them for future reference.
2. Safety Instructions
- Stable Surface: Always place the workbench on a flat, stable, and level surface to prevent tipping.
- Weight Capacity: Do not exceed the maximum load capacity of 100 kg for the work surface. Overloading can cause structural damage or injury.
- Assembly: Ensure all components are correctly assembled and all fasteners are securely tightened before use. Regularly check tightness.
- Personal Protective Equipment: Wear appropriate safety gear, such as safety glasses and gloves, when working with tools on the bench.
- Children and Pets: Keep children and pets away from the workbench during assembly and operation.
- Sharp Edges: Be aware of potential sharp edges on metal components during assembly and handling.
- Ventilation: If using chemicals or paints, ensure adequate ventilation in your workspace.
3. Package Contents
Verify that all parts are present before beginning assembly. If any parts are missing or damaged, contact your retailer immediately.
- 1 x Workbench Frame and Panels
- 10 x Hooks for Tool Panel
- 1 x Assembly Instructions
- All necessary fasteners (screws, bolts, nuts)
Note: Tools, decorative items, and other accessories shown in product images are not included.
4. Setup and Assembly
Assembly of the TecTake Workbench requires attention to detail and patience. It is recommended to have a second person assist with certain steps.
- Unpack Components: Carefully unpack all parts and lay them out on a clean, soft surface to prevent scratches. Identify each component using the parts list in the included assembly instructions.
- Initial Frame Assembly: Begin by assembling the main metal frame. Do not fully tighten all screws and bolts at this stage. Leave them slightly loose to allow for adjustments.
- Install Shelves and Panels: Attach the lower shelf, work surface, and tool panel (pegboard) to the frame. Ensure they are correctly oriented as per the diagrams.
- Drawer Assembly: Assemble the drawer and install its slides. Pay close attention to the alignment to ensure smooth operation. The rubber feet should be fitted to the base of the workbench legs; this may require some force.
- Final Tightening: Once all components are in place and the workbench is stable, progressively tighten all screws and bolts. Ensure the workbench is square and level.
- Attach Hooks: Insert the provided hooks into the perforated tool panel as desired for tool organization.
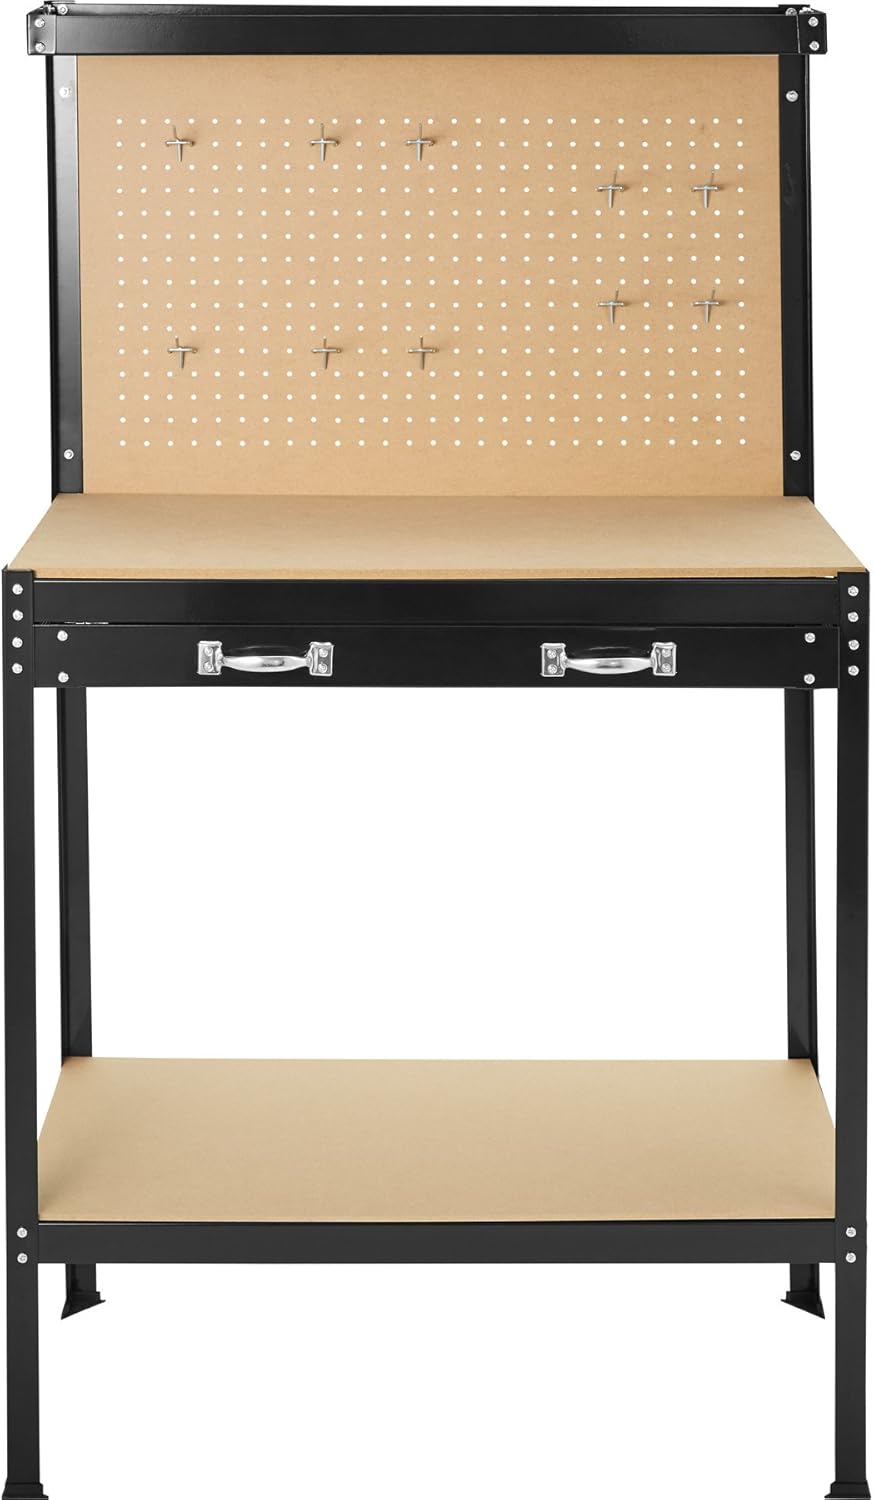
Image: Workbench structure during assembly, without tools.

Image: Detail of the workbench drawer, open for storage.
5. Operating Instructions
The TecTake Workbench is designed for versatile use in various workshop environments.
- Work Surface: Utilize the spacious work surface for assembly, repair, or crafting projects. The durable wood fiber panel provides a solid base.
- Tool Panel (Pegboard): Organize frequently used tools on the perforated back panel using the provided hooks. This keeps tools visible and easily accessible.
- Storage Drawer: The large drawer is ideal for storing smaller tools, fasteners, or accessories, keeping your work surface clear.
- Upper Shelf: The top shelf offers additional space for storing materials, manuals, or other light items.
- Lower Shelf: The bottom shelf provides ample space for larger tools, toolboxes, or project components.

Image: Fully assembled workbench with tools in use.
6. Maintenance
Regular maintenance ensures the longevity and safe operation of your workbench.
- Cleaning: Wipe down metal surfaces with a damp cloth to remove dust and debris. For the wood fiber panels, use a dry or slightly damp cloth. Avoid harsh chemicals that could damage the finish.
- Fastener Check: Periodically inspect all screws, bolts, and nuts for tightness. Re-tighten any loose fasteners to maintain stability.
- Drawer Slides: If the drawer becomes stiff or difficult to open/close, apply a small amount of silicone lubricant to the drawer slides.
- Damage Inspection: Regularly check for any signs of damage, such as bent metal, cracked panels, or worn rubber feet. Replace damaged parts if necessary.
7. Troubleshooting
- Workbench is Unstable/Wobbly:
- Ensure all assembly fasteners are fully tightened.
- Verify the workbench is placed on a flat and level surface. Adjust leg levelers if available, or place shims under the feet if needed.
- Drawer Does Not Open/Close Smoothly:
- Check the alignment of the drawer slides. They may need to be adjusted.
- Ensure there are no obstructions inside the drawer or along the slides.
- Apply a silicone-based lubricant to the drawer slides.
- Missing or Damaged Parts:
- Refer to the package contents list. If parts are missing or damaged upon delivery, contact your retailer or the manufacturer's customer service immediately for assistance.
8. Specifications
| Feature | Detail |
|---|---|
| Model Number | 402749 |
| Brand | tectake |
| Total Dimensions (L x W x H) | Approx. 81 x 41 x 145 cm |
| Work Surface Dimensions (L x W) | Approx. 80 x 40 cm |
| Working Height | Approx. 91 cm |
| Drawer Dimensions (L x W x H) | Approx. 71.5 x 28 x 6 cm |
| Upper Shelf Dimensions (L x W) | Approx. 80 x 18 cm |
| Back Panel Dimensions (L x H) | Approx. 80 x 50 cm |
| Material | Metal (Steel Alloy) and Wood Fiber Panels (MDF) |
| Color | Black |
| Product Weight | Approx. 13.5 kg |
| Load Capacity | 100 kg |
| Assembly Required | Yes |
9. Warranty Information
Specific warranty terms and conditions for the TecTake Workbench, Model 402749, are typically provided by the retailer at the time of purchase or by the manufacturer. Please refer to your purchase documentation or contact your point of sale for detailed warranty information.
10. Support
For technical assistance, spare parts, or any questions not covered in this manual, please contact the retailer from whom you purchased the TecTake Workbench. You may also visit the official tectake website for further support options.