1. Introduction
Thank you for choosing the Nutbro AC Triac RF Push Dimmer and Switch, Model S1-B+R1. This device is designed to provide versatile lighting control for dimmable LED, traditional incandescent, and halogen lamps. It combines RF wireless technology with a push-dimming function, offering convenience and flexibility in managing your lighting environment. Please read this manual thoroughly before installation and operation to ensure safe and correct usage.
2. Safety Information
- Electrical Hazard: Installation should only be performed by a qualified electrician. Ensure power is disconnected at the circuit breaker before installation or maintenance.
- Voltage Compatibility: This device operates on 100-240V AC. Do not connect to voltages outside this range.
- Load Compatibility: Only connect dimmable LED lamps, traditional incandescent, or halogen lamps within the specified power range (100-240W).
- Indoor Use Only: This product is designed for indoor use in dry locations. Do not expose to moisture or extreme temperatures.
- Overload Protection: Do not exceed the maximum output current of 1.0A or power of 240W. Overloading can cause damage to the device and connected lights.
3. Product Features
- AC Triac RF + Push Phase Dimmer, also functions as an RF switch.
- Wide input and output voltage range: 100-240V AC.
- Maximum output current: 1.0A; Maximum output power: 240W.
- Compact design, suitable for installation in standard panel bottom boxes.
- 2.4 GHz wireless technology with a remote control distance of up to 30 meters.
- Supports pairing with up to 10 remote controls.
- Configurable for lead edge or trailing edge dimming via DIP switch.
- Adjustable minimum brightness level via DIP switch.
- Compatible with dimmable single-color LED lamps, traditional incandescent, and halogen lamps.
- Can work with a WiFi relay controller (requires app installation on iOS/Android).
4. Specifications
| Model Number | S1-B+R1 |
| Input Voltage | 100-240V AC |
| Output Voltage | 100-240V AC |
| Output Current | 1.0A |
| Output Power | 100-240W |
| Remote Distance | Up to 30m |
| Operating Temperature | -30°C ~ 55°C |
| Product Dimensions (L x W x H) | 52 x 52 x 26 mm |
| Weight | 56g |
| Material | Metal |
| Included Components | Dimmer kit (includes 1 CR2 battery for remote) |
| Certifications | CCC |
| Country of Origin | China |
5. Setup and Installation
Important: Ensure the main power supply is turned off at the circuit breaker before beginning any installation work.
- Wiring the Dimmer Module:
Connect the input (L and N) terminals of the dimmer module to your 100-240V AC power supply. Connect the output (L and N) terminals to your dimmable light fixture. If using a push switch, connect it to the "Push Switch" terminals.
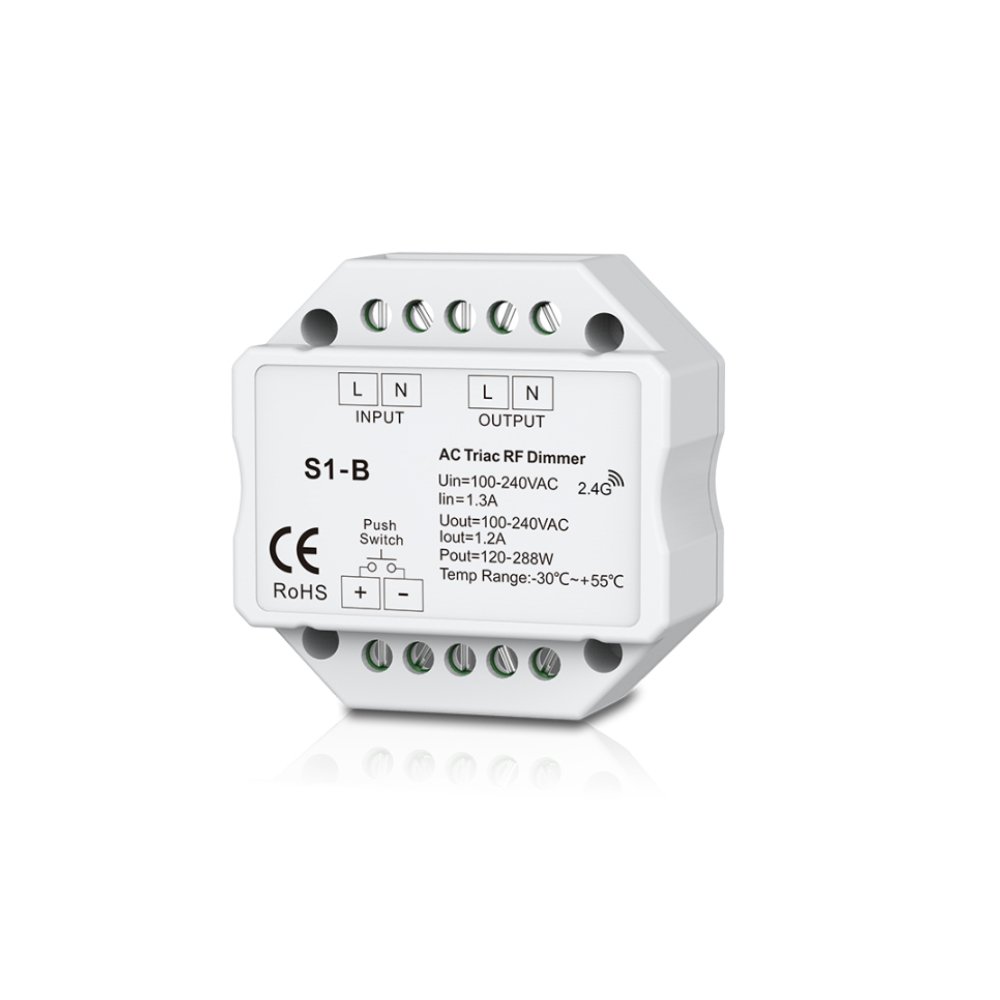
Image 1: Wiring diagram for the S1-B+R1 dimmer module. Connect Live (L) and Neutral (N) from the power source to the INPUT terminals. Connect Live (L) and Neutral (N) to the light fixture from the OUTPUT terminals. The Push Switch terminals are for an optional external push-button switch.
- DIP Switch Configuration:
The dimmer module features DIP switches for configuring dimming mode (lead edge/trailing edge) and minimum brightness. Consult the diagram on the module or refer to the detailed instructions below for proper settings based on your lamp type.

Image 2: The S1-B+R1 dimmer module showing input/output terminals and DIP switches for configuration.
- Mounting:
The compact design allows the module to be installed in a standard panel bottom box or other suitable enclosure, ensuring proper ventilation.
- Power On:
Once all connections are secure and verified, restore power at the circuit breaker.
6. Operating Instructions
6.1. Using the RF Remote Control
The included RF remote control allows for wireless operation of the dimmer. Ensure the CR2 battery is correctly installed.

Image 3: The RF remote control for the S1-B+R1 dimmer. It features power, dimming, and scene selection buttons.
- Power On/Off: Press the ⏻ button to turn the lights on or off.
- Dimming Up/Down: Use the ▲ (up arrow) and ▼ (down arrow) buttons to adjust brightness.
- Preset Brightness: The remote may include buttons for preset brightness levels (e.g., 25%, 50%, 75%, 100%).
- Scene Selection: Buttons labeled S1 and S2 can be used to save and recall custom brightness scenes.
6.2. Pairing the Remote Control
- Pairing: Briefly press the "Match" button on the dimmer module (usually a small button next to the DIP switches). The connected light will flash once. Within 5 seconds, press the ON/OFF button on the desired RF remote control. The light will flash 3 times, indicating successful pairing.
- Unpairing: To unpair a remote, press and hold the "Match" button on the dimmer module for 5 seconds. The connected light will flash 9 times, indicating all paired remotes have been cleared.
6.3. Using the Push Switch (Optional)
- Short Press: A short press (less than 0.5 seconds) will turn the lights on or off.
- Long Press: A long press (more than 0.5 seconds) will dim the lights up or down. Release and press again to reverse the dimming direction.
6.4. DIP Switch Settings for Dimming Mode and Minimum Brightness
The dimmer module has DIP switches to select between lead edge (forward phase) and trailing edge (reverse phase) dimming, and to set the minimum brightness level. Refer to your lamp's specifications to determine the correct dimming mode.
- Dimming Mode: Typically, incandescent and halogen lamps use lead edge dimming, while most LED lamps use trailing edge dimming. Incorrect mode can cause flickering or damage.
- Minimum Brightness: Adjust this setting to prevent flickering or unstable operation at very low dimming levels, especially with LED lamps. Start with a higher minimum brightness and gradually decrease until stable operation is achieved.
7. Maintenance
- Cleaning: Disconnect power before cleaning. Wipe the device with a soft, dry cloth. Do not use harsh chemicals or abrasive cleaners.
- Battery Replacement: Replace the CR2 battery in the remote control when its performance degrades. Ensure correct polarity.
- Inspection: Periodically inspect wiring connections for any signs of wear or damage.
8. Troubleshooting
| Problem | Possible Cause | Solution |
|---|---|---|
| Lights do not turn on. | No power, incorrect wiring, faulty lamp, remote not paired. | Check circuit breaker. Verify wiring connections. Test lamp with another fixture. Pair remote control. |
| Lights flicker or hum. | Incompatible lamp, incorrect dimming mode (lead/trailing edge), minimum brightness too low, overloaded circuit. | Ensure lamps are dimmable. Adjust DIP switch for correct dimming mode. Increase minimum brightness setting. Reduce total load. |
| Remote control not working. | Battery depleted, remote not paired, out of range. | Replace CR2 battery. Re-pair the remote control. Ensure remote is within 30m range. |
| Dimmer gets hot. | Overloaded circuit, insufficient ventilation. | Reduce total load. Ensure proper airflow around the module. If overheating persists, discontinue use and contact support. |
9. Warranty and Support
This product comes with a standard manufacturer's warranty. For specific warranty terms and conditions, please refer to the documentation provided with your purchase or contact your retailer. For technical support or inquiries, please contact the manufacturer or your point of purchase.
Manufacturer: FlyBoy4U