Introduction
This manual provides comprehensive instructions for the setup, operation, maintenance, and troubleshooting of your HP EliteDisplay E243 23.8-inch LED-Lit Monitor. Please read this manual thoroughly before using your monitor to ensure proper functionality and to maximize your viewing experience. Keep this manual for future reference.
What's in the Box
Verify that all components are present before proceeding with the setup.
- HP EliteDisplay E243 23.8-inch LED-Lit Monitor
- Monitor Stand (Base and Riser)
- Power Cable
- Video Cables (HDMI, DisplayPort, VGA - specific cables may vary by region or package)
- USB Cable (Type-A to Type-B for upstream connection)
- Documentation (Quick Setup Guide, Warranty Information)
Setup
1. Assembling the Monitor Stand
- Place the monitor panel face down on a soft, clean surface to prevent scratches.
- Attach the stand riser to the monitor panel until it clicks into place.
- Attach the stand base to the riser and secure it with the captive screw.
2. Connecting Cables
Connect the necessary cables to the monitor and your computer.
- Power Cable: Connect one end to the monitor's power input and the other to a grounded electrical outlet.
- Video Cable: Connect one end of an HDMI, DisplayPort, or VGA cable to the corresponding port on the monitor and the other end to your computer's video output port.
- USB Upstream Cable: For the integrated USB hub functionality, connect the USB Type-A to Type-B cable from the monitor's upstream USB port to an available USB port on your computer.
3. Initial Power On
- Press the power button on the monitor.
- Power on your computer.
- The monitor should automatically detect the input signal. If not, use the OSD menu to select the correct input source.

Figure 1: Front view of the HP EliteDisplay E243 monitor, showcasing its slim bezels and adjustable stand.
Operating the Monitor
On-Screen Display (OSD) Menu
The OSD menu allows you to adjust various monitor settings. Access it using the buttons located on the lower right edge of the monitor.
- Menu Button: Opens the OSD menu.
- Navigation Buttons: Used to move through menu options.
- Select/OK Button: Confirms a selection.
- Exit Button: Closes the OSD menu or goes back to the previous level.
Adjusting Display Settings
Common adjustments include:
- Brightness/Contrast: Adjust the overall luminance and difference between light and dark areas.
- Color Control: Modify color temperature, RGB levels, or select preset color modes.
- Input Control: Manually select the video input source (VGA, HDMI, DisplayPort).
- Image Control: Adjust sharpness, clock, phase, and aspect ratio.
Ergonomic Adjustments
The HP EliteDisplay E243 offers 4-way adjustability for optimal viewing comfort:
- Height Adjustment: Raise or lower the monitor to eye level (up to 150mm).
- Tilt: Adjust the screen's vertical angle (forward/backward).
- Swivel: Rotate the monitor horizontally on its base.
- Pivot: Rotate the screen from landscape to portrait orientation.
Using the USB Hub
The monitor features integrated USB 3.0 ports. Once the USB upstream cable is connected to your computer, you can connect USB devices such as keyboards, mice, or flash drives directly to the monitor's downstream USB ports.
Maintenance
Cleaning the Monitor
- Always unplug the monitor from the power outlet before cleaning.
- Use a soft, lint-free cloth lightly dampened with water or a non-abrasive screen cleaner.
- Do not spray cleaner directly onto the screen.
- Avoid using benzene, thinner, ammonia-based cleaners, or abrasive cleaning agents.
Care and Handling
- Avoid placing heavy objects on the monitor or its cables.
- Do not expose the monitor to direct sunlight, excessive heat, or extreme cold.
- Keep the monitor away from liquids and excessive moisture.
- Ensure adequate ventilation around the monitor.
Troubleshooting
| Problem | Possible Solution |
|---|---|
| No image on screen |
|
| Image is blurry or distorted |
|
| Colors are incorrect |
|
| USB ports not working |
|
Specifications
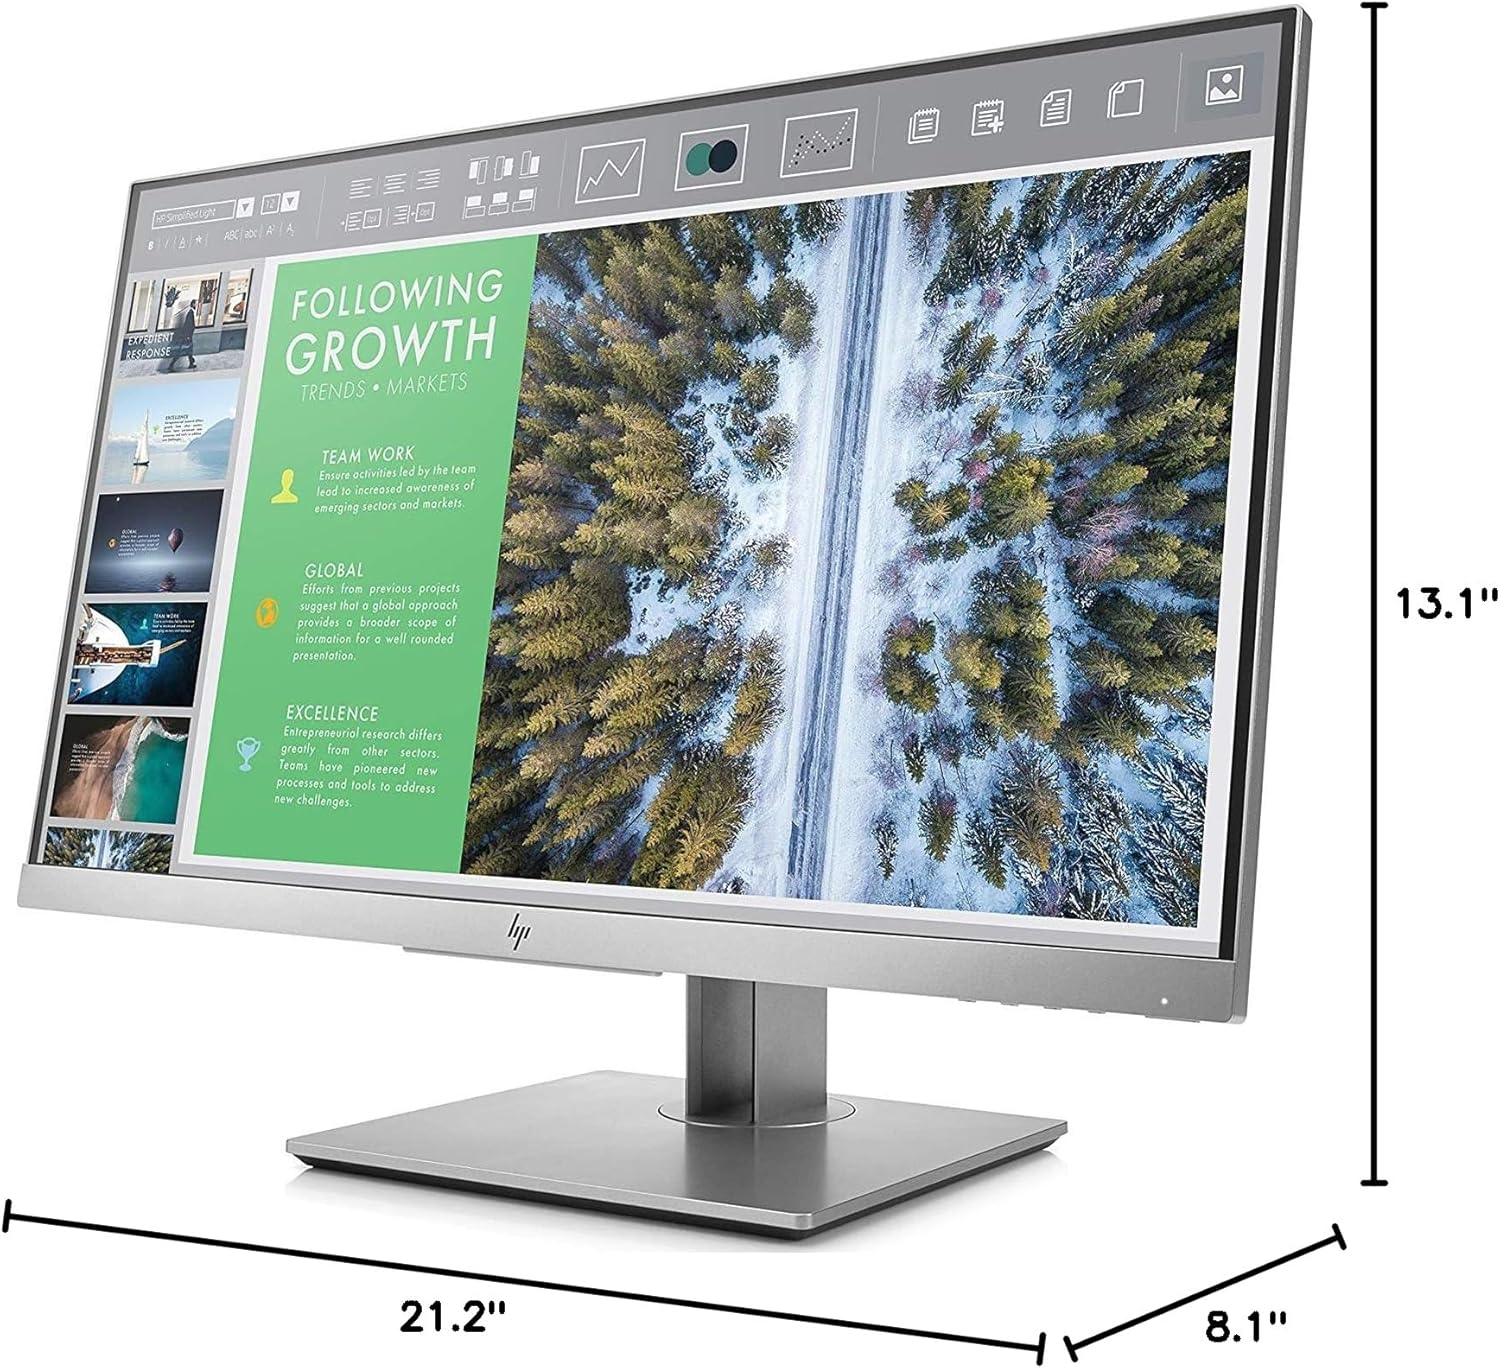
Figure 2: HP EliteDisplay E243 monitor with key dimensions indicated.
| Feature | Detail |
|---|---|
| Model Number | 1FH47AA#ABA |
| Display Size | 23.8 inches (diagonal) |
| Panel Type | IPS (In-Plane Switching) |
| Native Resolution | 1920 x 1080 at 60 Hz |
| Aspect Ratio | 16:9 |
| Screen Surface | Glossy |
| Connectivity | 1x VGA, 1x HDMI, 1x DisplayPort |
| USB Hub | 1x USB 3.0 Upstream, 2x USB 3.0 Downstream |
| Ergonomics | Tilt, Height Adjust (up to 150mm), Swivel, Pivot |
| VESA Mount Compatible | Yes |
| Dimensions (WxDxH) | 21.2 x 8.1 x 13.1 inches (with stand) |
| Weight | 12.32 pounds (with stand) |
| Color | Silver |
| Manufacturer | Hewlett Packard Office |
| First Available Date | September 18, 2017 |
Warranty and Support
For detailed warranty information, please refer to the warranty document included with your product or visit the official HP support website. HP provides various support resources, including drivers, software updates, and troubleshooting guides.
HP Support Website: www.hp.com/support